What a Toilet Seat Replacement Kit Actually Includes
Ever stared at that wobbly toilet seat and thought, "I just need some new bolts or something"? You're not wrong — but the fix involves more than a single bolt. A toilet seat replacement kit is a packaged set of mounting hardware designed to secure a toilet seat and lid firmly to the bowl. It contains every small but essential piece needed for a stable, rattle-free installation, saving you from hunting down individual toilet seat parts at the hardware store.
The problem? Most product listings and how-to guides gloss right over what's actually inside the box. You'll see phrases like "includes mounting hardware" and nothing else. That lack of detail leads to mismatched purchases, frustrating return trips, and seats that still wobble after installation. Understanding each of the toilet seat components before you buy — or before you grab a screwdriver — makes the entire process faster and more reliable.
What Comes Inside a Standard Replacement Kit
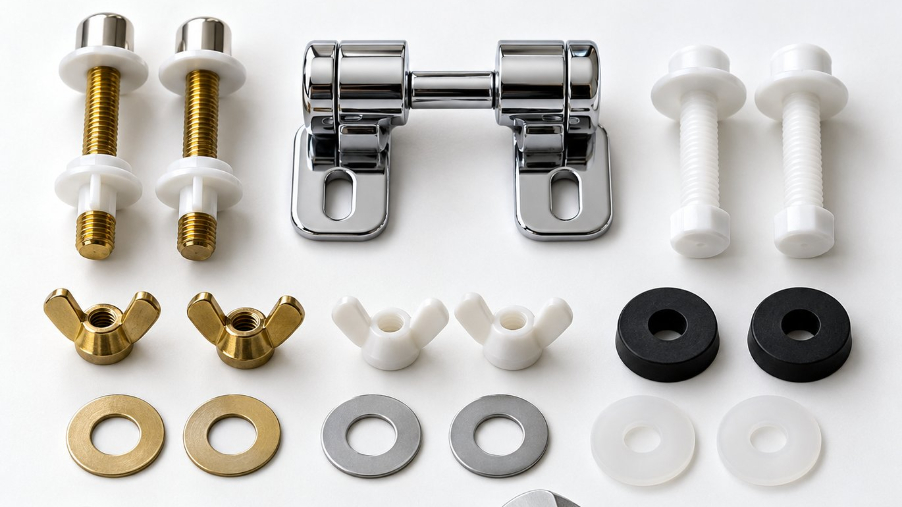
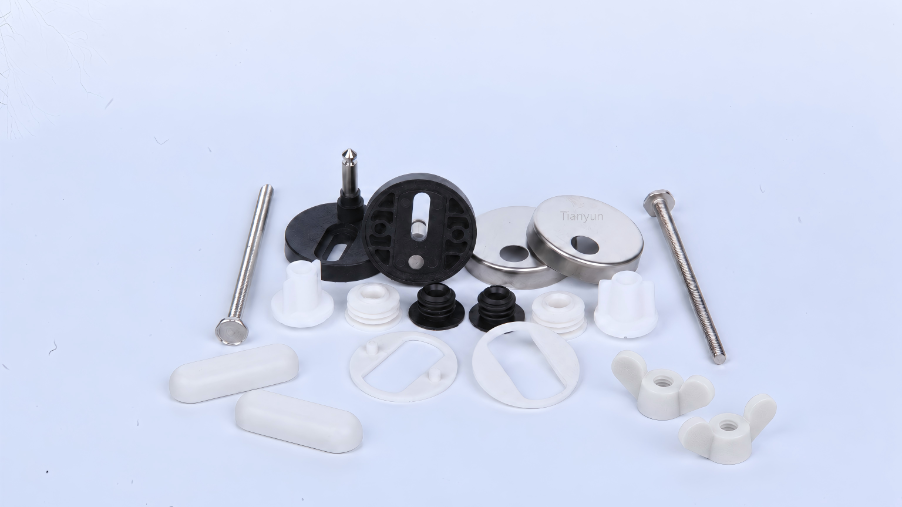
While the exact contents of a toilet seat kit can vary depending on the mounting style, most kits share a common set of core toilet seat pieces. Here's what you'll typically find when you open the package:
- Mounting bolts (seat post bolts) — the long fasteners that pass through the seat hinge and into the bolt holes on the toilet bowl
- Wing nuts or hex nuts — threaded fasteners that secure the bolts from underneath (wing nuts allow hand-tightening without tools)
- Rubber or plastic washers — thin gaskets placed between the bolt and the porcelain to create a cushioned, slip-resistant seal
- Hinge assemblies or hinge pins — the pivot mechanism connecting the seat and lid to the mounting bolts
- Bumper pads — small rubber or silicone feet attached to the underside of the seat and lid to cushion contact with the bowl
- Decorative bolt caps — snap-on plastic covers that hide bolt heads for a cleaner look
Some kits also include plastic anchors or stabilizer bushings for bowls with oversized mounting holes. Kits built for top-fix systems will contain an expanding anchor instead of a traditional bolt-and-nut setup, so the mounting style of your toilet determines which toilet lid parts you'll receive.
Why Every Component Matters
It's tempting to think of these pieces as interchangeable extras, but each one plays a specific role in keeping your seat locked in place. Rubber washers, for instance, do double duty — they prevent the metal bolt from grinding directly against porcelain (which can cause chips or cracks) and they add friction that resists loosening over time. Wing nuts let you hand-tighten the seat without reaching for a wrench, which is especially helpful in tight bathroom spaces. Bumper pads absorb the impact every time the seat or lid drops, reducing noise and protecting the bowl's glaze from repeated contact.
Even decorative bolt caps serve a functional purpose beyond aesthetics. They shield the bolt heads from moisture, slowing the corrosion that eventually weakens the entire assembly.
A single missing or worn component — one cracked washer, one absent bumper — can cause the entire seat to shift, wobble, or even crack under repeated use.
That's why grabbing a complete toilet seat replacement kit, rather than a handful of loose bolts, gives you the best chance at a solid, long-lasting fix. Every piece works together as a system, and skipping even one throws the balance off.
Of course, knowing what's inside the kit is only part of the picture. Each of these parts connects to a specific location on the seat, lid, and bowl — and understanding that physical relationship is what separates a five-minute fix from a frustrating afternoon.
Anatomy of a Toilet Seat and Its Hardware
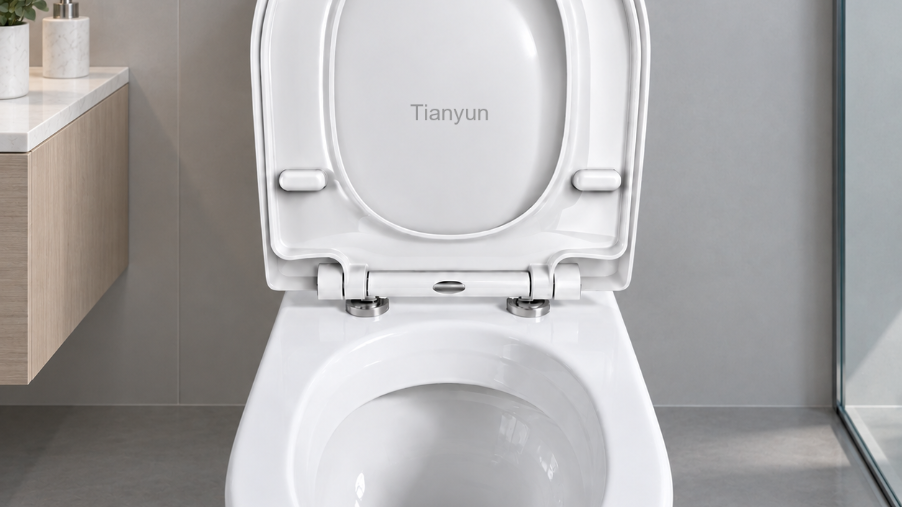
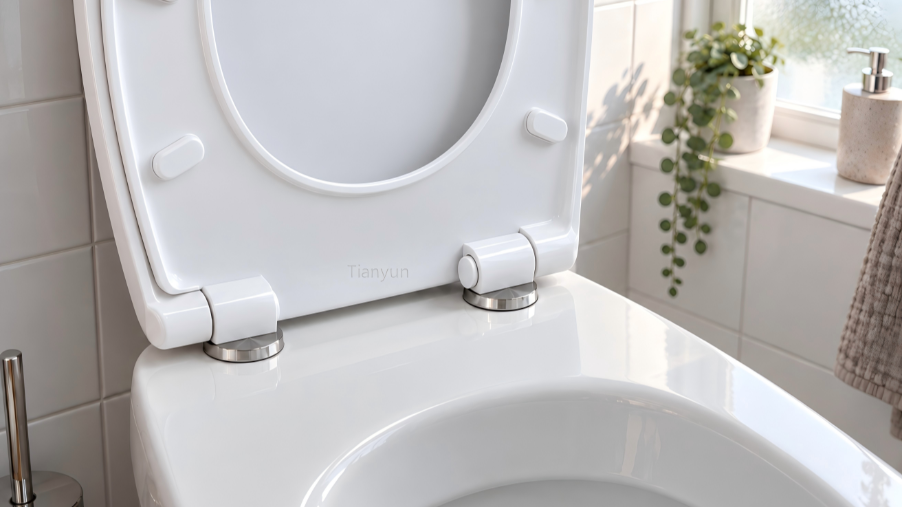
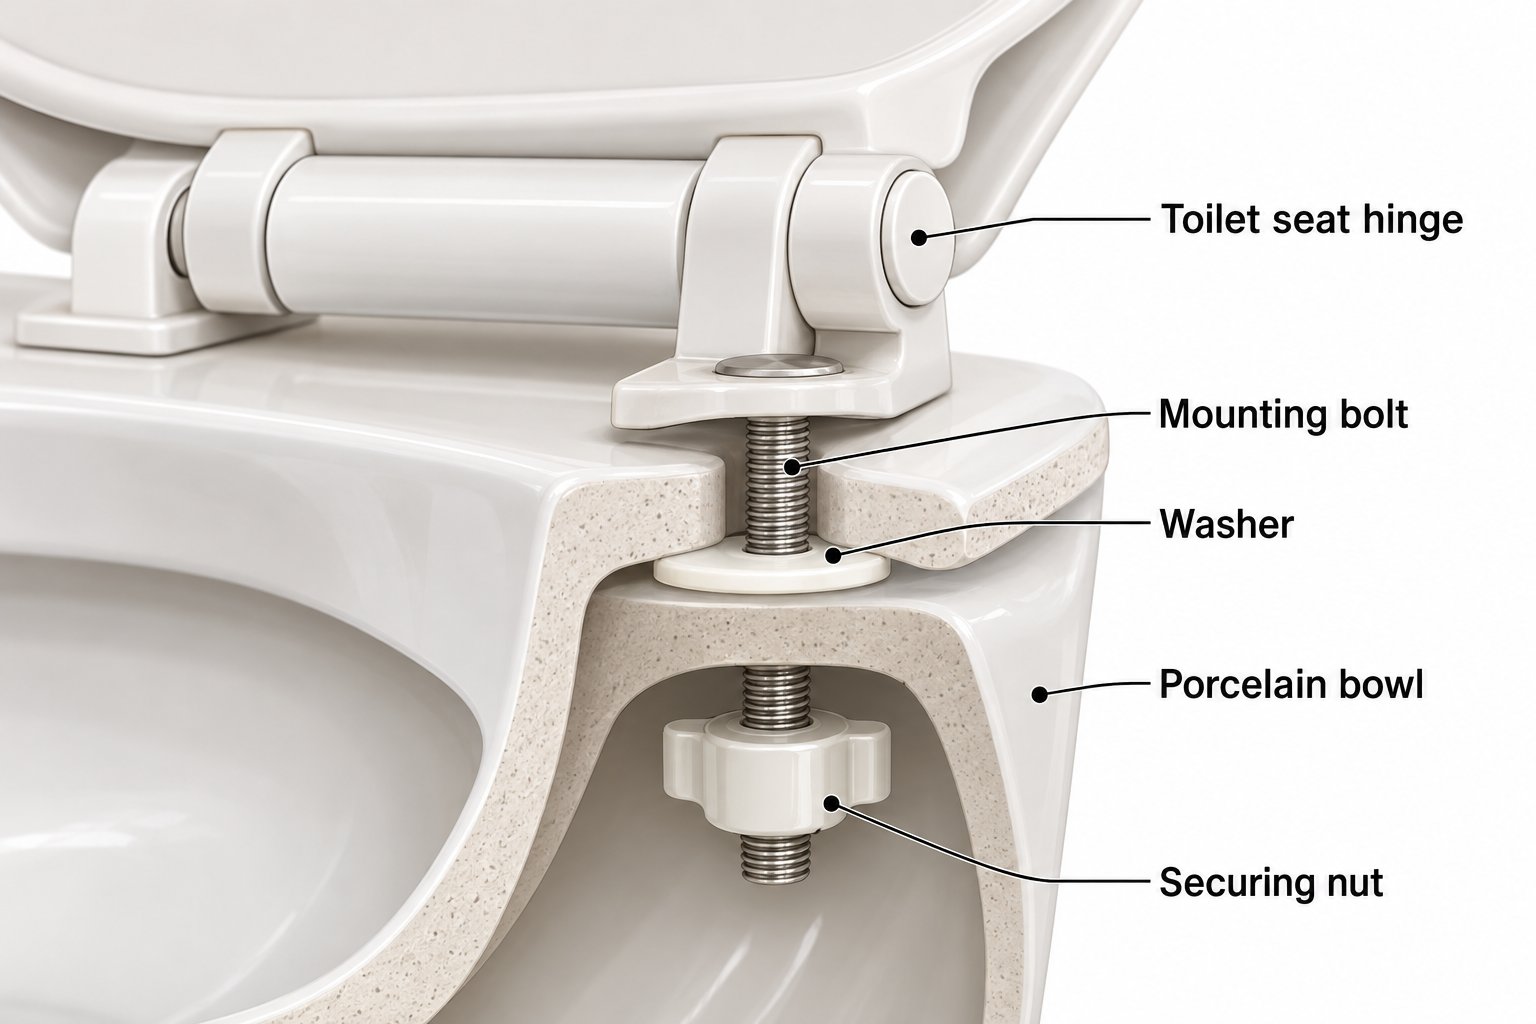
Picture your toilet seat from above. The lid folds over the seat, the seat rests on the bowl rim, and somewhere at the back — mostly hidden from view — a collection of small hardware pieces holds everything together. If you've never taken a close look at that connection point, you're not alone. Most people only notice these parts of a toilet seat when something breaks or starts rattling. But learning the toilet seat parts names and where each piece sits gives you a real advantage when shopping for toilet seat replacement parts or diagnosing a wobble.
Imagine a simple toilet seat parts diagram in your mind: at the rear of the bowl, two holes sit roughly 5.5 inches apart (center to center) on most North American toilets. Bolts drop through the hinge mechanism and into these holes, passing through washers before being secured with nuts underneath. The seat and lid pivot on the hinge assembly, and bumper pads on the underside cushion every point of contact with the porcelain. That's the full picture — and every single piece in that chain matters.
Mounting Hardware and Fasteners
The fasteners are the backbone of any toilet seat assembly, and getting familiar with them makes the difference between a secure seat and a frustrating repair.
Mounting bolts (also called seat post bolts) are the vertical fasteners that anchor the seat to the bowl. "Seat post" simply refers to the bolt's position — it sits inside or directly beneath the hinge post at the rear of the seat. These bolts typically measure between 2.5 and 3.5 inches in length, with a standard diameter of roughly 5/16 inch or 3/8 inch for most residential toilets. If your bolt is too short, it won't reach the nut underneath; too long, and it may interfere with the bowl's interior.
Nuts thread onto the bottom of each bolt to clamp the seat securely against the bowl rim. You'll encounter two common types. Wing nuts feature two flat "wings" that let you tighten by hand — no tools required. Hex nuts are six-sided and require a wrench or pliers, but they provide a stronger grip that's less likely to loosen over time.
Washers sit between the bolt head and the porcelain surface, acting as both a cushion and a friction layer. Rubber washers are the most common in toilet seat replacement parts because they absorb vibration and prevent metal-on-porcelain contact. Plastic washers offer similar protection with slightly less grip, while metal washers — though durable — risk scratching the bowl and are less common in seat hardware. The standard bolt spacing of about 5.5 inches (roughly 140mm) is consistent across most North American bowls, but always measure your own toilet to confirm before purchasing any kit.
Hinges, Bumpers, and Caps
The hinge is where all the movement happens. It's the pivot point that lets the seat and lid swing open and closed, and its design determines how your seat behaves day after day.
Standard pin hinges use a simple metal or plastic rod (the "hinge pin") that passes through aligned loops on the seat, lid, and mounting bracket. They're straightforward, inexpensive, and easy to replace. Integrated barrel hinges, by contrast, house the pivot mechanism inside a cylindrical barrel built into the seat itself. These are common on modern soft-close seats and offer a cleaner look, but they're typically brand-specific and harder to swap with universal commode seat parts.
Bumper pads are the small rubber or silicone feet you'll find on the underside of both the seat and the lid. They serve three purposes at once: cushioning the seat against the bowl rim to prevent porcelain damage, reducing the "clack" when the seat drops, and creating a slight air gap that keeps the seat from trapping moisture against the bowl surface. When bumpers go flat or fall off, the seat sits unevenly, slides more easily, and makes far more noise with every use.
Decorative bolt caps snap over exposed bolt heads at the rear of the seat. Beyond hiding the hardware for a tidier appearance, these caps seal out moisture — a small detail that significantly slows bolt corrosion in humid bathroom environments.
Here's a quick-reference breakdown of every toilet bowl seat part and its role in the assembly:
| Part Name | Material Options | Function |
|---|---|---|
| Mounting bolt (seat post bolt) | Plastic, zinc-plated steel, stainless steel, brass | Anchors seat and hinge assembly to the bowl through mounting holes |
| Wing nut / hex nut | Plastic, nylon, stainless steel | Threads onto the bolt from below to clamp the seat firmly against the bowl rim |
| Washer (rubber, plastic, or metal) | Rubber, nylon, stainless steel | Cushions the bolt-to-porcelain contact, adds friction, and prevents scratching or cracking |
| Hinge assembly (pin or barrel type) | Plastic, zinc alloy, stainless steel | Creates the pivot point allowing the seat and lid to open and close |
| Bumper pad | Rubber, silicone, soft plastic | Cushions seat-to-bowl contact, reduces noise, and prevents porcelain wear |
| Decorative bolt cap | Plastic (color-matched) | Covers exposed bolt heads to block moisture and improve appearance |
If you're ever unsure which part has failed, use this table as your starting point. Flip the lid up, look at the rear of the bowl where the seat connects, and match what you see to the names above. In most cases, the culprit behind a loose or noisy seat is one of these six parts of toilet seat hardware — worn, cracked, corroded, or simply missing.
Identifying the damaged part is the first step. The more practical question is whether that damage actually calls for a full toilet seat replacement kit or just a single component swap — and the answer depends on what symptoms your seat is showing.
Signs Your Toilet Seat Hardware Needs Replacing
Your toilet seat shouldn't move when you sit down. It shouldn't make a loud crack when the lid drops. And you definitely shouldn't see orange-brown flakes around the bolt heads every time you clean. Yet these are the exact symptoms millions of homeowners live with — often for months — because they assume the only fix is buying an entirely new seat. That's rarely true. Most of the time, the seat itself is perfectly fine. The hardware holding it in place is what's failed.
A quick inspection takes less than two minutes and tells you exactly whether a toilet seat repair kit will solve the problem or whether something more serious is going on. Here's what to look for.
Loose, Wobbling, or Shifting Seats
Sit down and shift your weight side to side. Does the seat slide laterally across the bowl rim? That sideways movement is the single most common toilet seat complaint, and it almost always traces back to one of three hardware issues: worn-out bolts, stripped threads, or degraded rubber washers that have lost their grip.
When the rubber washers beneath the bolt heads compress or crack over time, they stop creating friction against the porcelain. The bolt can still be "tight" in the technical sense — the nut hasn't fallen off — but the seat no longer stays anchored because there's nothing gripping the smooth bowl surface. You'll notice the wobble gets worse gradually, and periodic hand-tightening only helps for a few days before the sliding returns.
Stripped threads are another culprit. Plastic wing nuts, especially the thin ones bundled with budget seats, can strip after a few tightening cycles. Once the threads are gone, the nut spins freely without actually clamping anything. A toilet seat hardware replacement with fresh bolts, washers, and nuts fixes this immediately — no need to replace the seat, lid, or hinges if those parts are still intact.
To do a quick visual inspection, flip the bolt caps open at the rear of the seat and look at the bolt heads. If you see corrosion, cracks in the plastic, or bolts that turn without tightening, the mounting hardware has reached the end of its life. A replacement kit with new fasteners restores the solid, locked-down feel of a factory installation.
Cracked Hinges, Rusted Bolts, and Broken Bumpers
Hardware degradation doesn't happen overnight. It's a slow process driven by the one thing every bathroom has in abundance: moisture. Metal bolts and hinge pins corrode over time, especially in poorly ventilated bathrooms where humidity lingers after every shower. Rusty bolts are one of the clearest signs that replacement is overdue — discoloration and flaking metal mean the bolt is actively weakening and may snap under load.
Plastic hinges face a different enemy: brittleness. Years of repeated opening and closing, combined with temperature swings in the bathroom, cause plastic hinge arms to develop micro-cracks. One day, the hinge that's been quietly deteriorating simply snaps when you lift the lid. A broken toilet seat cover that won't stay upright is almost always a hinge failure, not a problem with the lid itself.
Missing or flattened bumpers create a chain reaction of damage. Without those small rubber feet cushioning contact, the seat slams directly against the porcelain bowl rim every time it drops. That repeated impact loosens bolts faster, stresses hinges, and can even chip the bowl's glaze over time. Replacement toilet seat bumpers are inexpensive and easy to stick on, but they're often overlooked until the banging becomes impossible to ignore — or until the seat starts cracking from the uncushioned impacts.
Not sure if your toilet seat broke beyond a simple hardware swap? Run through this symptom checklist:
- Seat slides left or right when you sit on it
- Visible rust or corrosion on bolt heads or nuts
- Hinge no longer holds the seat or lid in an upright position
- Seat slams shut despite being a slow-close model
- Bumper pads are missing, flattened, or peeling off
- Bolt caps are cracked or no longer snap into place
If you checked even one item on that list, a toilet seat repair addresses it. If you checked two or more, a complete kit — with fresh bolts, washers, nuts, bumpers, and possibly new hinges — is the most efficient path forward.
Replacing worn hardware with a toilet seat replacement kit is almost always cheaper and faster than buying an entirely new seat — and it solves the same problems.
The real question, once you've confirmed that new hardware is the answer, is figuring out which type of kit matches your specific toilet. Not all kits use the same mounting style, material, or hinge design — and grabbing the wrong one leads to a second trip to the store and a seat that still doesn't sit right.
Types of Toilet Seat Replacement Kits Compared
Knowing you need new hardware is one thing. Walking into a plumbing aisle — or scrolling through dozens of online listings — and seeing "top-fix kit," "bottom-fix universal," "brass bolt set," and "soft-close hinge kit" all side by side? That's where most people stall out. These labels describe real differences in how the kit mounts, what it's made of, and which toilets it fits. Picking the wrong category doesn't just waste money — it can leave you with a toilet seat that literally cannot attach to your bowl.
Here's a straightforward breakdown of every major toilet seat replacement kit type so you can match the right one to your bathroom.
Top-Fix vs Bottom-Fix Mounting Kits
This is the most important distinction in any toilet fixing kit, and it's determined entirely by your toilet's design — not by personal preference.
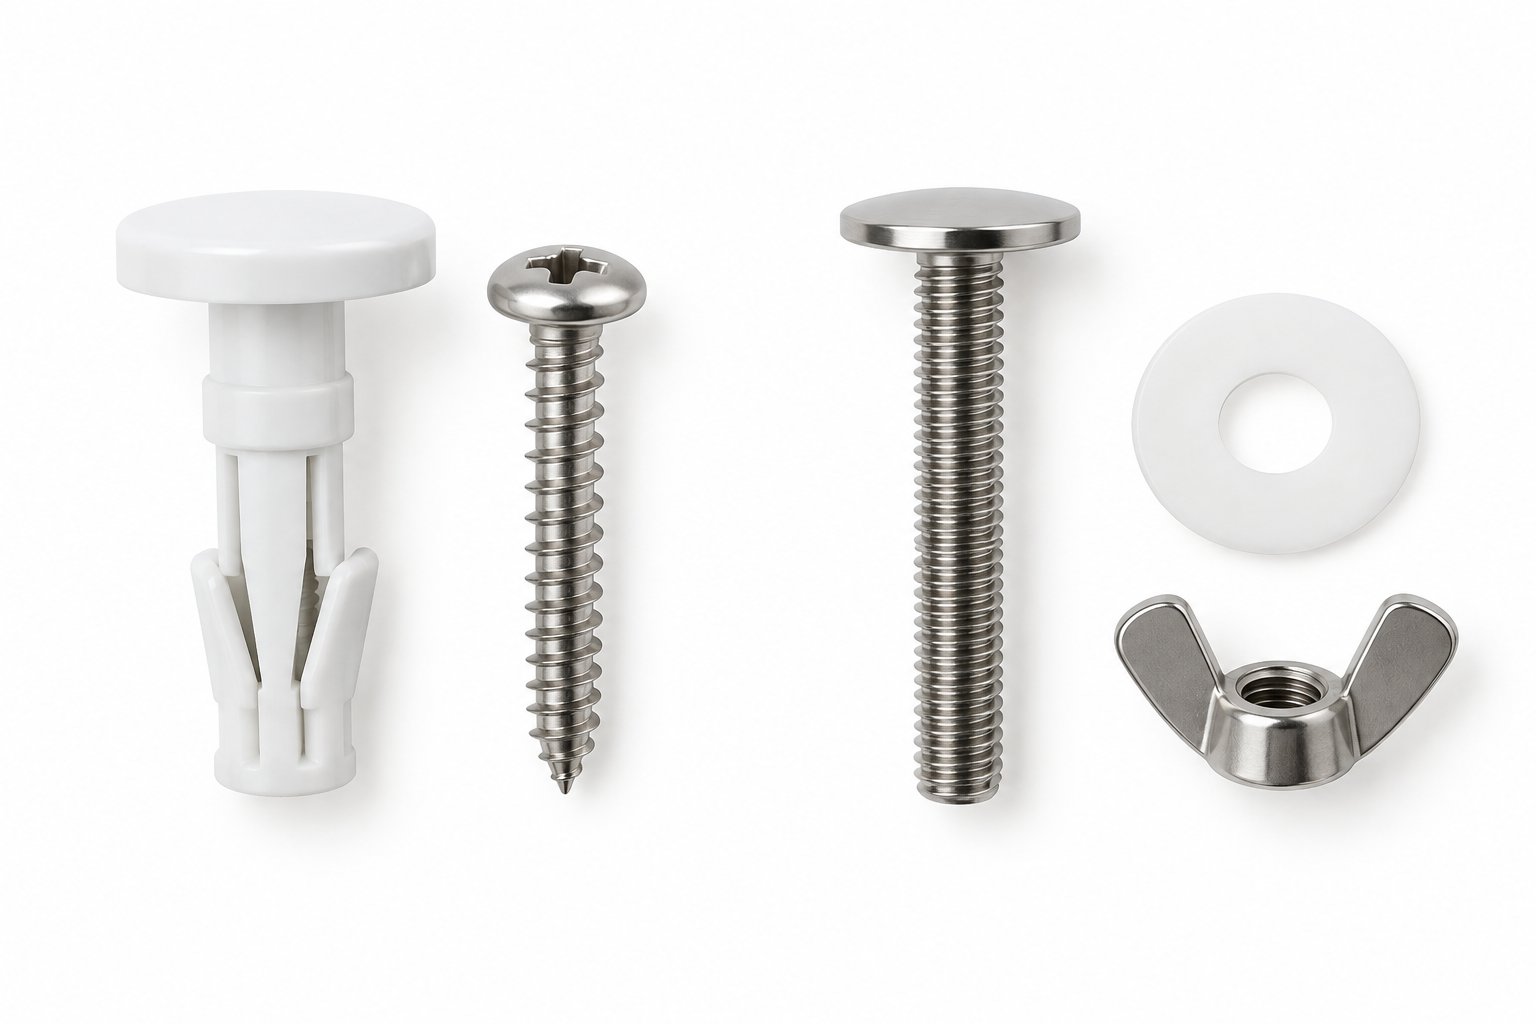
A top-fix kit installs completely from above the bowl rim. Instead of a traditional bolt-and-nut setup, it uses expanding anchors or threaded inserts that drop into the bowl's mounting holes. You tighten a screw from the top, and the anchor expands inside the hole to grip the porcelain from within. No kneeling, no reaching underneath, no fumbling with a wrench behind the toilet. Top-fix systems are designed specifically for modern toilets — back-to-wall, skirted, and wall-hung models where the underside of the bowl is completely enclosed or pressed against a wall. If you can't physically access the bottom of the mounting holes, a top-fix kit is your only option.
A bottom-fix kit is the traditional approach. Long bolts pass through the seat hinge and down through the bowl's mounting holes. You then reach underneath and thread a nut onto each bolt to clamp the seat against the rim. Bottom fixing works on older, open-back toilets where the underside is fully exposed and accessible. It's the most widely available toilet seat attachment style, and it's what most people picture when they think of seat installation. The trade-off? You'll need clearance behind and beneath the toilet, and those nuts can loosen over time from vibration and daily use, requiring periodic retightening.
Choosing the wrong mounting style is the single most common toilet seat replacement mistake — a top-fix kit won't work on a bottom-fix toilet, and vice versa.
Before you buy anything, take a look at the back of your toilet. Can you see and reach the underside of the bolt holes? Bottom-fix. Is the base enclosed with no access from below? Top-fix. That one observation narrows your search by half.
Plastic vs Stainless Steel vs Brass Hardware
The material of your toilet seat fittings determines how long they'll last before corrosion, brittleness, or wear sends you back to the store for another kit.
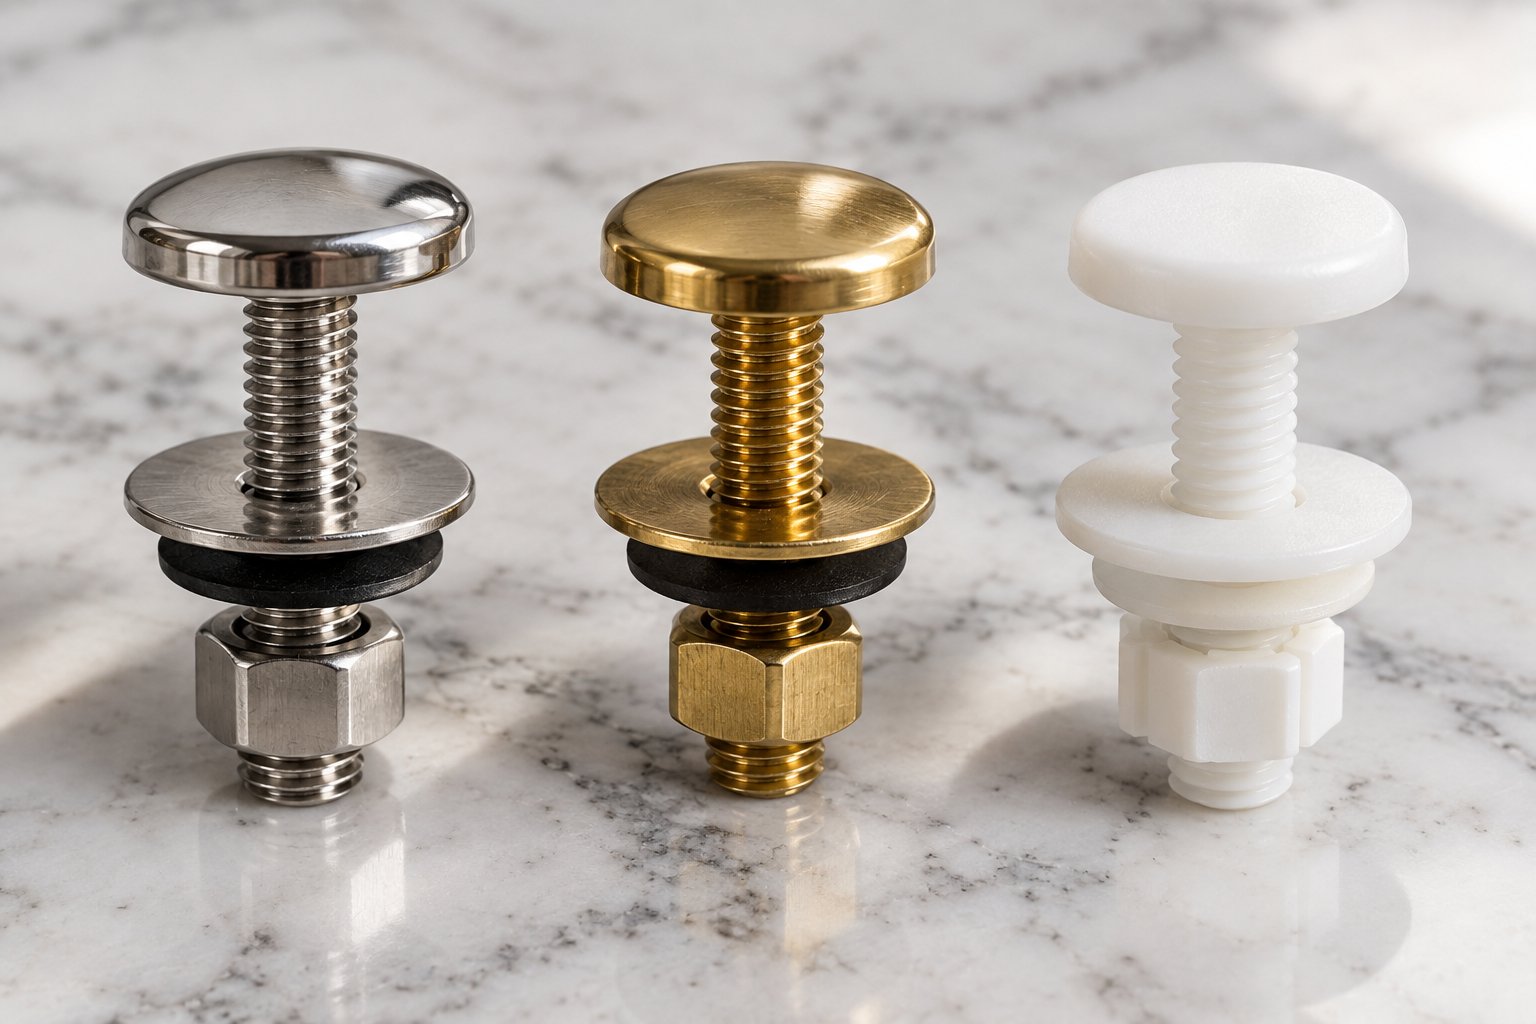
Plastic and nylon hardware is the most affordable option and the most common in budget kits. It won't rust — ever — which sounds like an advantage until you realize it trades corrosion resistance for structural weakness. Plastic bolts and wing nuts can strip, crack under stress, or become brittle in as little as two to three years. Research on toilet bolt materials shows plastic fasteners often fail within 18 months when subjected to more than 50 pounds of torque, which regular use can easily generate over time.
Stainless steel sits at the premium end. Its chromium oxide layer blocks oxygen from reaching the base metal, which means it resists rust even in constantly humid environments. Studies on residential bathroom hardware show stainless steel fasteners retain roughly 98% of their tensile strength after a full decade of exposure to 80% humidity. For a toilet seat hardware kit you want to install once and forget about, stainless steel is the clear winner.
Brass falls in between. It develops a natural patina that provides moderate corrosion protection, and it's stronger than plastic by a wide margin. However, brass can weaken when exposed to hard water minerals and acidic bathroom cleaners, which accelerate zinc loss from the alloy. Expect a solid 8 to 12 years of service — better than plastic, but not quite the near-permanent durability of stainless steel.
Universal Kits vs Brand-Specific Kits
Universal kits are designed to fit the widest range of toilets possible, typically using adjustable toilet seat clamps, elongated bolt slots, or multiple washer sizes to accommodate slight variations in bolt spacing and hole diameter. If your toilet is a standard residential model with conventional mounting holes, a universal kit will almost certainly work. They're convenient, widely stocked, and generally less expensive.
Brand-specific kits, on the other hand, are engineered for a particular manufacturer's hinge design or bolt configuration. Some brands use proprietary toilet seat clip mechanisms, non-standard bolt diameters, or integrated hinge systems that simply won't accept generic hardware. If you own a toilet with a unique mounting setup — common with higher-end models — a brand-matched kit saves you from the trial-and-error of trying to make universal parts fit where they weren't designed to go.
When does a universal kit work? When your toilet has standard-spaced bolt holes (around 5.5 inches center to center), open mounting slots, and a conventional hinge design. When is a brand-specific kit necessary? When the seat uses proprietary hinges, has non-standard hole spacing, or when the manufacturer explicitly states that only OEM parts are compatible.
There's also an upgrade opportunity worth considering. If you're already replacing worn hardware, a slow-close hinge replacement kit lets you swap standard hinges for soft-close ones at the same time. Instead of just restoring your old fixing for toilet seat stability, you add a damped hinge mechanism that lowers the seat and lid gently — no slamming, no noise, no cracked porcelain from repeated impacts. It's a small additional cost that turns a maintenance task into a genuine improvement.
Here's a side-by-side comparison to help you pinpoint the right kit category:
| Kit Type | Mounting Style | Material | Durability Rating | Best For | Limitations |
|---|---|---|---|---|---|
| Universal bottom-fix | Bolt-through from above, nut tightened from below | Plastic or zinc-plated steel | Moderate (3-7 years) | Standard open-back toilets with accessible undersides | Won't fit enclosed or skirted bowl designs |
| Universal top-fix | Expanding anchor tightened from above | Nylon anchor with stainless or plastic screw | Good (5-10 years) | Modern back-to-wall, skirted, or wall-hung toilets | Requires blind-hole mounting points in the bowl |
| Stainless steel bottom-fix | Bolt-through with stainless fasteners | Stainless steel bolts, nuts, and washers | Excellent (10-15+ years) | Humid bathrooms, long-term installations, heavy use | Higher upfront cost; still requires underside access |
| Brass bottom-fix | Bolt-through with brass fasteners | Brass bolts and nuts | Good (8-12 years) | Mid-range durability with better corrosion resistance than plastic | Weakens with hard water exposure; moderate cost |
| Brand-specific kit | Varies (top-fix or bottom-fix per brand design) | Varies (often proprietary plastic or metal) | Varies by manufacturer | Toilets with proprietary hinge systems or non-standard bolt spacing | Limited availability; typically higher price |
| Slow-close hinge upgrade kit | Replaces entire hinge mechanism (top-fix or bottom-fix) | Zinc alloy or stainless steel with damped hinge | Good to excellent (7-12 years) | Upgrading a standard seat to soft-close functionality | Must match bowl shape and mounting style; not universally compatible |
Scan the "Best For" column first — it's the fastest way to eliminate kit types that don't match your toilet. Then check "Limitations" to confirm nothing disqualifies your pick.
With the right kit category identified, the next step is getting precise. Bolt spacing, hole diameter, bowl shape, and hinge type all vary between toilets, and measuring these details before you buy is what separates a one-trip fix from a frustrating do-over.
How to Find the Right Kit for Your Toilet
You've identified the kit category — top-fix or bottom-fix, plastic or stainless steel, universal or brand-specific. But here's the thing: even within the correct category, a kit that's slightly off in bolt diameter or spacing will leave you right back where you started, staring at a seat that won't tighten down. The difference between a perfect fit and an unusable purchase often comes down to a few millimeters and one overlooked measurement.
Grab a tape measure, a pen, and your phone (for photos). This five-step process walks you through every measurement and decision point so you buy the right toilet seat replacement kit on the first try.
Measure Your Bolt Spacing and Hole Diameter
The two toilet seat holes at the back of your bowl are your starting point for every hardware decision. These holes accept the mounting bolts, and their spacing determines which kits are physically compatible with your toilet.
Bolt center-to-center spacing: Place your tape measure at the center of the left mounting hole and extend it to the center of the right hole. Most North American toilets use a standard bolt spread of 5.5 inches (140mm). This measurement has remained remarkably consistent across manufacturers for decades, which is why universal kits work on the majority of residential toilets. However, some European-style, imported, or older models use non-standard spacing — sometimes as narrow as 5 inches or as wide as 6.5 inches. If your measurement falls outside the 5.5-inch standard, you'll likely need a brand-specific kit or an adjustable mounting system with slotted bolt holes.
Hole diameter: Using a ruler or caliper, measure the inside width of each mounting hole. Standard toilet seat holes are typically around 3/8 inch (roughly 10mm) in diameter. If the holes appear significantly larger — perhaps from wear, previous over-tightening, or a manufacturing variation — a standard bolt may drop through without gripping. In that case, you'll need a kit that includes rubber bushings or toilet seat anchors to fill the gap and create a snug fit.
Bowl shape and its effect on kit selection: While bolt spacing is the primary compatibility factor, your bowl shape — round or elongated — matters too. Round bowls measure approximately 16.5 inches from the bolt holes to the front rim, and elongated bowls measure about 18.5 inches. The bowl shape itself doesn't change which bolts fit, but it does determine which hinge assemblies and toilet seat connectors are appropriate. Elongated seats use wider hinge brackets that won't align properly on a round bowl, and vice versa. A quick length measurement confirms your bowl shape and prevents you from ordering a hinge kit designed for the wrong profile.
Match Your Kit to Your Toilet Brand and Model
Measurements alone handle about 80% of compatibility questions. The remaining 20%? That's where brand-specific quirks come into play.
American Standard toilets, for example, frequently use proprietary hinge designs that differ from generic kits. Certain models require specific american standard toilet seat bolts with a narrower diameter or a slightly different thread pitch than the industry standard. If you own an American Standard slow-close model, the american standard toilet seat screws may also integrate directly into a damped hinge mechanism that generic hardware can't replicate. Replacing just the bolts without matching the hinge style often results in a seat that tightens fine but won't close softly — or won't close evenly at all.
Kohler, TOTO, and other major brands have similar nuances. The good news? You don't need to memorize every brand's specs. Here's a brand-agnostic method for finding the right kit regardless of manufacturer:
- Check the underside of your existing seat — most manufacturers stamp a model number, brand name, or part code on the bottom of the seat or inside the hinge cover
- Look inside the toilet tank — the toilet model number is often stamped or printed on the porcelain inside the tank, which you can cross-reference with the manufacturer's parts catalog online
- Bring old hardware to a plumbing supply store — a physical comparison is the fastest way to match bolt diameter, thread pitch, and hinge style when you can't find a model number
- Contact the manufacturer's support line — provide the toilet model number and they'll confirm exactly which toilet seat fastenings and hinge kits are compatible
Don't overlook replacement toilet seat feet, either. Those small bumper pads on the underside of the seat vary in size and attachment method between brands. Some press-fit into molded recesses, while others use adhesive backing. Ordering the wrong profile means the bumpers either fall off immediately or sit too high, tilting the seat forward.
Here's the full decision process distilled into a clear sequence:
- Identify your mounting style — look at the back of the toilet to determine if it's a top-fix (enclosed base, no underside access) or bottom-fix (open-back, nuts accessible from below)
- Measure bolt hole spacing — confirm the center-to-center distance matches the standard 5.5 inches, or note the exact non-standard measurement
- Check bowl shape — measure from bolt holes to the front rim (16.5 inches = round, 18.5 inches = elongated)
- Determine hinge type — examine whether the current seat uses a standard pin hinge or an integrated barrel/damped mechanism
- Select material preference — choose plastic for budget installs, stainless steel for long-term durability, or brass for a middle ground
For a quick reference on bolt sizing, this table covers the most common configurations:
| Bolt Diameter | Thread Type | Typical Toilet Type | Kit Compatibility |
|---|---|---|---|
| 5/16 inch (8mm) | Coarse thread | Standard residential round and elongated bowls | Most universal kits |
| 3/8 inch (10mm) | Coarse thread | Heavy-duty residential and some commercial toilets | Universal or heavy-duty kits |
| 1/4 inch (6mm) | Fine thread | Compact, imported, or European-style bowls | Brand-specific or metric kits |
| M8 metric | Metric thread | European and Asian-manufactured toilets | Metric-specific kits only |
One last tip that saves more return trips than any measurement guide: take a photo of your existing hardware before you remove it. Snap a picture of the bolt heads from above, the nuts from below (if accessible), and the hinge assembly from both sides. These photos give you — or a store associate — an instant visual reference when comparing kits on the shelf. A thirty-second photo session is the cheapest insurance against buying the wrong parts.
With the right kit matched to your specific toilet, the only thing left is the actual installation. And that starts with gathering a few basic tools you probably already own.
Tools You Need and How to Install a Replacement Kit
You've got the right kit in hand. The bolt size matches, the mounting style fits your toilet, and every washer and nut is accounted for. So what's standing between you and a rock-solid seat? About six common tools — most of which are probably already in a kitchen drawer or garage toolbox. Skipping even one can stall the project or force you to improvise, so take five minutes to gather everything before you touch a single bolt.
Tools and Supplies to Gather First
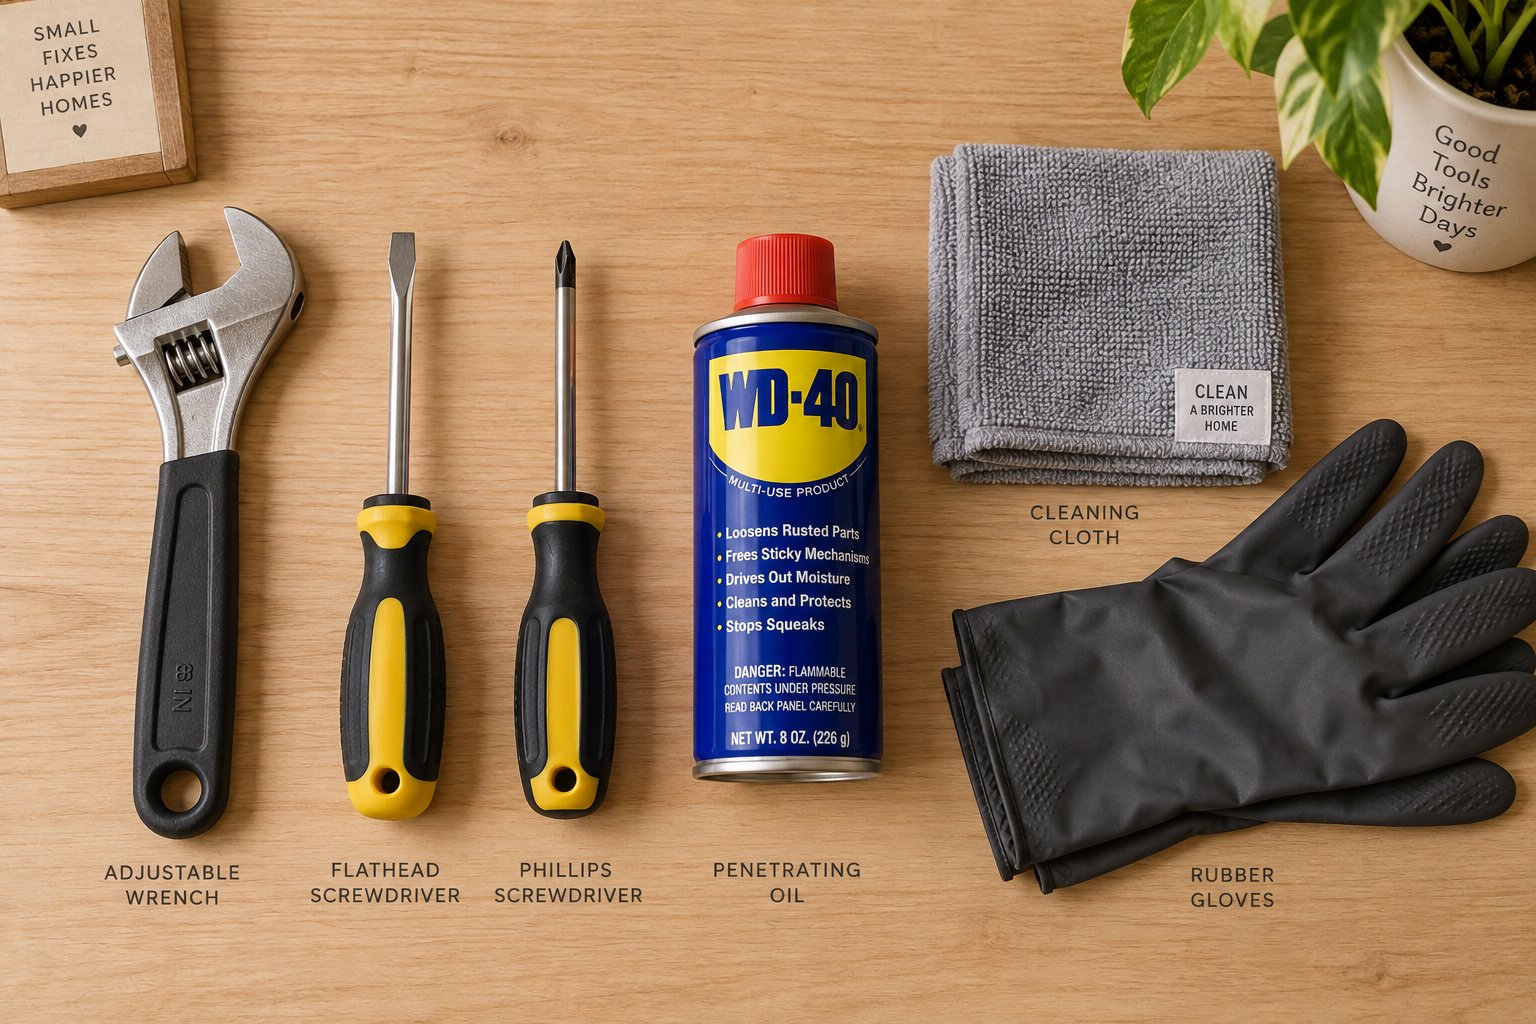
A toilet seat installation kit includes the hardware, but it never includes the tools. Here's the full list of what you'll want within arm's reach, along with why each item matters:
- Adjustable wrench or pliers — used to grip and turn hex nuts underneath the bowl. An adjustable wrench lets you dial in the exact jaw width to fit your specific nut size without slipping. Pliers work in a pinch, but they're more likely to round off the nut edges if you squeeze too hard.
- Flathead screwdriver — many toilet seat bolts have a wide slot across the top of the bolt head. You'll hold this screwdriver from above to keep the bolt from spinning while you tighten (or loosen) the nut from below. It's the tool you'll use most during this project.
- Phillips screwdriver — some kits, especially top-fix models, use Phillips-head screws instead of slotted bolts. Having both screwdriver types on hand covers every hardware toilet seat configuration you might encounter.
- Penetrating oil (such as WD-40 or PB Blaster) — essential for corroded or seized bolts. A few sprays break down rust and mineral buildup between the bolt and nut, making removal dramatically easier. If your existing hardware has been in place for several years, assume you'll need this.
- Hacksaw or oscillating multi-tool — the last resort for bolts that absolutely refuse to turn, even after soaking in penetrating oil. A small hacksaw blade or an oscillating tool with a metal-cutting attachment slices through rusted bolts so you can remove the old seat without damaging the porcelain.
- Cleaning cloths and bathroom cleaner — the area beneath the old seat and around the mounting holes collects grime you've likely never seen. Cleaning the porcelain before installing new hardware ensures the washers sit flat and grip properly.
- Rubber gloves (optional but recommended) — the underside of a toilet seat that hasn't been removed in years is exactly as unpleasant as you'd imagine. Gloves keep the job hygienic and give you a better grip on slippery nuts.
Lay everything out on a towel next to the toilet before you start. Hunting for a wrench mid-project — with one hand holding a bolt in place — is a frustration you can avoid entirely.
Step-by-Step Removal and Installation
Whether you're learning how to fix a toilet lid that won't stay upright or replacing the entire seat assembly, the removal and installation process follows the same sequence. These steps apply to both bottom-fix and top-fix kits, with notes where the process differs.
- Locate and expose the existing bolts. Flip open the plastic bolt caps at the back of the seat. Some caps pry off with a flathead screwdriver; others hinge open. You should see the heads of two bolts sitting in the bowl's mounting holes.
- Apply penetrating oil if the hardware looks corroded. Spray the bolt heads from above and the nut threads from below. Let the oil soak for 15 to 30 minutes — patience here prevents stripped threads, snapped bolts, and scraped knuckles. Experienced DIYers recommend WD-40 for loosening old toilet seat nuts that have been sitting untouched for years.
- Remove the old hardware. Hold the bolt head steady from above with a flathead screwdriver. Reach underneath the bowl with your adjustable wrench and turn the nut counterclockwise until it spins off. Repeat for the second bolt. If a nut refuses to budge even after penetrating oil, this is when you reach for the hacksaw — carefully cut through the bolt shank from below, keeping the blade flat against the porcelain to avoid scratching it.
- Lift the old seat and inspect the mounting area. With both bolts removed, the entire seat and hinge assembly lifts straight off. Set it aside and look at the mounting holes. You'll likely find grime, mineral deposits, or rust residue around and inside each hole.
- Clean the mounting area thoroughly. Spray bathroom cleaner on the bolt holes, the surrounding porcelain rim, and the back edge of the bowl. Scrub with a cloth until the surface is smooth and free of buildup. This step isn't cosmetic — debris under a washer prevents it from sitting flat, which leads to wobbling right from day one. Home Depot's installation guide emphasizes cleaning the mounting surface before positioning new hardware for exactly this reason.
- Position the new seat and align the hinge holes. Place the new seat on the bowl with the hinges at the back. Slide it forward or backward until the holes in the hinge brackets line up directly over the bolt holes in the porcelain. The seat should sit centered on the rim — equal overhang on both sides.
- Insert the new bolts. For a bottom-fix kit, drop each bolt down through the hinge bracket and through the bowl's mounting hole. If your kit includes washers, slide a rubber washer onto the bolt first so it sits between the bolt head and the porcelain. For a top-fix kit, insert the expanding anchor into the hole from above, then thread the screw into the anchor through the hinge bracket.
- Hand-tighten the nuts from below (bottom-fix) or tighten the screws from above (top-fix). For bottom-fix kits, reach underneath and thread a wing nut or hex nut onto each bolt. Turn clockwise by hand until the nut is snug against the underside of the porcelain. For top-fix kits, use a screwdriver to turn the screw until the anchor grips inside the hole. In both cases, start by hand — do not grab a wrench yet.
- Snug with a wrench — but do not over-tighten. This is where many toilet seat fix attempts go wrong. Use your adjustable wrench to give each nut an additional quarter to half turn beyond hand-tight. That's it. The seat should feel solid and immovable, but you shouldn't be straining against the wrench. Over-tightening is a real risk: too much torque cracks porcelain, and plumbing professionals specifically warn against forcing bolts past the point of firm resistance.
- Attach bumper pads. If your toilet seat repair kit includes adhesive-backed bumper pads, stick them to the marked positions on the underside of the seat and lid. Press firmly for five seconds each. These pads cushion every contact point between the seat and the bowl, so don't skip them — they reduce noise, prevent porcelain wear, and help keep the seat from sliding.
- Test seat stability. Close the lid. Open it. Sit down and shift your weight side to side, then front to back. The seat should feel absolutely locked in place with zero lateral movement. If you detect any wobble, tighten each nut another quarter turn and test again.
How do you fix a toilet seat that still wobbles after following these steps? That's actually a tightness calibration issue more often than a hardware problem. The sweet spot is firm resistance without force — when the wrench meets solid pushback and the seat doesn't budge under your body weight, you're there. If you can still wiggle the seat after a quarter turn past hand-tight, try another quarter turn. But the moment you feel the porcelain flex or hear a faint creak, stop immediately and back off slightly. Cracking a toilet bowl with an over-tightened bolt turns a $15 hardware swap into a $300 toilet replacement.
The entire process — removal, cleaning, and installation — typically takes 15 to 30 minutes for a straightforward swap with cooperative hardware. Corroded bolts can stretch that to an hour if you need to soak and saw. Either way, it's a one-person job that requires no plumbing knowledge, no special training, and no professional help.
But what about the jobs that don't go smoothly? Seized bolts that laugh at penetrating oil, brand-new hardware that still wobbles, or soft-close hinges that refuse to slow down — these are the real-world complications that turn a simple swap into a head-scratcher.
Troubleshooting Common Installation Problems
Sometimes the penetrating oil does its job, the bolts spin right off, and the new hardware drops into place like it was made for your toilet. Other times? The old bolt snaps in half, the new seat still rocks like a seesaw, or your freshly installed slow-close hinge slams shut with all the grace of a screen door in a windstorm. These are the moments that send people straight to Google searching how to fix a broken toilet seat — and finding almost nothing useful.
The good news is that nearly every installation headache falls into one of a few predictable categories. And each one has a fix that doesn't require a plumber.
Dealing With Seized or Corroded Bolts
Rust is the most common obstacle standing between you and a clean removal. When metal bolts sit inside porcelain mounting holes for years — soaking up bathroom humidity with every shower — corrosion fuses the nut to the bolt threads. You turn the wrench, and nothing moves. Or worse, the bolt head starts to round off while the nut stays frozen in place.
Start with the penetrating oil soak method. Spray the bolt-nut junction generously from below and apply a few drops from above so the oil seeps down into the threads. Then walk away. Give it a full 15 to 30 minutes — rushing this step is the number one reason people strip bolt heads or crack hardware. After soaking, grip the nut with an adjustable wrench and try again. You'll often feel the nut break free with a faint "pop" as the rust bond gives way.
When penetrating oil isn't enough, it's time for a more direct approach. A small hacksaw blade — the kind designed for close-quarters work — can cut through a corroded bolt shank from below the bowl. Hold the blade flat against the underside of the porcelain and saw through the bolt slowly, letting the blade do the work. An oscillating multi-tool with a metal-cutting attachment does the same job faster and with better control, especially in tight spaces where a full hacksaw frame won't fit.
One critical warning here: never use excessive force on a seized bolt. Yanking a wrench, hammering a nut, or muscling a bolt with channel-lock pliers transfers all that force directly into the porcelain bowl. A cracked toilet bowl isn't a repair — it's a replacement. Knowing how to fix a cracked toilet seat is one thing; a cracked bowl is an entirely different and far more expensive problem. Patience and penetrating oil cost you nothing. A new toilet costs several hundred dollars.
Fixing Alignment Issues and Persistent Wobble
You've installed fresh hardware, tightened everything to a firm snug, and the seat still shifts when you sit down. Frustrating — but don't assume you did something wrong. Persistent wobble after a proper installation usually points to one of three issues that have nothing to do with your technique.
Oversized mounting holes are the most common culprit. Over years of use, the porcelain mounting holes can wear slightly larger than their original diameter, or they may have been drilled oversize at the factory. When the bolt diameter is smaller than the hole, the bolt moves freely inside the opening instead of sitting snug — and no amount of tightening eliminates that play. The fix? Rubber bushings or a toilet seat stabilizer kit. These kits include tapered rubber or nylon inserts that press into the oversized hole, reducing its effective diameter so the bolt fits tightly. Some stabilizer kits also use a wider washer-and-bushing combination that spans the gap from above.
Stripped threads create a different symptom. The nut turns endlessly without ever clamping down, or it feels tight for a moment and then slips. If your old plastic wing nut stripped the bolt threads, the new nut may inherit the same problem on the same bolt. In this case, replacing just the nut isn't enough — you need to swap the entire bolt. Most toilet seat hinge replacement parts include both bolts and nuts for exactly this reason.
Mismatched bolt diameters are subtler. A bolt that's a fraction too thin for the mounting hole won't grip the porcelain, while one that's slightly too thick won't drop through at all. Always verify your bolt size against the measurements you took before purchasing — even "universal" kits sometimes include bolts at the smaller end of the tolerance range.
Soft-close hinges introduce their own category of post-installation surprises. You've gone through the effort to repair a toilet seat hinge by swapping in a new slow-close mechanism, and the lid still slams. When a replaced hinge doesn't slow-close properly, the issue is almost always one of two things: incorrect hinge tension adjustment or an incompatible hinge mechanism. Many soft-close hinges have a tension setting — a small dial or screw at the pivot point — that controls how much resistance the damper applies. If the tension is too low for the weight of your seat and lid, gravity wins and the lid drops fast. Increasing the tension setting (usually by turning the adjustment screw clockwise) adds enough resistance for a controlled descent. If there's no adjustment screw, the hinge may simply be designed for a different seat weight or lid size, making it mechanically incompatible. Knowing how to repair a soft close toilet seat often comes down to matching the hinge to your seat's specific dimensions and weight.
For American Standard owners specifically, figuring out how to tighten toilet seat American Standard models can be tricky because many of their seats use proprietary hinge mechanisms with unique tightening sequences. Some require you to tighten the bolt first, then lock the hinge into position with a separate set screw — reversing the order leaves the seat loose no matter how tight the main bolt feels. Always check the manufacturer's installation sheet that came with the seat or download it from their website.
Here's a quick-reference troubleshooting checklist for the most common post-installation problems:
- Bolt spins freely but won't tighten — stripped threads on the bolt or nut; replace the full bolt-and-nut set
- Seat shifts left to right after installation — oversized mounting holes; install rubber bushings, anchor inserts, or a stabilizer kit
- Hinge snaps or cracks during installation — over-tightened hardware or brittle plastic hinge; use a metal or reinforced hinge and tighten only to firm resistance
- Bolt is too short or too long for bowl thickness — measure bowl rim thickness before purchasing; select a kit with the correct bolt length or one that includes adjustable-length bolts
- Soft-close lid slams instead of lowering gently — check tension adjustment; confirm hinge is rated for your seat's weight and dimensions
- Toilet seat clips won't snap into place — hinge bracket may be misaligned with the mounting holes; reposition the seat and re-center before locking clips down
Most installation failures trace back to selecting the wrong kit type — not user error. If the hardware matches your toilet's mounting style, bolt spacing, and hinge design, the installation itself is straightforward.
Solving these problems on the spot saves you from unnecessary return trips and the temptation to over-tighten your way to a "fix" that cracks porcelain instead. But even a perfectly installed kit can fail prematurely if the hardware material isn't built to survive years of bathroom humidity and daily use — and that's where the quality of the metal, plastic, or alloy inside your kit starts to matter more than most people realize.
Choosing Durable Toilet Seat Hardware That Lasts for Years
You just installed a fresh toilet seat replacement kit, everything feels tight, and the wobble is gone. But how long will it stay that way? Six months? Two years? A decade? The answer depends almost entirely on what the bolts, nuts, washers, and hinges inside that kit are made of. Two kits can look identical in the package — same bolt length, same mounting style, same number of pieces — yet one holds firm for a dozen years while the other degrades into a rattling mess within 18 months.
The difference isn't luck. It's material science applied to the humid, chemical-heavy environment where toilet seat hardware lives every single day.
Why Hardware Material Determines Lifespan
Think about the conditions inside your bathroom. Steam from hot showers pushes humidity levels above 80% multiple times a day. Cleaning products containing bleach, ammonia, or acidic compounds splash across surfaces regularly. Temperature swings from cool mornings to steamy evenings create condensation on every metal surface. That's the environment your toilet lid hardware has to survive — not a dry toolbox in the garage, but a relentless cycle of moisture, heat, and chemical exposure.
Cheap plastic bolts and hinges are the first to surrender. Polypropylene and basic nylon fasteners resist rust entirely — they can't corrode because there's no metal to oxidize. Sounds like a win, right? The trade-off is structural. Plastic bolts have a tensile strength of roughly 50 MPa, compared to 700 MPa for stainless steel. Under the repeated load cycles of daily sitting, shifting, and standing, plastic threads compress, deform, and eventually strip. Field research on toilet bolt materials shows plastic fasteners cracking or stripping in under 18 months when subjected to regular torque loads — the kind generated simply by sitting down every day.
Zinc-plated steel offers a significant step up in strength, but it carries a hidden weakness. The zinc coating protects the underlying steel from oxygen exposure, and it works well — until the coating gets scratched. A single nick during installation, a cleaning brush dragged across the bolt head, or even the friction of a washer shifting under load can breach the zinc layer. Once exposed, the bare steel underneath begins rusting within weeks in a humid bathroom. Studies on residential hardware corrosion show zinc-plated bolts failing at roughly the 3-to-5-year mark in typical conditions, with coastal or high-humidity homes seeing even faster degradation.
Brass delivers better corrosion performance than coated steel. Its copper-zinc alloy forms a natural patina that shields the surface from further oxidation, and it handles moisture well under normal circumstances. Where brass falters is in hard-water environments. Minerals in hard water accelerate a process called dezincification, which leaches zinc out of the alloy and leaves behind a weak, porous copper structure. Bathroom cleaners with acidic formulations speed this process further. Expect 8 to 12 solid years from brass hardware for toilet installations — good longevity, but not the "install it and forget it" lifespan that many homeowners want when sourcing replacement parts for commode hardware.
Stainless steel sits at the top of the durability hierarchy. Its chromium content forms a self-healing oxide layer on the surface — scratch it, and the chromium reacts with oxygen to regenerate the protective barrier automatically. This is why stainless steel retains approximately 98% of its tensile strength after a full decade of exposure to 80% humidity. It doesn't pit, doesn't flake, and doesn't weaken in hard water. A 12-year study of over 1,200 commercial restroom installations found stainless steel bolts had a failure rate of just 0.7% — compared to 12% for brass and nearly 33% for plastic. For toilet seat accessories that need to perform quietly in the background for years, stainless steel is the material that delivers.
Here's how each material tier stacks up across the factors that matter most:
| Material | Corrosion Resistance | Typical Lifespan | Best Application |
|---|---|---|---|
| Stainless steel (e.g., OEM-grade mounting bases) | Excellent — self-healing chromium oxide layer resists rust, chemicals, and hard water | 15+ years | Long-term residential installs, high-humidity bathrooms, commercial restrooms |
| Brass | Good — natural patina protects surface, but vulnerable to dezincification in hard water | 8-12 years | Mid-range residential use in moderate-humidity environments |
| Zinc-plated steel | Moderate — coating protects until breached, then rapid rust progression | 3-5 years | Budget installs, temporary housing, low-humidity climates |
| Plastic / nylon | No metal corrosion, but cracks and strips under load | 1-3 years under regular use | Lightweight or temporary use; not recommended for primary long-term hardware |
The pattern is clear: spending a few dollars more on material quality at the point of purchase eliminates years of repeated replacements, retightening sessions, and the creeping frustration of toilet seat and accessories that degrade faster than you'd expect.
Professional-Grade Fixing Systems Worth Considering
OEM-quality hardware — the kind that toilet seat manufacturers install at the factory — consistently outperforms the generic universal kits sold at most retail stores. Why? Because OEM-grade components are engineered for specific load tolerances, mounting configurations, and environmental conditions rather than designed to be "good enough" for the broadest possible range of toilets.
This distinction matters more than most people realize. A factory-installed seat feels rock-solid because the hardware was matched to the exact bowl geometry, hinge mechanism, and weight distribution of that particular seat. When you replace worn hardware with a generic kit, you're approximating that original engineering — and the approximation is often close, but not perfect. Slightly thinner washers, marginally softer bolt material, or a hinge pin that's a fraction too loose all contribute to that subtle wobble that returns months after installation.
Toilet seat brands and sanitaryware OEMs increasingly source their fixing systems from specialized manufacturers who focus exclusively on mounting hardware precision. Tianyun's toilet seat fixing systems and hinge kits, for instance, are engineered specifically for seat manufacturers and OEMs seeking factory-level installation quality. Their product line includes top-fix kits with precision-machined expanding anchors, stainless steel mounting bases that resist corrosion across the full range of bathroom conditions, hinge mounting kits calibrated for specific seat weights, and custom fixing solutions tailored to non-standard bowl geometries. These are the kinds of purpose-engineered toilet seat hardware systems that deliver the tight, zero-play fit consumers associate with a brand-new toilet — because they're literally the same grade of hardware that goes on at the factory.
What makes this category of hardware different from a standard retail kit? Three things. First, material consistency — OEM-grade stainless steel mounting bases use controlled alloy compositions rather than whatever stainless variant happens to be cheapest that quarter. Second, dimensional precision — bolt tolerances are tighter, washer thicknesses are matched to specific porcelain rim profiles, and hinge pins are ground to exact diameters. Third, compatibility engineering — custom fixing solutions account for the specific bolt spacing, hole diameter, and hinge geometry of the seat they're designed for, rather than relying on "universal" sizing that compromises in every direction to fit the most toilets possible.
Does every homeowner need OEM-grade replacement parts for commode hardware? Not necessarily. A quality universal kit in stainless steel handles most residential situations well. But if you've been through two or three generic kits that keep loosening, or if your toilet uses a non-standard mounting configuration that universal kits don't quite fit, professional-grade fixing systems close that gap permanently. The upfront cost is modestly higher; the long-term stability is noticeably superior.
Material quality and engineering precision get you a seat that stays tight for years — but even the best hardware can't help if it's designed for a different toilet brand's mounting system. And brand compatibility, especially across manufacturers like American Standard, Kohler, and TOTO, introduces its own set of challenges that catch homeowners off guard.
Matching Replacement Kits to Popular Toilet Brands
A stainless steel bolt with perfect corrosion resistance still fails if it doesn't physically fit your toilet's mounting system. And brand-specific mounting quirks are more common than most homeowners expect. American Standard, Kohler, TOTO, and dozens of other manufacturers each make subtle — sometimes not-so-subtle — design choices in hinge geometry, bolt configuration, and mounting hole placement that can render an otherwise excellent kit completely unusable.
The frustrating part? These differences rarely show up in product descriptions. You'll see "fits most standard toilets" on the packaging, buy with confidence, and then discover that your particular model uses a proprietary hinge bracket that's 2mm too narrow for the kit's bolt. Understanding how major brands diverge from the generic "standard" is what keeps a straightforward hardware swap from turning into a multi-trip ordeal.
American Standard Toilet Seat Hardware Compatibility
American Standard is one of the most searched brands when it comes to american standard toilet seat parts — and for good reason. Their product line spans decades of models, each with its own hardware personality. If you own an American Standard toilet, here's what you need to know before grabbing a universal kit off the shelf.
Many American Standard models use proprietary hinge designs that differ significantly from generic mounting hardware. Where a standard seat might use a simple pin hinge with two vertical bolts, certain American Standard seats employ integrated barrel hinges with locking tabs, set screws, or snap-in brackets that only accept matching american standard toilet seat hinges. Attempting to install a universal hinge assembly on one of these seats often results in a hinge that physically attaches but doesn't pivot correctly — or one that wobbles because the bracket width doesn't match the bowl's mounting points.
Bolt configuration adds another layer of complexity. Some american standard toilet seats use a top-mount system where rubber plugs must be installed into the mounting holes before the bolts go in. Skip those plugs — or lose them in the packaging — and the bolts sit loosely in oversized holes, producing exactly the kind of wobble you're trying to eliminate. If your kit came with rubber plugs and you're not sure what they're for, check the installation instructions carefully. They're not optional spacers; they're structural components required for proper mounting.
The american standard soft close toilet seat models present an additional compatibility challenge. Their slow-close mechanisms rely on matched damped hinges that are calibrated for the specific weight and dimensions of that seat. A generic soft-close hinge kit may close too quickly, too slowly, or unevenly because the damping resistance doesn't correspond to the lid's mass. When sourcing replacement parts American Standard toilet owners need, the safest path is to match the exact hinge model number stamped on the existing hardware — not just the toilet model number, but the hinge part number itself.
Finding Compatible Kits for Any Brand or Model
American Standard gets the spotlight because of its market share and search volume, but every major brand has its own compatibility pitfalls. Kohler's Cachet and Reveal lines use quick-release hinge mechanisms with proprietary grip tabs. TOTO's SoftClose seats integrate the damping cylinder directly into the hinge barrel, making generic hinge swaps nearly impossible. Duravit and Villeroy & Boch, popular in European-influenced bathrooms, often use metric bolt sizing that won't accept standard 5/16-inch or 3/8-inch American hardware.
So how do you find the right toilet seat replacement kit when brand-specific quirks keep throwing curveballs? These steps work regardless of manufacturer:
- Flip the seat over and look for a model or part number — most manufacturers stamp this on the underside of the seat or inside the hinge housing. This number is your fastest shortcut to ordering exact-match replacement hardware.
- Check inside the toilet tank — the toilet's model number is typically printed or stamped on the porcelain wall inside the tank. Cross-reference this number on the manufacturer's website to find compatible seat hardware and hinge kits.
- Photograph your existing hardware from multiple angles — capture the bolt heads from above, the nut style from below, and the hinge assembly from both sides. These images let store associates or online support teams identify the correct kit visually.
- Bring the old parts to a plumbing supply store — a physical comparison against stock hardware is still the most reliable way to match bolt diameter, thread pitch, and hinge bracket width when model numbers have worn off.
- Contact the manufacturer directly — provide the toilet model number and describe the seat's hinge style. Most major brands maintain parts catalogs and can confirm the exact toilet seat for American Standard toilet, Kohler, TOTO, or any model in their lineup.
Keeping your old hardware as a reference — even the corroded, stripped pieces — is the single best way to avoid buying an incompatible replacement kit.
That worn bolt you're tempted to toss in the trash? It carries critical dimensional information: diameter, thread pitch, shank length, and head style. A new bolt that matches those four measurements will fit your toilet. One that doesn't match on any single dimension probably won't.
For toilet seat brands and sanitaryware OEMs dealing with cross-brand compatibility challenges at a larger scale, the problem is even more complex. Each toilet model in a product line may require slightly different mounting hardware, and maintaining separate SKUs for every configuration drives up cost and inventory. This is where OEM suppliers like Tianyun play a critical role — their custom fixing solutions are engineered for cross-brand hardware compatibility, allowing seat manufacturers to standardize mounting systems that adapt to varying bowl geometries without sacrificing installation stability. For the individual homeowner, this kind of engineering trickles down as american standard replacement toilet seats and other branded products that ship with better-fitting, more reliable hardware straight out of the box.
Whether you're replacing hardware on an american standard toilet or a lesser-known imported model, the process follows the same logic: identify the existing hardware precisely, match every dimension before purchasing, and resist the assumption that "universal" means "guaranteed to fit." The few minutes spent measuring, photographing, and cross-referencing save hours of frustration — and ensure the wobble stays gone for good.
Frequently Asked Questions About Toilet Seat Replacement Kits
1. What is included in a standard toilet seat replacement kit?
A standard toilet seat replacement kit typically contains mounting bolts (seat post bolts), wing nuts or hex nuts, rubber or plastic washers, hinge assemblies or hinge pins, adhesive bumper pads, and decorative bolt caps. Some kits also include plastic anchors or stabilizer bushings for bowls with oversized mounting holes. The exact contents vary depending on whether the kit uses a top-fix or bottom-fix mounting style, so always confirm the mounting method your toilet requires before purchasing.
2. How do I know if I need a top-fix or bottom-fix toilet seat kit?
Check the back of your toilet bowl. If you can see and reach the underside of the bolt holes — meaning the back of the toilet is open — you need a bottom-fix kit. If the toilet base is enclosed, skirted, or mounted against a wall with no access from below, a top-fix kit is required. Top-fix kits use expanding anchors tightened from above, while bottom-fix kits use a traditional bolt-through approach secured with a nut underneath. Choosing the wrong style means the kit physically cannot attach to your toilet.
3. Can I use a universal toilet seat replacement kit on any toilet?
Universal kits fit most standard residential toilets with a bolt hole spacing of approximately 5.5 inches (140mm) and conventional hinge designs. However, they do not work on every toilet. Brands like American Standard, Kohler, and TOTO sometimes use proprietary hinge mechanisms, non-standard bolt diameters, or unique mounting configurations that require brand-specific hardware. Always measure your bolt spacing, hole diameter, and check your hinge type before assuming a universal kit will be compatible.
4. How do I remove a corroded or seized toilet seat bolt?
Start by spraying penetrating oil such as WD-40 or PB Blaster onto the bolt-nut junction from both above and below. Let it soak for 15 to 30 minutes before attempting to turn the nut with an adjustable wrench. If the bolt still won't budge, use a small hacksaw blade or an oscillating multi-tool with a metal-cutting attachment to carefully saw through the bolt shank from below. Keep the blade flat against the porcelain to avoid scratching. Never use excessive force, as this can crack the toilet bowl.
5. What is the best material for toilet seat hardware that lasts?
Stainless steel is the most durable option for toilet seat hardware. Its self-healing chromium oxide layer resists rust, bathroom chemicals, and hard water, retaining roughly 98% of its tensile strength after a decade of humidity exposure. Brass offers solid performance lasting 8 to 12 years, while zinc-plated steel typically lasts 3 to 5 years before the coating breaks down. Plastic hardware is the least durable, often cracking or stripping within 1 to 3 years. OEM-grade suppliers like Tianyun produce stainless steel mounting bases and precision-engineered fixing systems designed for long-term residential and commercial durability.
Apply This Insight to Your Project
Tell us what you are building and how the topic “That Wobbly Seat? The Right Toilet Seat Replacement Kit Ends It” relates to your application. Our engineering team can help evaluate the next step.