Every Toilet Seat Part You Need to Know
Imagine this: you sit down and feel the toilet seat shift sideways beneath you. Or maybe the lid slams shut with a bang that echoes through the house every single time someone uses the bathroom. You know something needs fixing — but when you search for a solution, you realize you cannot even name the part that is causing the problem. Is it a hinge? A bolt? Some rubber piece underneath? Most guides online lump the seat in with the tank, bowl, flapper, and fill valve, giving you a massive toilet parts overview when all you really need is a focused look at the seat assembly itself.
This guide is different. It zooms in exclusively on the parts of a toilet seat — nothing more, nothing less.
Why Most People Cannot Name Their Toilet Seat Parts
Here is the thing: toilet seats seem too simple to study. A lid, a ring, and a couple of bolts — how complicated can it be? That assumption is exactly why so many homeowners end up ordering the wrong replacement hardware or struggling to describe a problem to a plumber. A toilet seat is actually an assembly of distinct toilet seat components, each with a specific name and a specific job. The lid is not the seat. The bumpers are not the stabilizers. And the hinge system alone can include pins, barrels, damper cylinders, and release buttons depending on the model. Without knowing these toilet seat parts names, you are essentially guessing — and guessing costs time, money, and repeat trips to the hardware store.
Knowing each component by name changes everything. You can pinpoint whether a wobble comes from a worn stabilizer or a loose mounting bolt. You can search for exactly the right part online instead of scrolling through pages of irrelevant results. And when you call a plumber or walk into a retailer, you can communicate the issue clearly and get the right fix on the first try.
Every toilet seat is an assembly of distinct, replaceable parts — and knowing them saves you time, money, and frustration.
What This Guide Covers
Think of what follows as a toilet seat parts diagram in text form — a complete, layered walkthrough of every piece in the assembly, organized from top to bottom. You will learn about the lid, the seat ring, the hinge mechanism and its many variations, mounting bolts and nuts, protective bolt caps, rubber bumpers, and stabilizers that prevent side-to-side movement. Beyond simple identification, each section explains how these toilet seat parts interact, why they fail, and how to match symptoms like wobbling, slamming, or sliding to the specific component at fault. Whether you own a basic friction-hinge seat or a modern soft-close model, every part that makes up your seat assembly is covered here.
The seat may look like one solid piece when it is closed, but underneath that simple appearance sits a collection of small, purpose-built components — and each one is worth understanding before something breaks.
Complete Toilet Seat Anatomy from Top to Bottom
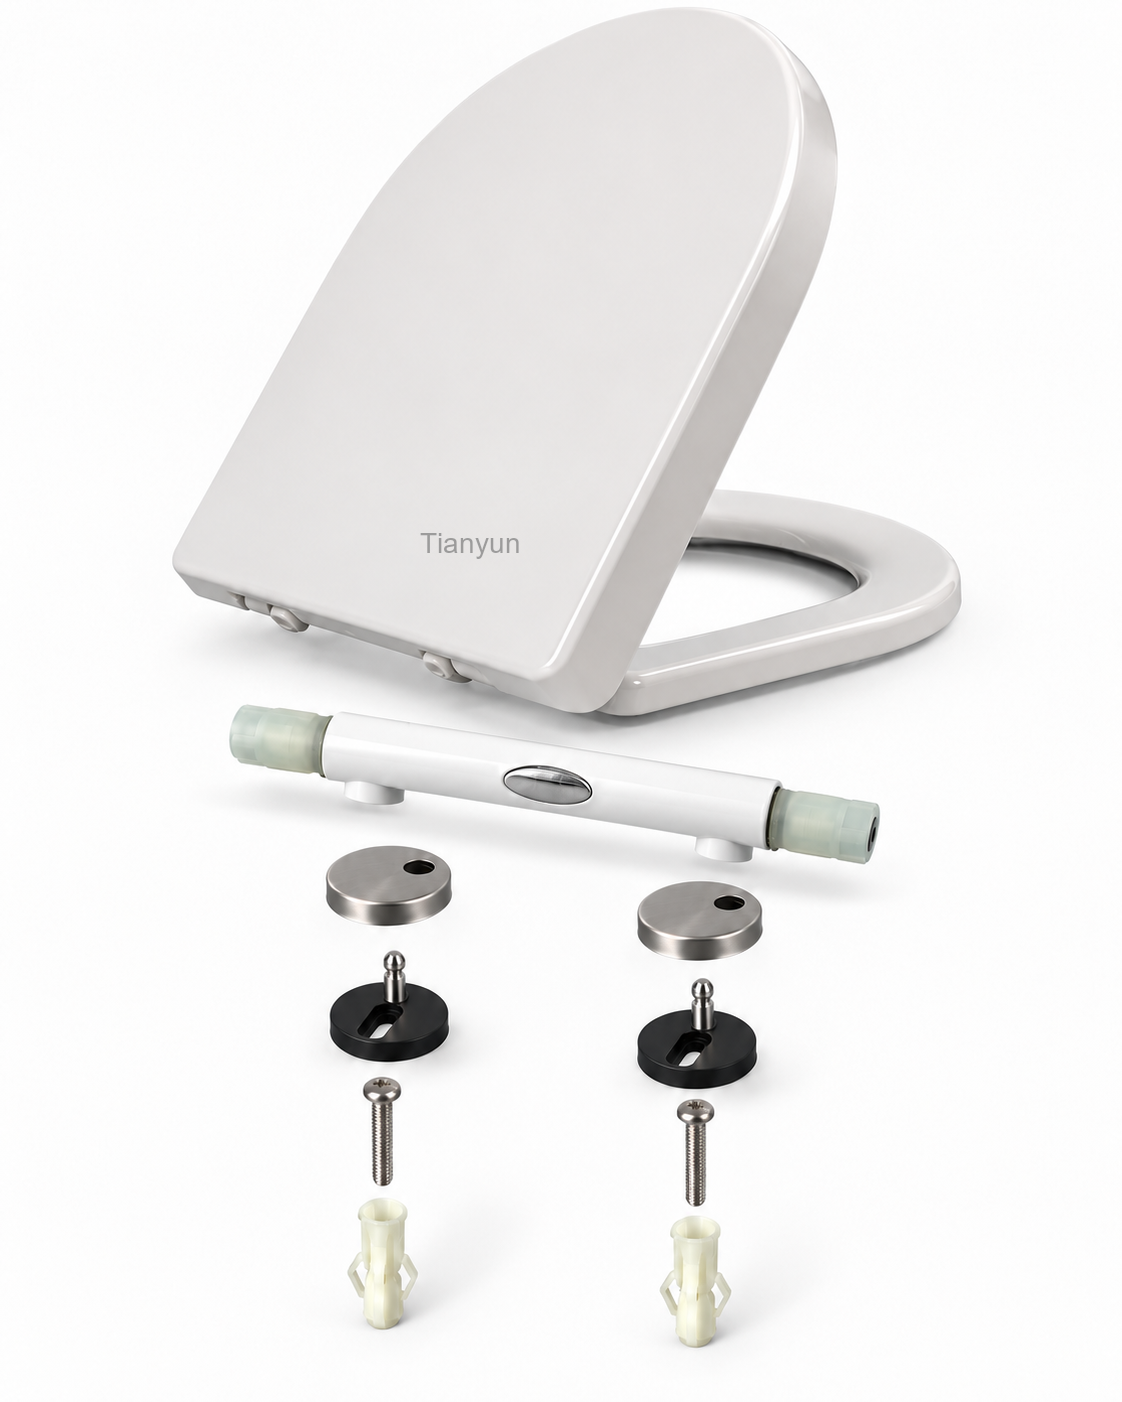
Picture yourself standing over the toilet, looking straight down. What you see first is the topmost surface of the assembly — and from that vantage point, every single toilet seat piece occupies a specific layer. Understanding this spatial order is the fastest way to identify any component by location alone, even if you have never touched a screwdriver. The following breakdown walks through all the commode seat parts from the very top surface to the underside where hardware meets porcelain.
The Lid and Seat Ring
The two largest and most visible toilet lid parts sit right at the top of the assembly:
- Lid (cover): The flat, top panel that folds up and down over the seat opening. It shields the bowl when the toilet is not in use and helps contain moisture and odors.
- Seat ring: The open, oval- or round-shaped ring directly beneath the lid. This is the part users actually sit on, and its shape must match the toilet bowl — either round or elongated.
Together, the lid and seat ring form the two broadest toilet seat pieces in the assembly. They connect to the bowl through a shared hinge mechanism at the rear, which brings us to the next layer down.
Hinges, Bolts, and Mounting Hardware
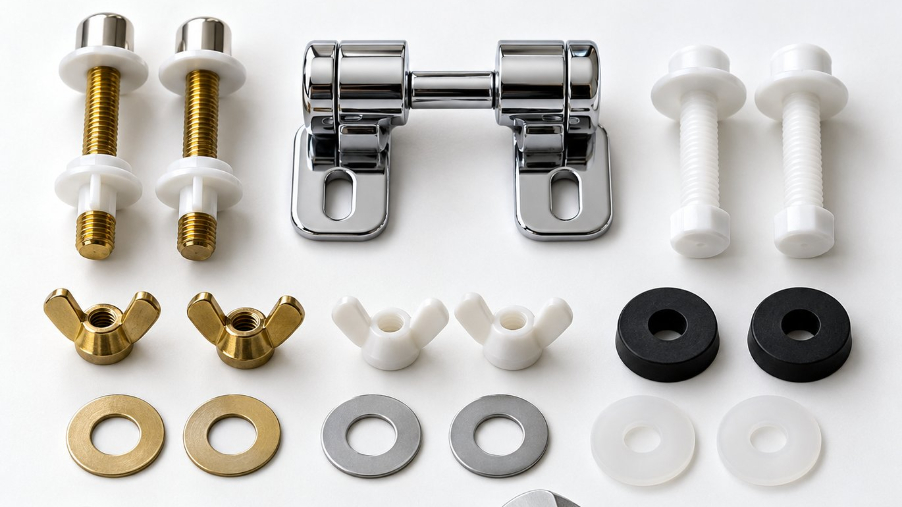
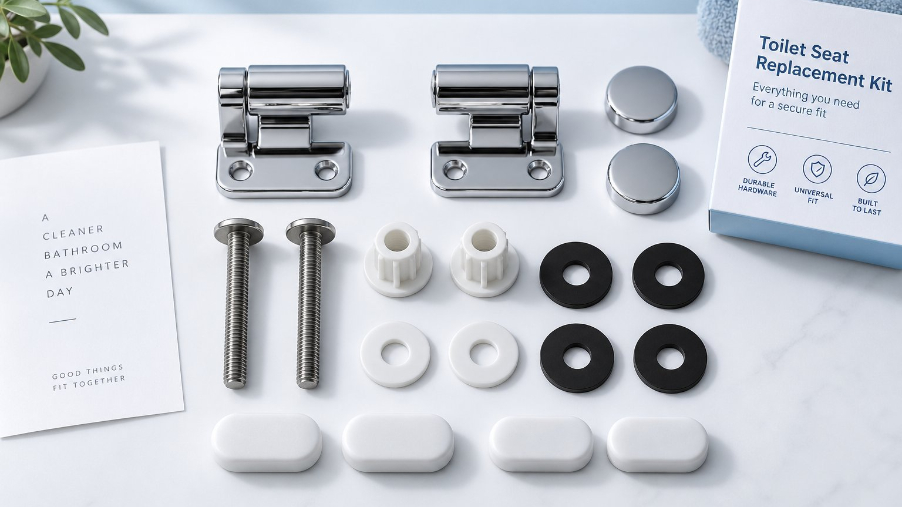
Move your eyes toward the back of the seat, right where the lid and ring pivot. This is where the toilet seat hardware lives — and it involves more individual parts than most people expect:
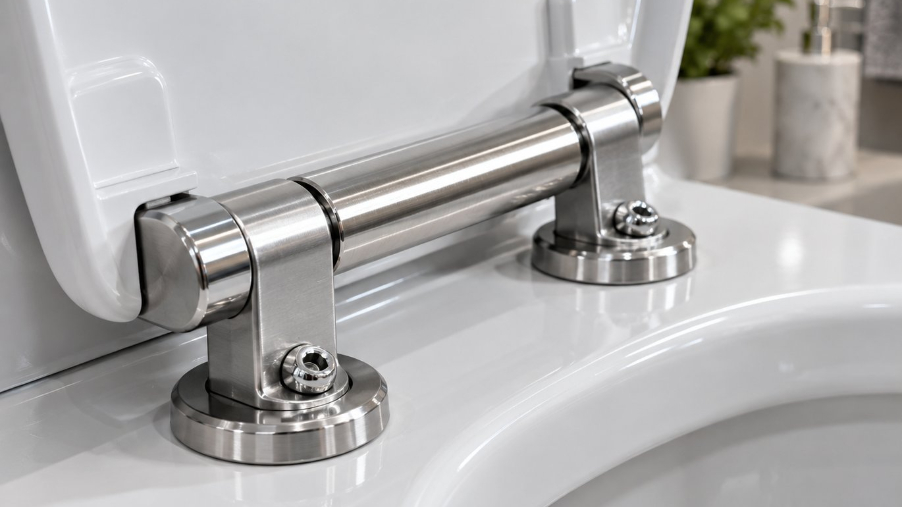
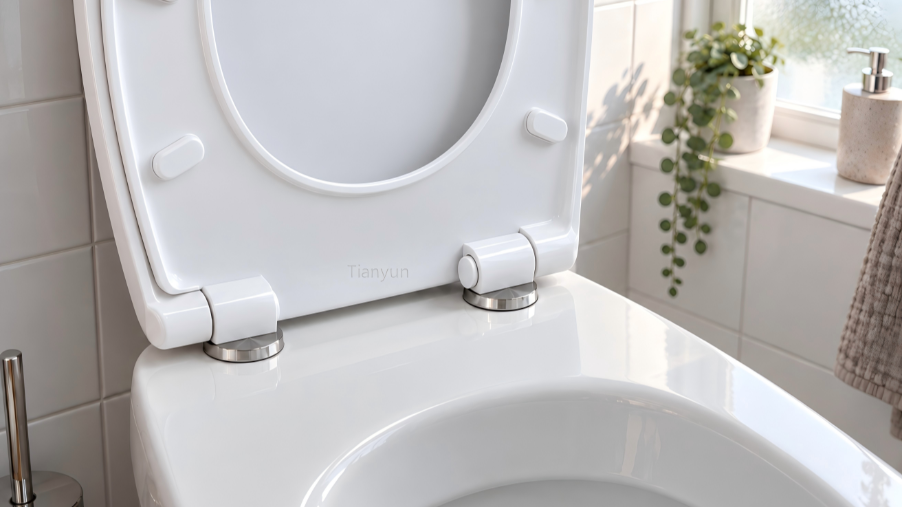
- Hinge mechanism: The pivoting joint that allows the lid and seat ring to swing open and closed. Depending on the model, it may include dampers for slow closing or release buttons for quick removal.
- Hinge posts (or pins): Small rods or pegs that act as the pivot point inside each hinge barrel, enabling smooth rotation.
- Hinge plates (or mounting brackets): Flat plates that sit on the bowl rim and anchor the entire hinge assembly in place. These are a key piece of toilet lid hardware because they distribute stress across the porcelain surface.
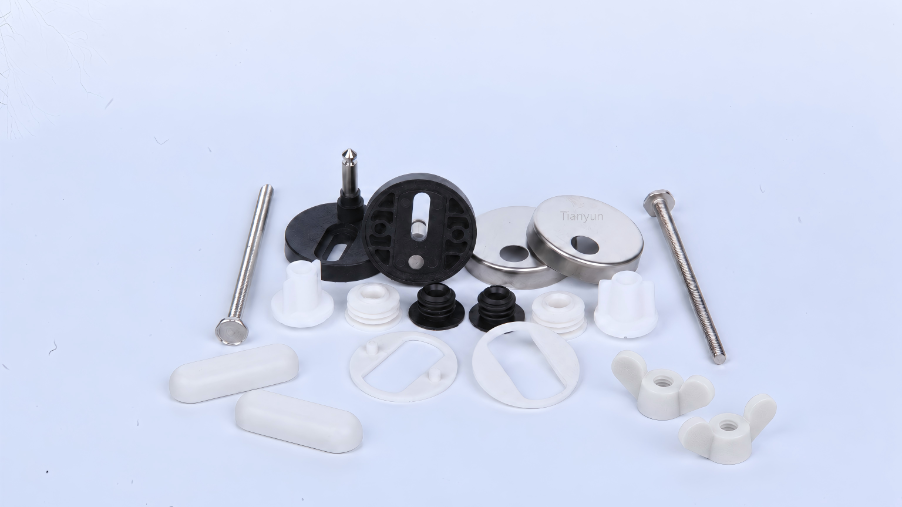
- Mounting bolts: Threaded rods that pass down through the hinge plates and through the bolt holes in the bowl rim, physically securing the seat to the toilet.
- Nuts (wing nuts or plastic nuts): Fasteners that thread onto the mounting bolts from underneath the bowl rim, clamping everything tight. Wing nuts allow hand-tightening, while plastic nuts resist corrosion.
- Bolt caps (or covers): Small snap-on or hinged plastic covers that conceal the bolt heads on top, giving the hardware toilet seat connection a clean, finished appearance.
This cluster of toilet bowl seat parts handles all structural attachment. If any single piece loosens or corrodes, the entire seat can wobble, shift, or detach — which is why identifying exactly which fastener has failed matters so much.
Bumpers, Caps, and Stabilizers
Flip the seat ring over and you will find a final set of small but essential components pressed against the porcelain:
- Rubber bumpers (seat ring): Typically four small rubber or silicone pads bonded to the underside of the seat ring. They cushion contact with the bowl rim, protect the porcelain from scratches, and dampen noise when the seat is lowered.
- Rubber bumpers (lid): Two to four additional pads on the underside of the lid that prevent it from striking the seat ring or tank when opened or closed.
- Stabilizers (grippers or anti-slide washers): Components mounted near the hinge area that grip the bowl surface and prevent the seat from sliding side to side during use. These are often the first parts to wear out and a leading cause of that familiar wobble.
Every item in the list above occupies a distinct position in the assembly. By simply noting where on the seat a problem appears — top surface, rear hinge zone, or underside contact points — you can narrow down the responsible part almost instantly. That location-based logic becomes even more powerful once you understand how each hinge type changes the parts involved, which is exactly where the mechanical differences start getting interesting.
Toilet Seat Hinge Types and Their Sub-Components
Not all hinges are built the same way — and the type hiding behind your toilet seat determines everything from how the lid moves to which replacement parts will actually fit. A hinge is more than just a pivot point. It is the most mechanically complex part of the entire seat assembly, and swapping the wrong component into the wrong hinge type is one of the most common mistakes homeowners make when attempting a fix. Understanding the differences between hinge categories is the key to choosing the right toilet seat attachment hardware and getting a repair right the first time.
Standard Friction Hinges
The simplest and most traditional design, standard friction hinges rely on a basic pin-and-barrel mechanism. A metal or plastic pin passes through a cylindrical barrel molded into the hinge body, creating a pivot that lets the lid and seat ring rotate freely. There are no dampers, no springs, and no release mechanisms — just raw mechanical rotation controlled by the natural friction between the pin and barrel surfaces.
You will find these toilet seat fittings on most budget and mid-range seats. They are lightweight, inexpensive, and easy to replace because the sub-component list is short: a hinge pin, a barrel housing, and sometimes a small washer or bushing that sits between the pin and barrel to reduce wear. The trade-off? Without any damping, the lid falls at whatever speed gravity dictates. That means slamming — and over time, the friction surfaces wear smooth, causing the lid to drop even faster or refuse to stay upright when raised.
When a standard friction hinge wears out, the entire hinge unit usually needs replacing rather than just a single internal part. The good news is that these are widely available and often sold as universal toilet seat fittings kits compatible with most bolt-hole spacings.
Soft-Close and Quick-Release Hinge Systems
Soft-close hinges solve the slamming problem by adding a damper mechanism inside or alongside the hinge barrel. When you release the lid, the damper applies controlled resistance to slow the descent, producing that quiet, graceful closing motion. But what exactly creates that resistance?
Most soft-close systems use one of two damping technologies. The first is a hydraulic damper cylinder — a small sealed cartridge filled with silicone oil. As the hinge rotates, an internal rotor pushes against the oil, generating fluid resistance that decelerates the lid. The damping torque must be carefully matched to the weight and size of the seat to feel natural rather than sluggish. The second approach uses a spring-loaded cartridge, where a coiled spring inside the hinge barrel absorbs rotational energy and releases it gradually. Both types are designed as maintenance-free, sealed units with cycle lives that can reach tens of thousands of open-close repetitions before performance degrades.
When a soft-close hinge eventually fails — and they do, usually after several years — the seat starts slamming again because the damper has lost its resistance. Toilet seat dampers replacement is sometimes possible if the manufacturer sells the damper cartridge separately, but in many cases the damper is integrated into a proprietary hinge assembly that must be swapped as a complete unit. Identifying whether your hinge uses a removable damper cylinder or a sealed all-in-one barrel is critical before ordering parts.
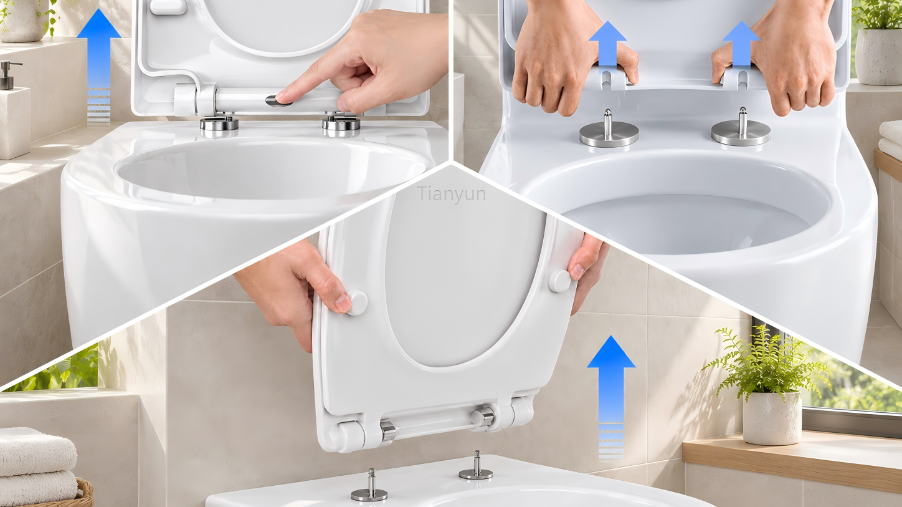
Quick-release hinges add another layer of functionality. These feature release buttons or locking tabs at the hinge posts that allow you to lift the entire seat straight off the bowl without unscrewing any bolts. A simple push of both buttons disengages the seat from the hinge plates, which remain bolted to the porcelain. This makes thorough cleaning around the hidden toilet seat fittings area far easier — no tools required. Many modern seats combine soft-close damping with quick-release capability in a single hinge assembly, which means the sub-component list grows to include release buttons, locking tabs, spring clips, and guide channels in addition to the damper mechanism.
The toilet seat holder mechanism within a quick-release hinge must be robust enough to keep the seat locked firmly during use yet disengage smoothly when the release buttons are pressed. Worn locking tabs can cause the seat to feel loose or pop off unexpectedly, so these small plastic components are worth inspecting if your quick-release seat has started shifting.
Adjustable Hinges for Alignment
Sometimes a seat sits slightly off-center on the bowl — shifted a few millimeters to the left or right. Adjustable hinges solve this with elongated adjustment slots in the hinge plate rather than fixed round bolt holes. You loosen the mounting bolts, slide the entire hinge assembly laterally until the seat is centered, and retighten. The sub-components here include the slotted hinge plate, guide rails or grooves that control the sliding range, and locking washers that grip the plate once the bolts are tightened to prevent future drift.
These toilet seat attachments are particularly useful on bowls where the bolt holes are not perfectly symmetrical or where a replacement seat from a different manufacturer does not align precisely with the original mounting points. Adjustable hinges can function as a standalone toilet seat holder solution or be combined with soft-close or quick-release features in premium models.
| Hinge Type | Key Sub-Components | Closing Behavior | Replaceability |
|---|---|---|---|
| Standard Friction | Pin, barrel, bushing or washer | Free-fall (no damping); relies on friction alone | High — widely available universal kits |
| Soft-Close | Pin, barrel, hydraulic damper cylinder or spring cartridge, rotor | Controlled slow descent; quiet closing | Moderate — damper cartridge may be replaceable separately or require full hinge swap |
| Quick-Release | Hinge posts, locking tabs, release buttons, spring clips, guide channels | Varies (often paired with soft-close damping) | Moderate — release buttons and locking tabs can wear; may need manufacturer-specific parts |
| Adjustable | Slotted hinge plate, guide rails, locking washers | Depends on base hinge type (friction or soft-close) | High — slotted plates are broadly compatible with standard bolt spacing |
Each hinge category introduces its own set of internal parts — and those parts dictate exactly what you can replace individually versus what forces a full assembly swap. That distinction matters even more when you look one layer deeper, at the mounting hardware that anchors the hinge to the bowl itself and how bolt system design varies between manufacturers.
Mounting Hardware Variations Explained
The hinge may be the most mechanically complex part of the assembly, but it cannot do its job without the mounting hardware that locks it to the bowl. This is the layer most people never think about — until a bolt corrodes, a nut strips, or the entire seat starts rocking because the wrong toilet seat hardware kit was used during installation. Two fundamentally different bolt systems exist, and choosing between them is not a matter of preference. It depends on your toilet's design.
Top-Mount vs. Bottom-Mount Bolt Systems
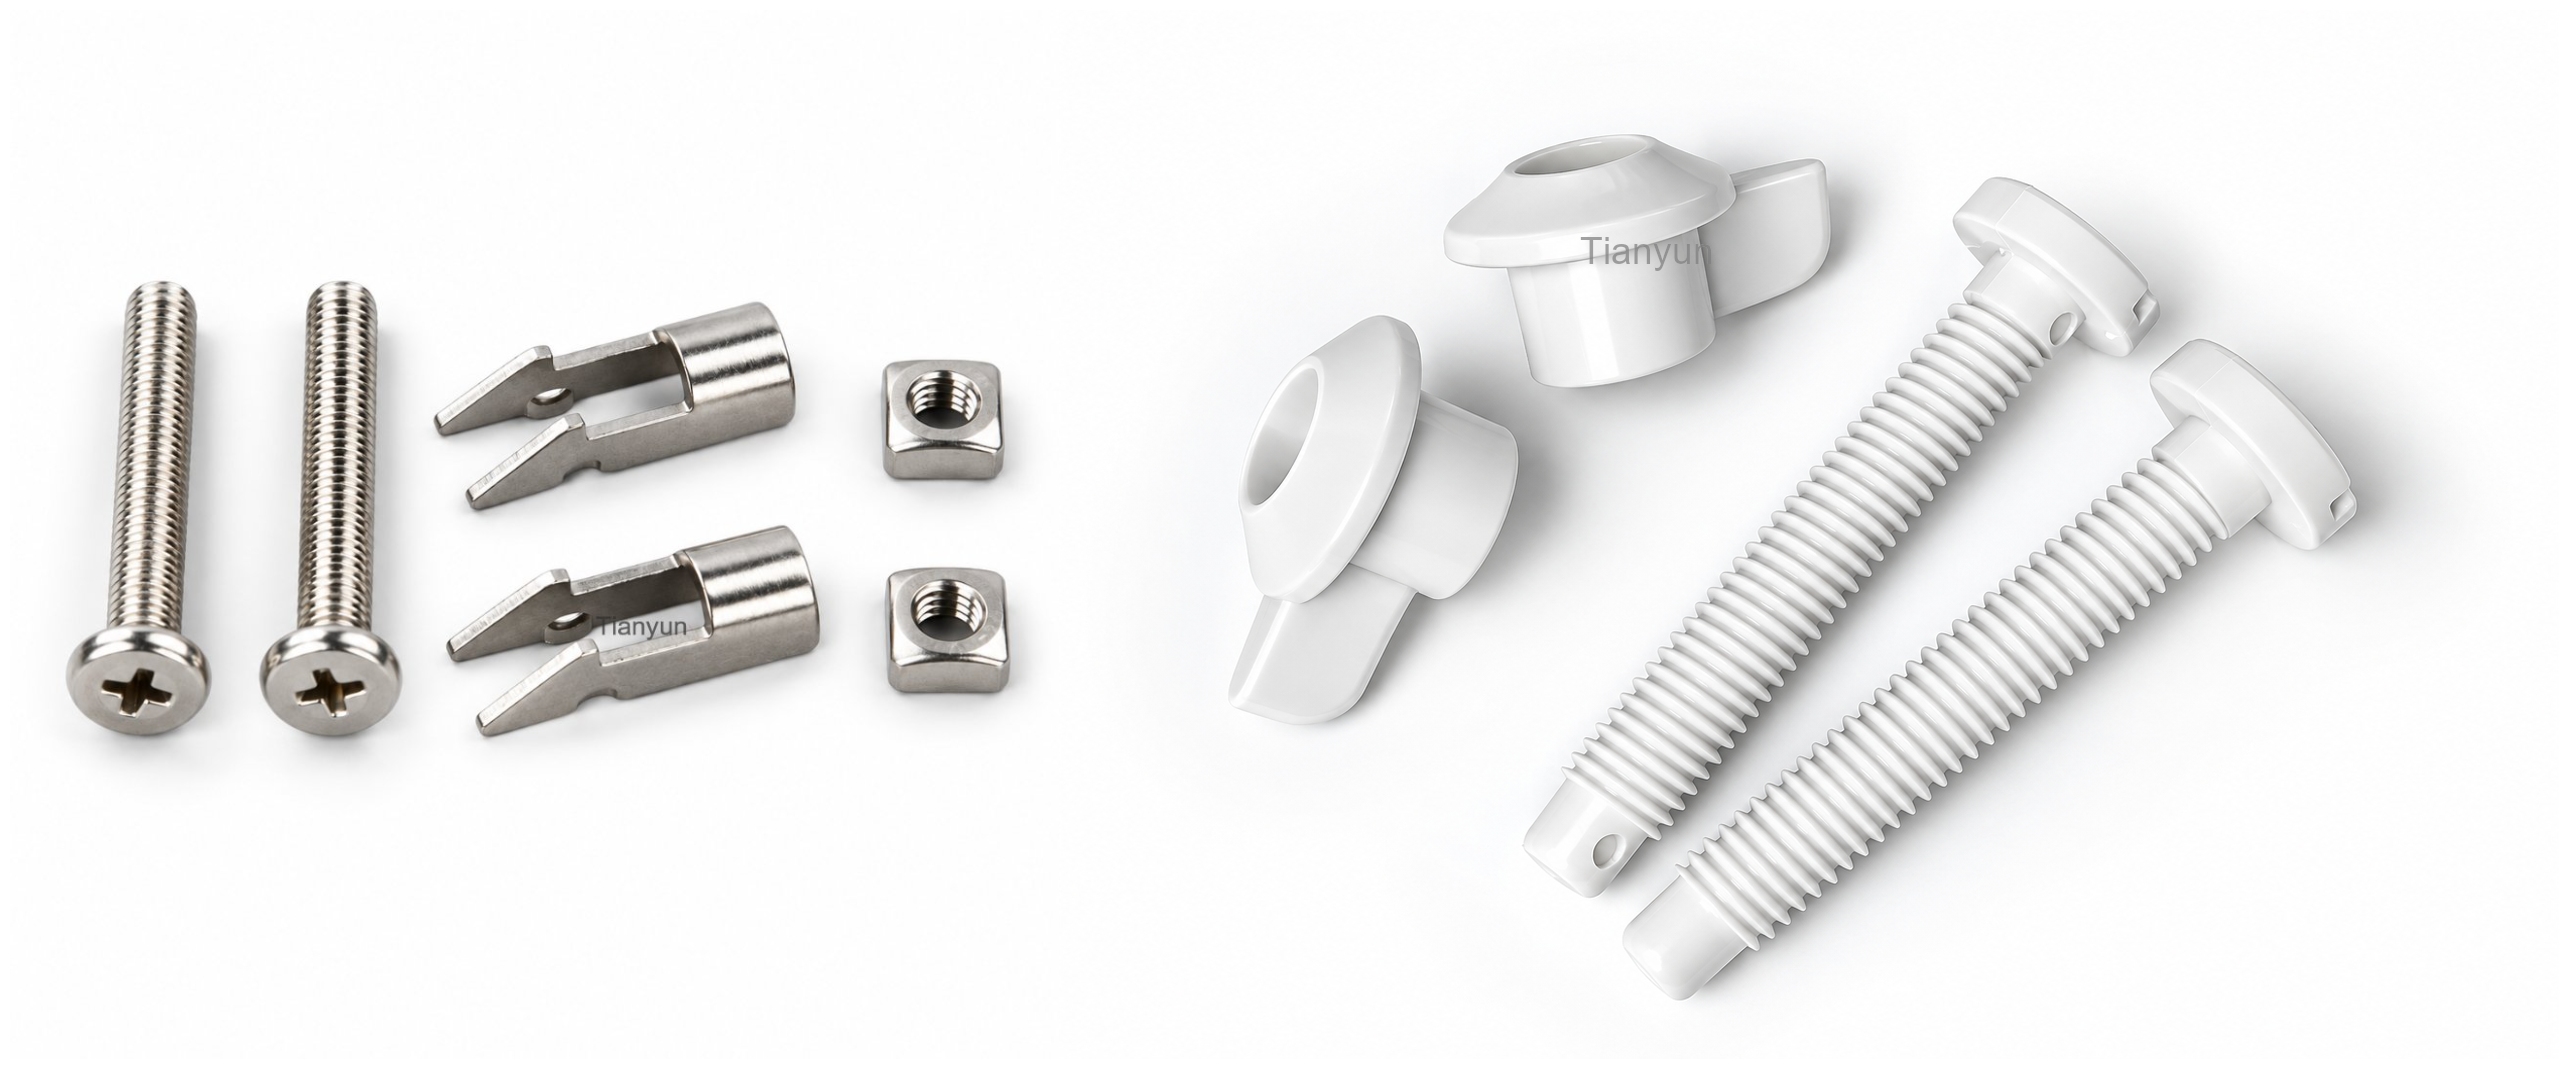
The bottom fixing system is the traditional standard. Two long bolts drop through the hinge plates and pass downward through the bolt holes in the porcelain rim. You then reach underneath the bowl and thread a nut — usually a wing nut or hex nut — onto each bolt, tightening until the seat sits firmly. This approach is straightforward and has been the default toilet seat fixing kit configuration for decades. It works perfectly on open-back toilets where the underside of the bowl rim is fully accessible.
The top-mount system flips that process. Instead of securing nuts from below, you tighten screws entirely from above. Expanding anchors, toggle-style sleeves, or rubber bushings drop into the bolt holes and grip the porcelain from inside when the top screw is turned. There is no need to reach underneath at all. This design is increasingly common on modern back-to-wall, skirted, and wall-hung toilets where the enclosed base makes underside access impossible. It also appeals to anyone who simply wants a faster, tool-minimal toilet seat installation kit experience.
Which system should you use? Your toilet decides for you. If the bowl has open, accessible bolt holes from below, bottom fixing works reliably. If the bowl is enclosed or skirted, top-mount is likely your only option. Trying to force the wrong system leads to instability and potential damage to the porcelain.
| Criteria | Top-Mount System | Bottom-Mount (Bottom Fixing) System |
|---|---|---|
| Ease of Installation | Very easy — all work done from above; no under-bowl access needed | Moderate — requires reaching underneath the bowl to tighten nuts |
| Durability | Strong — expanding anchors resist loosening over time | Strong — but nuts may loosen with vibration and need periodic retightening |
| Adjustability | Simple — lift hinge caps and adjust screws from the top | Less convenient — readjustment means reaching under the bowl again |
| Common Material Options | Plastic screws with rubber or nylon expanding anchors; some stainless steel | Plastic bolts with wing nuts; metal bolts with metal nuts; stainless steel sets |
Metal vs. Plastic Hardware Considerations
The material your toilet fittings are made from affects longevity just as much as the mounting style. Three main options dominate the market:
- Plastic bolts and wing nuts: Lightweight, completely corrosion-resistant, and easy to hand-tighten without tools. They are the most common hardware for toilet seats in residential settings. The downside is that overtightening can crack plastic threads, and they offer slightly less clamping force than metal.
- Metal bolts with metal nuts: Typically brass or zinc-plated steel. These deliver stronger clamping pressure and greater rigidity, making them a solid choice for heavy-use environments. The trade-off is rust. In a bathroom's humid atmosphere, uncoated metal toilet hardware can corrode within a few years, fusing the bolt and nut together and turning a simple toilet seat hardware replacement into a hacksaw job.
- Stainless steel bolts and nuts: The best of both worlds — strong clamping force and excellent corrosion resistance. They cost more, but for homeowners who want long-term durability without worrying about rust stains bleeding onto the porcelain, stainless steel is the premium choice.
One final detail often overlooked: bolt cap covers. These small plastic lids snap or hinge over the exposed bolt heads on top of the bowl rim. They serve no structural purpose, but they give the installation a finished, tidy appearance and prevent dust or moisture from collecting on the bolt heads. Most toilet seat fixing kit packages include them, though they are also sold separately as universal accessories.
Bolts and nuts handle the structural connection between seat and bowl — yet they are not the only parts sitting between porcelain and plastic. Just underneath the seat ring, a quieter set of components works to absorb impact, protect surfaces, and stop lateral movement entirely.
Bumpers, Stabilizers, and Protective Components
Bolts and hinges get all the attention when a toilet seat starts misbehaving, but some of the hardest-working parts of a toilet seat are the smallest ones — quiet little pads and grips that sit hidden underneath, doing their job so well that most people forget they exist. Until they wear out. Then you hear the clatter, feel the sideways slide, or notice scratches forming on the porcelain rim. These are the protective components, and understanding what they do — and when they need replacing — can save you from misdiagnosing a problem that has nothing to do with bolts or hinges at all.
What Bumpers Do and Where They Sit
Flip your toilet seat upside down and you will spot them immediately: small, round pads made of rubber or silicone, bonded or press-fitted to the underside of both the seat ring and the lid. These are bumpers, and they serve a dual purpose that is easy to underestimate.
First, bumpers act as cushions. Every time the seat ring lowers onto the bowl rim, bumpers absorb the impact, preventing hard plastic or wood from striking glazed porcelain directly. Without them, repeated contact would gradually chip or scratch the bowl's finish. Second, bumpers dampen noise. Even on a soft-close seat, the final moment of contact produces sound — bumpers muffle it, turning a potential clack into a barely noticeable tap.
A standard toilet seat typically has four bumpers on the underside of the seat ring — two near the front and two near the back — and two to four bumpers on the underside of the lid. The seat ring bumpers bear body weight and endure the most wear, while the lid bumpers prevent the cover from banging against the seat ring or, when opened fully, against the tank. Together, they are among the most common toilet lid accessories, yet they rarely get the credit they deserve.
Over time, bumpers compress, crack, peel off, or simply fall into the bowl and get flushed away. When even one goes missing, you will notice an uneven resting surface, increased noise, and direct plastic-to-porcelain contact on that corner of the seat.
Stabilizers That Prevent Seat Wobble
If bumpers handle vertical impact, stabilizers handle lateral movement. Also called seat grippers or anti-slide washers, stabilizers are components mounted near the hinge area — typically on the underside of the seat where it contacts the bowl rim behind the bolt holes. Their job is simple but critical: grip the porcelain surface and prevent the seat from shifting side to side during use.
Imagine sitting down and feeling the entire seat slide an inch to the left. That unsettling shift is almost always caused by worn or missing stabilizers, not loose bolts. Many homeowners tighten the mounting hardware again and again, only to find the wobble returns within days. The real culprit is a degraded stabilizer that has lost its grip. These components are among the first parts of a toilet seat to wear out because they endure constant friction and body weight with every use.
Some stabilizers are molded directly into the seat's hinge area, while others are separate rubber or plastic pieces that clip or adhere into place. Aftermarket toilet seat stabilizer kit options — like the popular Compac Home Safe-T Bumpers, which screw into the bowl rim to lock the seat in position — have earned dedicated followings among homeowners tired of the constant sliding problem. One useful accessory for toilet cover stability, these kits typically include L-shaped bumper brackets, mounting screws, and alignment bands that take just a few minutes to install.
How to Replace Worn Bumpers and Stabilizers
The good news is that replacement toilet seat feet and bumpers are inexpensive and widely available. Most replacement bumpers come as adhesive peel-and-stick pads — you simply clean the mounting spot with rubbing alcohol, peel off the backing, and press the new bumper firmly into place. Universal packs of four or eight bumpers cost only a few dollars and fit the vast majority of residential seats.
Stabilizers are a different story. Because they interact with both the seat geometry and the bowl rim profile, they tend to be more model-specific. Before purchasing a toilet seat repair kit or standalone stabilizers, check the manufacturer and model number stamped on the underside of your seat. Some brands sell stabilizer kits designed to snap directly onto their hinge posts, while universal aftermarket options use adhesive backing or screw-in mounts to achieve a similar grip.
Not sure whether your bumpers or stabilizers actually need attention? Here are the telltale signs:
- The seat makes a hard clacking or rattling sound when lowered, even gently.
- You can see visible gaps between the seat ring and the bowl rim on one or more corners.
- One or more rubber pads are cracked, compressed flat, or missing entirely.
- The seat slides or shifts sideways when you sit down, despite tight mounting bolts.
- Scratch marks or scuff lines appear on the porcelain rim where the seat contacts it.
- The lid does not rest evenly on the seat ring when closed — one side sits higher than the other.
Replacing these small components is one of the quickest, cheapest fixes in bathroom maintenance. A five-minute swap of a few adhesive bumpers or the addition of an accessory for toilet cover stabilization can eliminate noise, protect porcelain, and restore that solid, planted feel — often solving what seemed like a major wobble problem without touching a single bolt.
Of course, bumpers and stabilizers are only part of the picture. The full inventory of components sitting inside your seat assembly can change dramatically depending on the type of seat you own — standard, soft-close, quick-release, or something more advanced entirely.
How Parts Differ Across Toilet Seat Types
A standard seat and a bidet seat may both bolt onto the same bowl — but the parts inside them could not be more different. The type of toilet seat you own determines how long the component list gets, which pieces are replaceable individually, and how complex a repair might become. If you have ever searched for a toilet seat replacement kit and felt overwhelmed by the options, this is why: each seat category carries its own unique inventory of internal parts on top of the shared basics.
Standard vs. Soft-Close Seat Parts
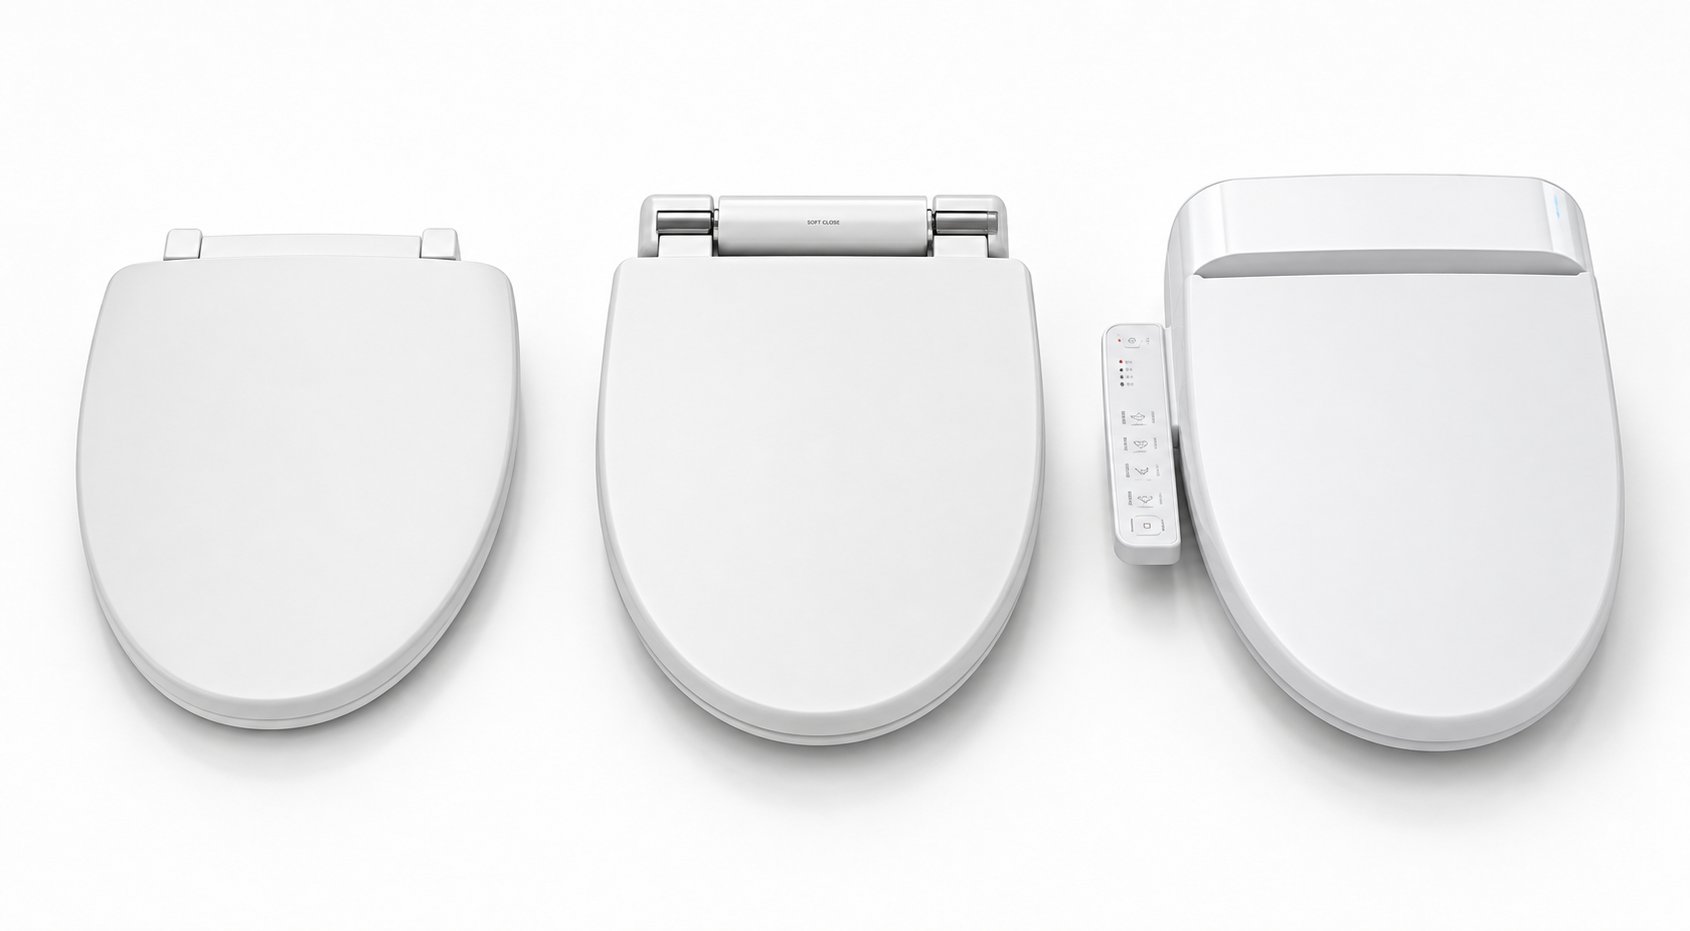
A standard seat keeps things minimal. You get a lid, a seat ring, basic friction hinges, mounting bolts with nuts, bolt caps, and rubber bumpers. That is the entire toilet seat kit — six or seven distinct components, all straightforward to source and replace. This simplicity is what makes standard seats the easiest to maintain and the cheapest to swap out entirely.
Soft-close seats share every one of those baseline parts, then add the damper mechanism that controls closing speed. Depending on the design, that damper might be a hydraulic cylinder filled with silicone oil or a spring-loaded cartridge integrated directly into the hinge barrel. These internal components are precision-engineered to match the weight and dimensions of the specific lid and ring, which is why generic dampers rarely deliver the same smooth deceleration as the originals.
This is where material and damper integration really matter. Manufacturers like Tianyun combine PP (polypropylene) or UF (urea-formaldehyde) seat covers with purpose-built soft-close hinges and dampers as a single, pre-matched assembly. Rather than pairing a third-party damper with a separately sourced seat ring and lid, the entire system — cover, ring, hinges, and damper cartridges — is engineered together, ensuring consistent closing speed and long-term cycle durability. For sanitaryware brands and OEM buyers building a toilet seat and accessories lineup, that integrated approach eliminates the compatibility guesswork that plagues mix-and-match sourcing.
Quick-Release, Bidet, and Specialty Seat Components
Quick-release seats add release buttons or locking tabs at each hinge post. Press the buttons, lift the seat off, and the hinge plates stay bolted to the bowl. The unique parts here are the release mechanism components — spring clips, guide channels, and locking tabs — which wear over time and may need model-specific replacements.
Bidet seats jump to an entirely different complexity level. On top of the standard seat and hinge assembly, you are dealing with a water supply connection, an inlet valve, a retractable nozzle assembly with self-cleaning function, a control panel or wireless remote, and a power cord that plugs into a nearby GFCI outlet. Some models add a water filter, T-valve connector, and dedicated bidet hose to the installation parts list. Each of these toilet seat accessories introduces potential failure points that do not exist on a standard seat.
Heated seats sit between soft-close and bidet in terms of complexity. They incorporate a heating element embedded in the seat ring, a thermostat to regulate temperature, and a control module — usually with a simple dial or button interface. A power cord is required, but there are no water connections or nozzles to maintain.
Open-front commercial seats take a different path. The ring features a gap at the front — mandated by many building codes for public restrooms — which changes bumper placement and sometimes shifts hinge positioning slightly rearward. The parts are mechanically simpler (no dampers, no electronics), but the ring shape means residential replacements will not fit.
| Seat Type | Unique Parts Beyond Standard Components | Common Applications | Complexity Level |
|---|---|---|---|
| Standard | None — lid, ring, friction hinges, bolts, bumpers only | Budget residential bathrooms, rentals | Low |
| Soft-Close | Hydraulic damper cylinders or spring cartridges integrated into hinge barrels (e.g., Tianyun PP/UF covers with matched dampers) | Most modern residential bathrooms | Low to Moderate |
| Quick-Release | Release buttons, locking tabs, spring clips, guide channels | Homes prioritizing easy cleaning | Moderate |
| Bidet | Water supply line, inlet valve, nozzle assembly, control panel or remote, power cord, T-valve, water filter | Wellness-focused homes, accessibility applications | High |
| Heated | Heating element, thermostat, control module, power cord | Cold climates, comfort upgrades | Moderate |
| Open-Front Commercial | Gap-front ring shape, repositioned bumpers, sometimes offset hinges | Public restrooms, commercial buildings | Low |
The pattern is clear: the more features a seat offers, the longer its parts list grows — and the more carefully you need to match replacements to the exact model. A worn damper on a soft-close seat demands a different fix than a failed nozzle on a bidet seat, and neither solution looks anything like replacing a simple bumper on a standard model. Recognizing which category your seat falls into is the essential first step before diagnosing any problem, because the symptom you are seeing and the part responsible for it depend entirely on what kind of seat is sitting on your bowl.
Troubleshooting Symptoms to Identify the Failed Part
You know your seat type. You can name every component from lid to stabilizer. But here is the real question: when something goes wrong, how do you work backward from what you see and feel to the exact part that needs attention? This is where most homeowners get stuck. They notice a wobble or hear a slam, grab a wrench, and start tightening everything in sight — only to find the problem returns within a week because they never addressed the actual failed component.
The fix for a toilet seat broke situation is almost never "tighten everything and hope." It is a targeted swap of one specific part. The diagnostic table below maps the six most common symptoms directly to the component at fault and the action that resolves it. Bookmark this section — it is the fastest path from frustration to a functioning seat.
| Symptom | Part at Fault | Recommended Action |
|---|---|---|
| Seat wobbles or shifts side to side | Loose mounting bolts, worn stabilizers, or degraded hinge posts | Tighten bolts first; if wobble persists, replace stabilizers or inspect hinge posts for cracks |
| Seat slams down when released | Failed soft-close damper or worn friction hinge | Replace the damper cartridge if removable; otherwise swap the full hinge assembly |
| Seat slides forward or backward | Under-tightened mounting bolts or oversized bolt holes | Retighten bolts; if holes are oversized, use rubber washers or a toilet seat stabilizer kit to fill the gap |
| Seat ring or lid cracks or splits | Fatigued seat material (PP, UF, wood, or thermoset) | Replace the entire seat assembly — cracked rings and lids cannot be reliably repaired |
| Lid will not stay up when raised | Worn hinge friction or broken counterbalance mechanism | Replace the hinge unit; on some models, adjusting the hinge tension screw may restore resistance |
| Rust stains around bolt area | Corroding metal mounting hardware | Remove old hardware and replace toilet parts with plastic or stainless steel bolts and nuts |
Wobbling, Shifting, and Sliding Problems
A seat that moves when it should not is the single most reported toilet seat repair issue — and it has three distinct flavors, each pointing to a different culprit.
Side-to-side wobble is the classic complaint. You sit down and the whole seat rocks like a seesaw. The instinct is to grab a wrench and crank the mounting bolts tighter, and honestly, that does solve it about half the time. Bolts loosen gradually through normal use — vibration, body weight shifts, and temperature changes all contribute. But if the bolts feel snug and the wobble remains, the stabilizers near the hinge area have likely worn out. These rubber or plastic grippers lose their traction over time, and no amount of bolt tightening compensates for a stabilizer that can no longer grip porcelain. Toilet seat repair kits that include replacement stabilizers alongside fresh bolts and washers are the most efficient way to address both possibilities in one shot.
Forward-backward sliding is less common but equally annoying. You will notice the seat creeps toward you or drifts away from the tank during use. This usually means the mounting bolts are not applying enough downward clamping pressure — either they were hand-tightened and never snugged properly, or the bolt holes in the porcelain are slightly oversized for the hardware. Adding rubber fender washers between the bolt head and the hinge plate creates extra friction and fills the gap. If the holes are significantly oversized, aftermarket stabilizer brackets that screw directly into the bowl rim provide a mechanical lock that stops all forward-backward drift.
Slamming, Cracking, and Corrosion Issues
Slamming means one thing on a soft-close seat: the damper has failed. That hydraulic cylinder or spring cartridge — the component responsible for controlled, quiet closing — has either leaked its silicone oil or lost spring tension. When you release the lid and it drops like a standard friction seat, the damper is done. Some manufacturers sell replacement parts toilet owners can swap in themselves, particularly removable damper cartridges that slide out of the hinge barrel. Others use sealed, integrated hinge assemblies where the only option is a full hinge replacement. On a standard friction hinge seat, slamming is simply the default behavior, but if the lid seems to fall faster than it used to, the hinge barrel has worn smooth and lost the friction that once slowed it slightly.
Cracking is the one symptom where targeted toilet parts repair is usually not an option. A broken toilet seat cover or a split seat ring means the primary structural material has fatigued beyond recovery. Hairline cracks spread under repeated stress, and glue or epoxy repairs rarely hold under body weight. The practical answer is a full seat replacement. Before buying, check whether your seat is round or elongated and confirm the bolt-hole spacing — replacing a cracked seat with the wrong shape just trades one problem for another.
A lid that refuses to stay up when raised points to hinge friction loss or a broken internal tension mechanism. Some higher-end hinges include a small tension screw that can be adjusted to increase resistance, but once the friction surfaces inside the barrel have worn smooth, replacement is the only lasting fix.
Finally, rust stains bleeding onto the porcelain around the bolt area are a dead giveaway that metal mounting hardware is corroding. Humidity in bathrooms accelerates oxidation on uncoated steel and zinc-plated bolts. The fix is straightforward: remove the corroded hardware — penetrating oil helps if the nut has seized onto the bolt — and replace toilet parts with plastic or stainless steel equivalents that will not rust. This is one of the cheapest and most satisfying upgrades you can make, and it prevents unsightly orange stains from becoming a recurring cleaning headache.
Every symptom in this list traces back to a specific, identifiable component. Match the behavior to the part, and you skip the guesswork entirely. The remaining question is whether the replacement part you need will actually fit your particular seat — and that depends on dimensions and shape compatibility, which vary more than most people expect.
Seat Sizing, Shape, and Parts Compatibility
You have identified the failed part, you know exactly what needs replacing — and then you order the wrong size. It happens more often than you would think, because toilet seat replacement parts are not one-size-fits-all. The seat ring, lid, bumper layout, and even hinge geometry all change depending on the shape and dimensions of the bowl underneath. A part that fits perfectly on an elongated seat will sit awkwardly — or not attach at all — on a round one. Before spending a dollar on replacements, you need to confirm that the components you are ordering actually match the seat and bowl you own.
Round vs. Elongated Seat Part Differences
Two seat shapes dominate the residential market, and the dimensional gap between them is significant enough to make every major component non-interchangeable.
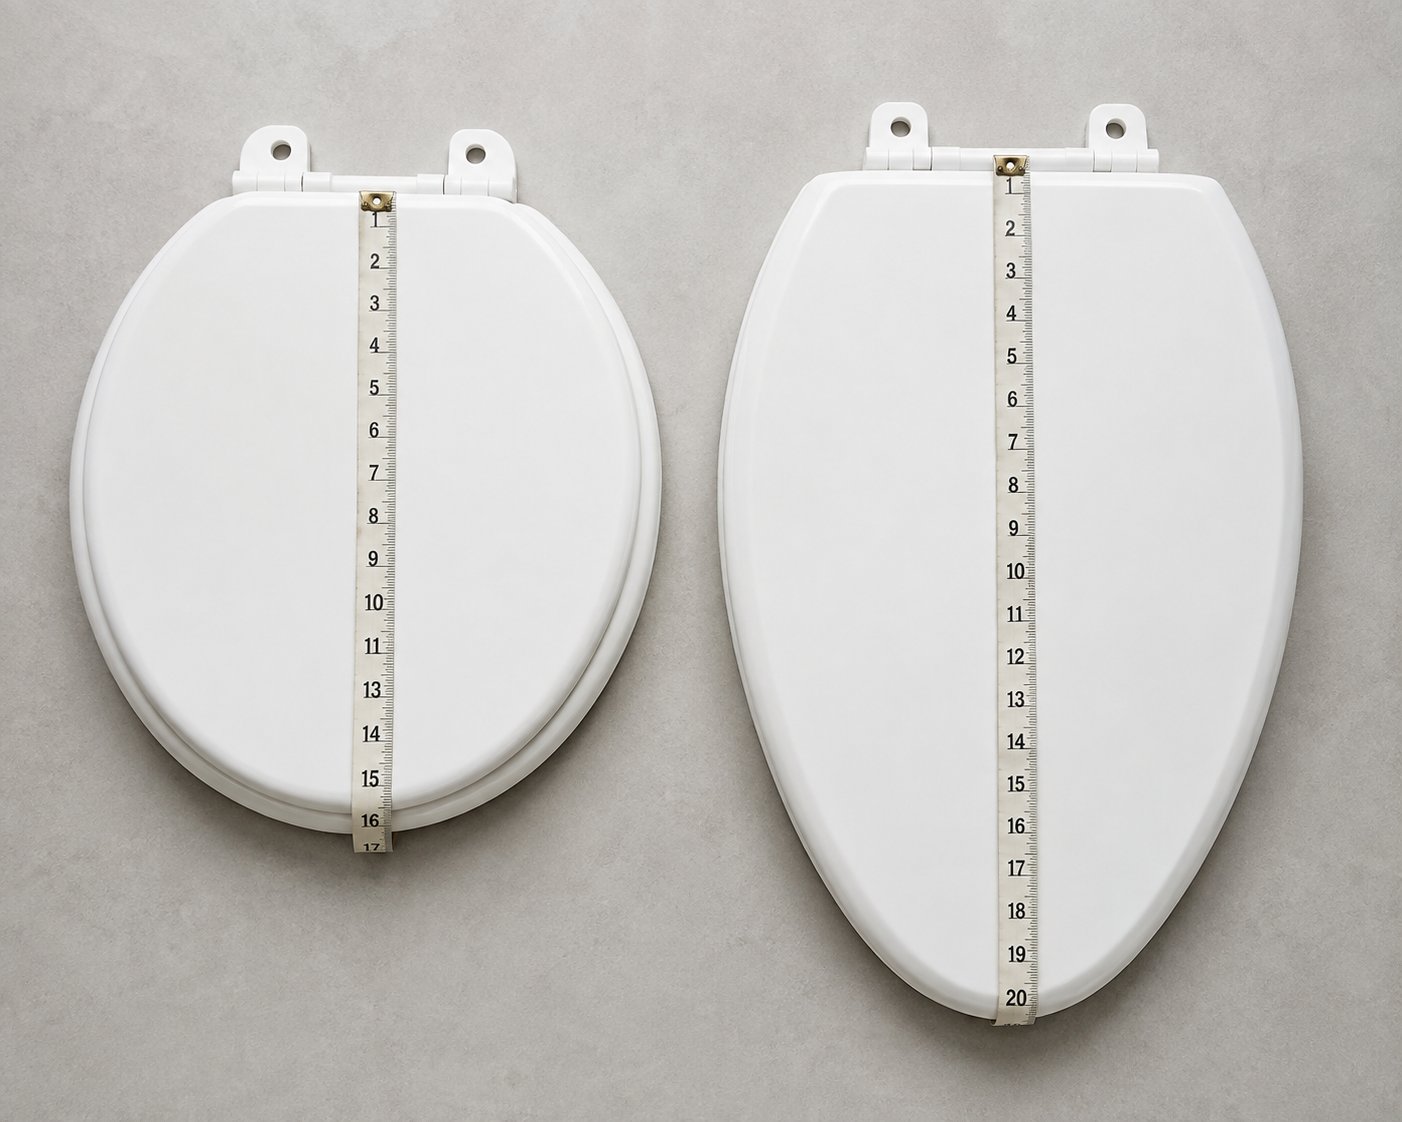
Round seats measure approximately 16.5 inches from the center of the mounting bolt holes to the front edge of the bowl rim. Elongated seats stretch that distance to roughly 18.5 inches, creating a longer, more oval profile. Width, however, stays fairly consistent across both shapes — typically 14 to 14.5 inches at the widest point.
That two-inch length difference changes multiple parts of the toilet seat at once. The seat ring itself is a different mold — an elongated ring will overshoot the front of a round bowl, while a round ring leaves the front of an elongated bowl exposed and unsupported. The lid must match the ring it covers, so lids are equally shape-specific. Bumper placement shifts as well: because a round seat ring is shorter, the front bumpers sit closer to the hinge line, altering the stress distribution on the porcelain rim. And on open-front commercial seats — where a gap in the ring at the front is required by many building codes — that gap changes the bumper count entirely, often eliminating the front bumpers and sometimes shifting hinge alignment slightly rearward to compensate for the altered weight balance.
The practical takeaway? A seat ring, lid, or bumper set designed for a round bowl will not work on an elongated bowl, and vice versa. Even if the bolt holes line up, the fit will be wrong.
How to Check Parts Compatibility Before Buying
Here is where things get encouraging: while seat shapes are not interchangeable, mounting bolt spacing is remarkably standardized. On the vast majority of residential toilets sold in North America, the distance between the two bolt holes measures approximately 5.5 inches center-to-center. That consistency means most toilet bowl hardware — bolts, nuts, washers, and basic hinge plates — will physically attach to most residential bowls regardless of brand.
But "physically attach" and "fit correctly" are not the same thing. Hinge assemblies, damper cartridges, and quick-release mechanisms are frequently manufacturer-specific. A soft-close hinge designed for one brand's elongated seat will bolt onto the bowl just fine, but the damper torque may be calibrated for a heavier or lighter lid than the one you own — resulting in a seat that closes too fast or creeps shut agonizingly slowly. Quick-release locking tabs are even more proprietary; the tab spacing, pin diameter, and guide channel profile vary enough between brands that cross-compatibility is rare.
European, Asian, and some designer toilets add another layer of complexity. Bolt spacing on these models can deviate from the 5.5-inch standard, and D-shaped or square bowls require specialty seat rings that do not follow round or elongated conventions at all. If your commode seat parts name search keeps returning zero results, an unusual bowl shape is often the reason.
Before ordering any toilet seat part, run through this compatibility checklist:
- Confirm the seat shape: Measure from the center point between the two bolt holes straight to the front rim of the bowl. Around 16.5 inches means round; around 18.5 inches means elongated. If neither measurement fits, you may have a D-shaped or specialty bowl.
- Measure the bolt hole spacing: Check the center-to-center distance between the two mounting holes. Standard is 5.5 inches, but verify — especially on imported or older toilets.
- Identify the hinge type: Determine whether your current seat uses standard friction hinges, soft-close dampers, quick-release buttons, or adjustable slotted plates. Replacement hinges must match the existing type unless you are swapping the full seat assembly.
- Note the manufacturer and model number: Look for a stamp or sticker on the underside of the seat ring, inside the hinge barrel area, or on the back of the lid. This number is the fastest way to find exact-match parts of toilet seat hardware online or through the manufacturer's catalog.
- Check open-front vs. closed-front design: If you are replacing parts on a commercial open-front seat, confirm that bumper kits and hinge assemblies are rated for that ring style — residential closed-front parts may not align correctly.
- Measure the bowl width: While width is fairly standard at 14 to 14.5 inches, some compact or oversized bowls fall outside that range. A quick measurement prevents ordering a seat ring that is too narrow or too wide for full rim contact.
Taking five minutes to work through this list eliminates the most common ordering mistakes — wrong shape, wrong hinge type, wrong bolt spacing — and ensures the toilet seat replacement parts you receive will actually solve the problem instead of creating a new one. With compatibility confirmed, the final decision becomes whether to replace just the failed component or invest in a complete seat assembly where every part is already matched and ready to install.
Sourcing and Replacing Toilet Seat Parts the Right Way
That compatibility checklist protects you from ordering the wrong part — but it does not answer a more fundamental question: should you replace just the failed component, or is it smarter to swap the entire seat assembly at once? The answer depends on what broke, how old the seat is, and whether individual toilet seat spare parts are even available for your model. Getting this decision wrong means either overspending on a full seat you did not need or wasting time chasing a single part that cannot be sourced separately.
When to Replace a Single Part vs. the Entire Seat
Some components lend themselves perfectly to individual replacement. Rubber bumpers, mounting bolts with nuts, bolt cap covers, and adhesive stabilizer pads are all inexpensive, widely available, and designed to be swapped without removing the seat from the bowl. Universal toilet parts kits — containing a pair of bolts, washers, nuts, and sometimes bumpers — cost just a few dollars and fit the vast majority of residential toilets regardless of brand. If your only issue is a wobble caused by loose hardware or a missing bumper, a single-part fix is the obvious choice.
Soft-close damper cartridges fall into a gray area. Some manufacturers sell the damper cylinder as a standalone replacement part, letting you slide out the failed cartridge and pop in a new one without touching the rest of the hinge. Others integrate the damper permanently into a sealed hinge barrel, which means a damper failure forces you to replace the entire hinge assembly — and sometimes the full seat, if the hinge is proprietary and no longer stocked separately.
A full seat swap becomes the only practical path when the seat ring or lid itself is cracked, warped, or discolored beyond cleaning. Structural damage to the primary sitting surface cannot be reliably patched, and even minor hairline cracks spread under repeated load. The same applies when a proprietary hinge system fails and replacement parts for a toilet of that specific model are discontinued. At that point, sourcing individual components turns into a frustrating scavenger hunt with no payoff. Replacing the entire assembly — lid, ring, hinges, hardware, and bumpers as one matched package — is faster, often cheaper, and guarantees that every component works together from day one.
Finding the Right Replacement by Model Number
Whether you are buying a single bolt or a complete seat, the model number is your most powerful search tool. Most manufacturers stamp or print it in one of three locations: on the underside of the seat ring, inside the hinge barrel area, or on a sticker adhered to the back of the lid. Kohler, for instance, prints the model number and color code on the underside of the hinge on most plastic seats manufactured after October 2019, and some models include a scannable QR code that links directly to the product page. Other brands use similar systems, though placement varies.
The seat must usually be removed from the bowl to view the model number — which is worth doing even if you plan to order online. That number lets you search the manufacturer's parts catalog for exact-match replacement toilet parts, filter results on retailer websites to eliminate incompatible options, and communicate precisely with plumbing supply specialists if you need to order by phone.
If the model number has worn off or the seat is too old to trace, your fallback is measurement. Confirm round vs. elongated, verify the 5.5-inch bolt spacing, identify the hinge type, and note the material (polypropylene, urea-formaldehyde, wood, or thermoset). That combination of details narrows the field enough to find a compatible commode seat replacement even without a model number.
Here are practical tips for finding the right replacement part efficiently:
- Check the underside of the seat ring and inside the hinge area for a stamped or printed model number before searching online.
- Photograph the hinge mechanism, bolt heads, and any identifying labels — these images help plumbing supply staff match parts visually when a model number is unavailable.
- Search the manufacturer's website first. Many brands maintain searchable parts catalogs and exploded diagrams that list every individual component by part number.
- For discontinued models, try plumbing specialty retailers and online marketplaces that stock aftermarket and NOS (new old stock) replacement parts for a toilet that is no longer in production.
- When replacing mounting hardware, bring the old bolt and nut to the store. Matching thread pitch, diameter, and length in person prevents the most common sizing mistakes.
- If universal toilet parts do not fit — particularly on European, Asian, or designer bowls — contact the manufacturer's customer service line directly. They can often ship proprietary components that are not listed on retail websites.
- Consider buying a complete hardware kit rather than a single bolt. Kits typically include bolts, nuts, washers, bumpers, and sometimes stabilizers, covering multiple potential failure points for just a few dollars more than a bolt-only purchase.
Sourcing Complete Seat Assemblies from OEM Suppliers
Individual part sourcing makes sense for homeowners fixing a single seat. But for sanitaryware brands, distributors, and OEM buyers managing product lines at scale, the calculus shifts entirely. Sourcing a seat ring from one vendor, hinges from another, dampers from a third, and bumpers from a fourth creates a compatibility chain where a single mismatched component can undermine the entire assembly's performance. A damper calibrated for a heavier lid produces sluggish closing on a lighter one. A hinge barrel machined to slightly different tolerances introduces play that no stabilizer can compensate for.
This is why integrated seat systems — where the cover, ring, hinges, dampers, and mounting hardware are engineered, tested, and shipped as a single unit — have become the preferred sourcing model for commercial buyers. Tianyun's PP and UF toilet seat covers with matched soft-close hinges and dampers illustrate this approach: every part in the assembly is designed to work together, from the damper torque matched to the specific lid weight to the hinge geometry aligned with the ring profile. For brands building a toilet parts replacement catalog or distributors stocking ready-to-install seat solutions, that kind of pre-matched assembly eliminates sourcing complexity and ensures consistent end-user quality across every unit shipped.
The same principle applies at the homeowner level, even if the scale is smaller. When you are dealing with a seat that has multiple worn components — cracked bumpers, a failing damper, and corroded bolts all at once — replacing individual pieces one at a time is like patching a tire with three holes. A complete seat assembly, where every component is factory-fresh and designed to work as a system, delivers a more reliable, longer-lasting result than a patchwork of replacement parts for commode hardware sourced piecemeal from different suppliers.
At the end of the day, every toilet seat problem traces back to a specific, nameable part. A wobble is a stabilizer. A slam is a damper. A crack is a seat ring. Rust is a bolt. The entire point of mapping these components — from the lid at the top to the bumpers pressed against porcelain at the bottom — is to give you the vocabulary and the visual map to skip the guesswork, identify exactly what failed, and source exactly what you need to fix it. That knowledge turns a frustrating mystery into a five-minute diagnosis and a confident trip to the hardware store or parts catalog.
Frequently Asked Questions About Parts of a Toilet Seat
1. What are the main parts of a toilet seat?
A toilet seat assembly consists of several distinct components arranged from top to bottom: the lid (top cover), seat ring (the open ring you sit on), hinge mechanism (connects seat to bowl and allows pivoting), hinge posts or pins, hinge plates or mounting brackets, mounting bolts, nuts (wing nuts or plastic nuts secured from underneath), bolt caps or covers, rubber bumpers on the underside of the lid and seat ring, and stabilizers or grippers near the hinge area. Each part has a specific function — the bumpers protect porcelain and reduce noise, while stabilizers prevent side-to-side shifting during use. Knowing these names helps you diagnose problems accurately and order exact replacement parts.
2. Why does my toilet seat wobble and how do I fix it?
A wobbly toilet seat is usually caused by one of three components: loose mounting bolts, worn stabilizers, or degraded hinge posts. Start by tightening the mounting nuts underneath the bowl rim — bolts loosen naturally over time from vibration and weight shifts. If the wobble persists after tightening, the stabilizers (rubber or plastic grippers near the hinge area) have likely lost their traction. These are among the first seat parts to wear out. Replace them using a toilet seat stabilizer kit or aftermarket anti-slide brackets. If neither fix works, inspect the hinge posts for hairline cracks — damaged posts require a full hinge or seat replacement.
3. What is the difference between top-mount and bottom-mount toilet seat hardware?
Bottom-mount (bottom fixing) is the traditional system where bolts pass through the hinge plates and bowl rim from the top, then a nut is tightened from underneath. It requires reaching under the bowl and works best on open-back toilets with accessible undersides. Top-mount systems use expanding anchors or toggle-style sleeves that grip inside the bolt holes when a screw is tightened entirely from above — no under-bowl access needed. Top-mount is common on modern skirted, back-to-wall, and wall-hung toilets where the enclosed base makes bottom access impossible. Your toilet's design determines which system you need.
4. How do I know if my toilet seat replacement parts will fit?
Before ordering, run through five key checks: First, measure from the bolt hole center to the front bowl rim — roughly 16.5 inches indicates a round seat, 18.5 inches means elongated. Second, verify bolt hole spacing (standard is 5.5 inches center-to-center, but imported or older toilets may differ). Third, identify your hinge type — standard friction, soft-close, quick-release, or adjustable. Fourth, locate the manufacturer model number stamped on the seat underside or inside the hinge area for exact-match parts. Fifth, confirm whether you have an open-front or closed-front design, as bumper placement and hinge alignment differ between them.
5. When should I replace a single toilet seat part versus the entire seat?
Replace individual parts when the issue is isolated to inexpensive, widely available components like rubber bumpers, mounting bolts, nuts, bolt caps, or adhesive stabilizer pads. Soft-close damper cartridges can sometimes be replaced individually if the manufacturer sells them separately. However, a full seat swap is the better choice when the seat ring or lid is cracked, warped, or structurally damaged — these cannot be reliably repaired. It is also smarter to replace the full assembly when proprietary hinges fail and individual parts are discontinued, or when multiple components have worn out simultaneously. Pre-matched seat assemblies, such as Tianyun's PP and UF covers with integrated soft-close hinges, ensure all parts work together out of the box.
Apply This Insight to Your Project
Tell us what you are building and how the topic “Wobbly Seat? Map All Parts Of A Toilet Seat To Find The Fix” relates to your application. Our engineering team can help evaluate the next step.