Why Measuring Your Toilet Seat Correctly Prevents Costly Mistakes
Imagine tearing open the packaging on a brand-new toilet seat, lining it up with the bowl, and realizing it wobbles, overhangs, or leaves an awkward gap along the rim. You're not alone. Buying the wrong size is one of the most common — and most avoidable — bathroom mistakes homeowners make. It leads to uncomfortable seating, unsightly misalignment, and the hassle of boxing everything back up for a return.
Here's the good news: learning how to measure a toilet takes less than two minutes. Three simple dimensions — length, width, and bolt-hole spacing — are all you need to determine whether a seat will fit your bowl perfectly. That's the entire foundation of a reliable toilet seat measuring guide, and it's far easier than most people expect.
Why Getting Toilet Seat Measurements Right Matters
Unlike light switches or shower curtain rings, toilet seat sizes are not one-size-fits-all. Bowls come in different shapes and proportions, and even a measurement error of 10 to 15 millimeters can turn a supposedly compatible seat into one that rocks side to side or refuses to close flush against the rim. Getting the correct wc seat size before you shop eliminates guesswork and keeps your money where it belongs — in your wallet, not wasted on a return label.
What This Guide Covers
This article walks you through every step: identifying your bowl shape, measuring each critical dimension, checking your numbers against standard benchmarks, handling specialty toilet types like wall-hung models, avoiding the most common mistakes, and using your measurements confidently when shopping for a replacement.
Measure once, buy right — two minutes with a tape measure saves hours of frustration and the cost of a return.
Whether you've never replaced a toilet seat before or you're tired of getting it wrong, the process ahead is straightforward. It all starts with recognizing which bowl shape you're working with.
Identifying Your Toilet Seat Shape Before You Measure
One question pops up more than any other when people start shopping for a replacement seat: are toilet seats universal? The short answer is no — not even close. Toilet sizes vary by shape, overall dimensions, and bolt-hole configuration, which means a seat designed for one bowl profile can be completely wrong for another. Picking the correct shape first narrows the field dramatically and tells you exactly which measurement ranges to expect when you grab your tape measure.
Round vs Elongated vs D-Shape and Square
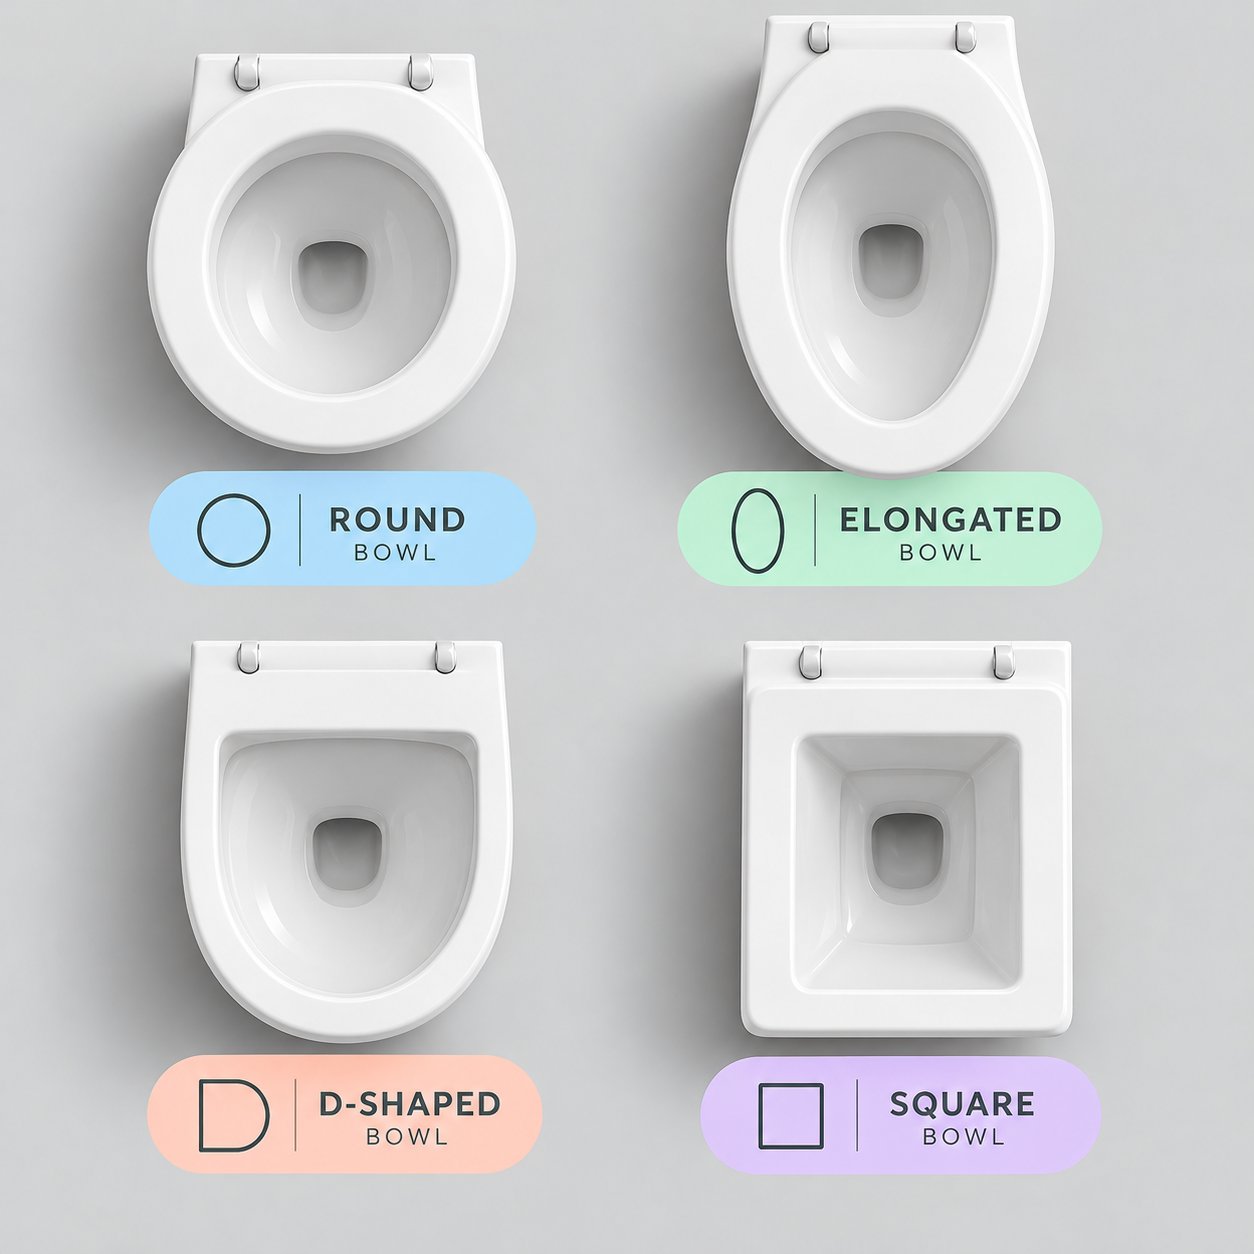
Most online guides stop at "round or elongated" and call it a day. In reality, four distinct bowl profiles account for the vast majority of toilets installed in homes today. Knowing how to size a toilet starts with a simple visual check — look straight down at your bowl and compare what you see to the descriptions below.
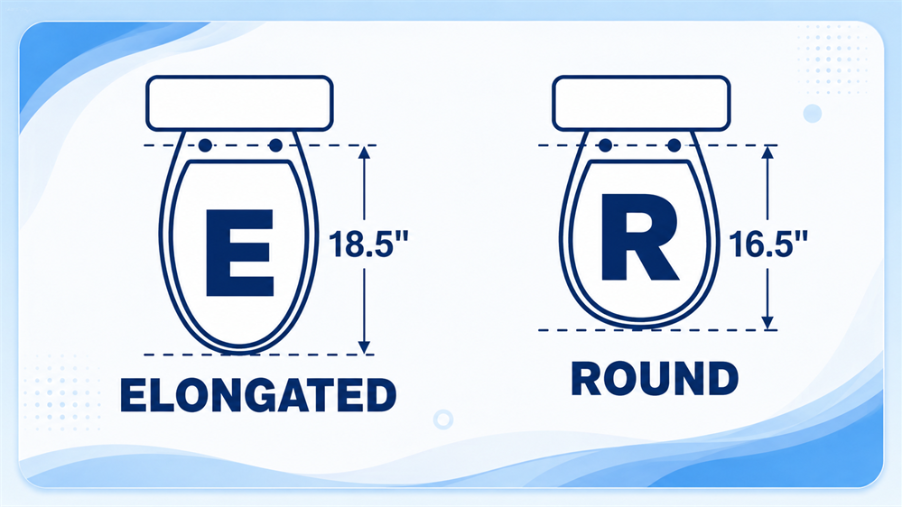
Round (O-Shape) — Picture a bowl that looks almost like a circle when viewed from above. The front edge curves evenly without extending much beyond the tank. Round bowls are compact, typically found in older homes and smaller bathrooms, and they measure roughly 16.5 inches from the mounting holes to the front rim. If your bathroom is tight on space, there's a good chance you're looking at a round bowl.
Elongated (Oval or V-Shape) — This bowl has a noticeably oval profile. The front extends further outward, creating a longer seating area that many people find more comfortable. Elongated bowls are the dominant choice in modern construction across North America, measuring approximately 18.5 inches from bolt holes to the front edge. If your bowl looks like an egg stretched toward the front, it's elongated.
D-Shape — Imagine taking that oval and flattening the back edge into a straight or nearly straight line. Viewed from above, the outline resembles the letter "D." This profile is common in modern European-style bathrooms and wall-hung installations. D-shape bowls often fall between round and elongated lengths, and their flat rear edge means you can't simply swap in a standard round or elongated seat — the contour won't match.
Square (Angular) — The most contemporary of the four, a square bowl features sharp or slightly softened corners and straight side edges. It delivers a bold, architectural look but trades some of the ergonomic curvature found in rounder profiles. Square bowls are less common overall and typically appear in high-end or designer bathrooms. As Badeloft's toilet shape guide notes, these bowls usually measure between 14 and 16 inches for the bowl length, and comfort is traded off for aesthetics.
How Toilet Seat Shapes Affect Your Measurements
Why does shape matter so much before you even pick up a tape measure? Because shape determines the length and width ranges you should expect — and misidentifying the shape is the number-one reason people end up with the wrong seat. A homeowner who assumes their D-shape bowl is simply "elongated" will order a seat with the wrong rear contour. Someone who mistakes a compact elongated bowl for a round one will end up with a seat that's too short.
Understanding how to measure a toilet seat accurately begins with knowing which profile you're working with. Each shape corresponds to a predictable set of dimensions. The reference table below maps all four profiles to their typical measurement ranges in both millimeters and inches, giving you a quick benchmark before you measure your specific bowl.
| Bowl Shape | Typical Length (Bolt Holes to Front) | Typical Width (Widest Point) | Common Bolt-Hole Spacing |
|---|---|---|---|
| Round | 400–420 mm (15.75–16.5 in) | 350–370 mm (13.75–14.5 in) | 140 mm (5.5 in) |
| Elongated | 450–480 mm (17.75–18.9 in) | 350–370 mm (13.75–14.5 in) | 140 mm (5.5 in) |
| D-Shape | 430–460 mm (16.9–18.1 in) | 350–380 mm (13.75–15.0 in) | 140–160 mm (5.5–6.3 in) |
| Square | 350–410 mm (13.75–16.1 in) | 340–370 mm (13.4–14.5 in) | 140–160 mm (5.5–6.3 in) |
A few important notes on this table. These are typical industry ranges drawn from common residential models — individual toilets may fall slightly outside these bands, especially imported or designer fixtures. The bolt-hole spacing of 140 mm (5.5 inches) is standard across most North American and UK toilets, but European and specialty models sometimes use wider spacing. That's exactly why you should always measure your specific bowl rather than relying on shape identification alone.
Notice how round and elongated bowls share nearly identical widths? That overlap is what trips people up. Width alone won't tell you which seat to buy. Length — measured from the bolt holes to the front edge — is the dimension that separates one shape from another most clearly. When you know how to measure for a toilet seat using all three dimensions together, mismatches become almost impossible.
With your bowl shape identified and a clear picture of the measurement ranges you're targeting, the logical next move is grabbing a tape measure and capturing the exact numbers from your own toilet bowl.
Step-by-Step Instructions to Measure Your Toilet Bowl
You know your bowl shape, and you have a sense of the measurement ranges to expect. Grab a tape measure, a pen, and a scrap of paper — the entire process takes about 90 seconds, and doing it right the first time is the difference between a perfect fit and another trip to the returns counter.
One rule matters more than any other before you start: every measurement should come directly from the porcelain bowl, not from an old seat sitting on top of it. The existing seat may have been the wrong size from day one, or it could have warped after years of use. Measuring toilet dimensions from the ceramic itself gives you the only numbers you can trust.
Always measure the bowl, never the old seat — the previous seat may not have been the correct size to begin with, and copying a mistake just repeats it.
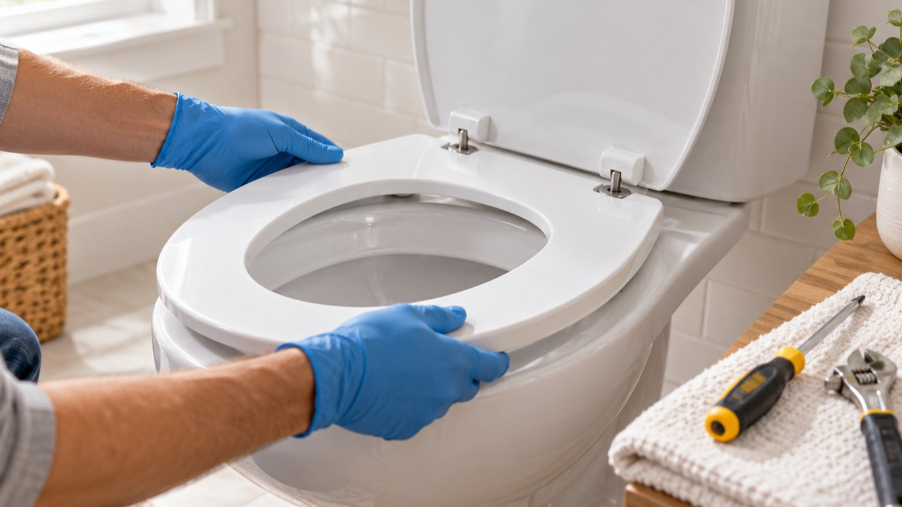
If an old seat is still attached, either remove it entirely or flip it up out of the way so the full rim and bolt holes are exposed. You need unobstructed access to the outer edges of the porcelain for every reading. Here is the exact sequence to follow, tape measure in hand.
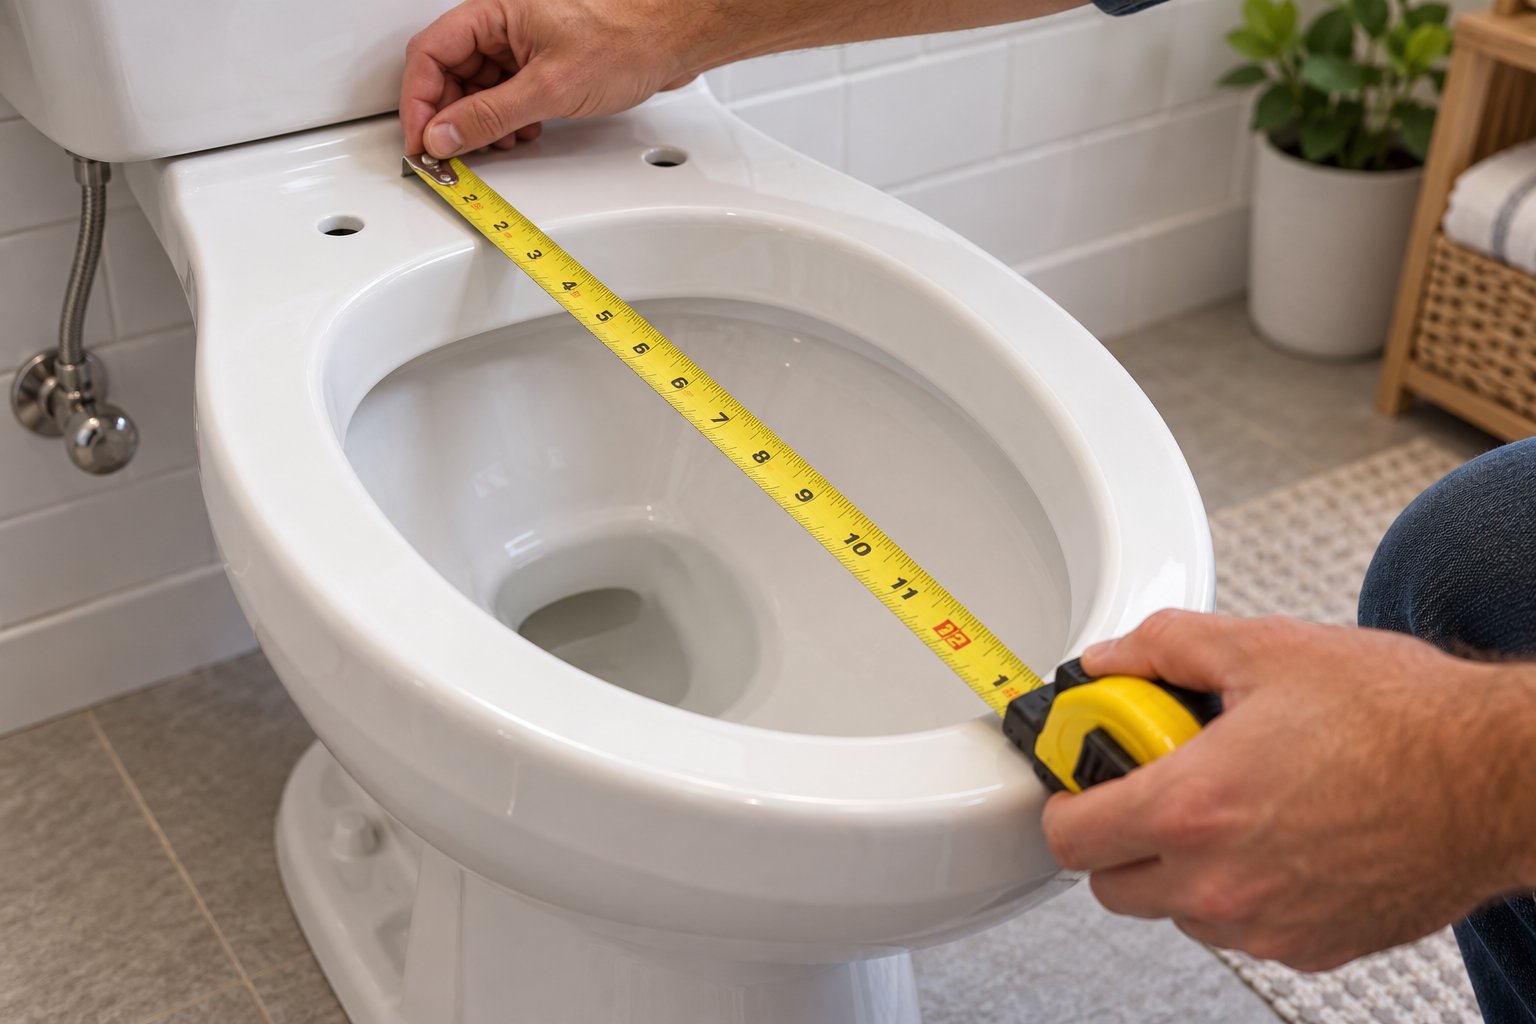
- Locate the two bolt-fixing holes at the rear of the bowl. These are the two holes (or slots) in the porcelain where mounting bolts pass through to secure the seat hinges. They sit at the back of the rim, one on each side. If decorative hinge covers are still in place, pop them off so the holes are fully visible.
- Find the center point between the two bolt holes. Imagine a straight line connecting the center of the left hole to the center of the right hole. The midpoint of that line is your starting reference. You can eyeball it or lay a pencil across both holes and mark the halfway point.
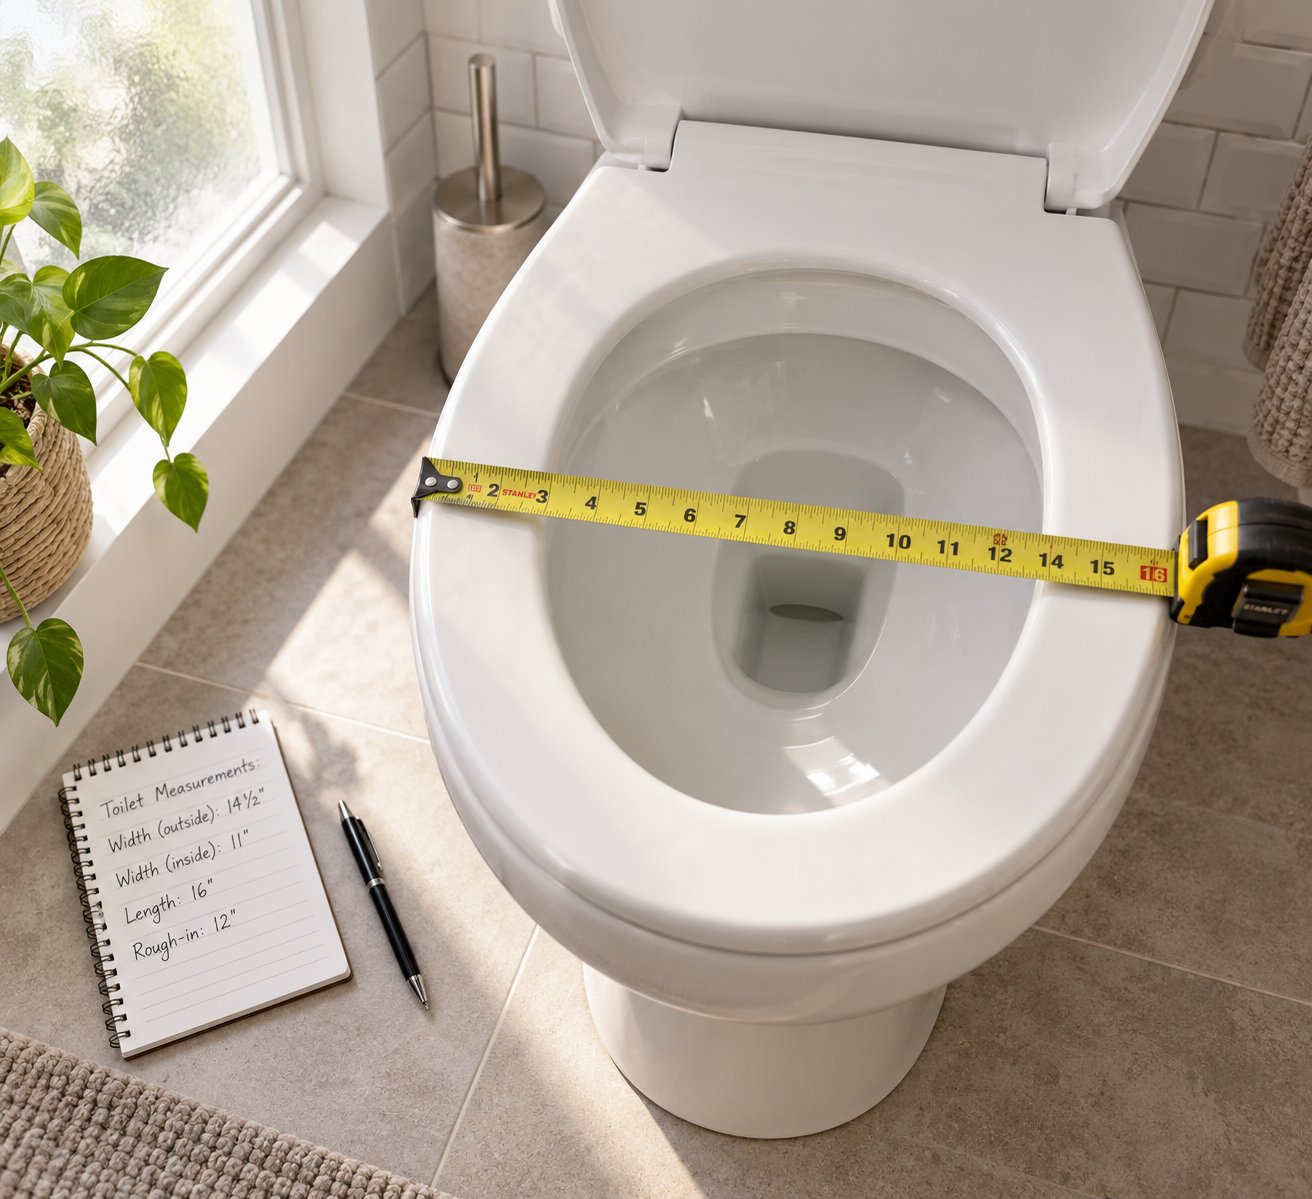
- Measure the length from that center point to the very front outer edge of the bowl rim. Extend your tape in a straight line down the center of the bowl — not following any curve inside the basin, but running directly from the midpoint between the bolt holes to the outermost tip of the front rim. This is the single most important number for determining toilet bowl size, and it must reach the outer edge of the porcelain, not the inner lip of the bowl opening. Record this figure in both millimeters and inches.
- Measure the width at the widest point of the bowl. Shift your tape measure sideways. The widest span is usually located about halfway along the bowl's length, sometimes slightly forward of center. Stretch the tape from the outer rim edge on one side to the outer rim edge directly opposite. Again, you're measuring porcelain to porcelain — ignore any overhang from an old seat. Write this number down next to your length reading.
- Measure the bolt-hole spacing, center to center. Place the end of your tape at the exact center of one bolt hole and measure across to the exact center of the other. A common reading is 140 mm (approximately 5.5 inches) on standard North American and UK toilets, though some European and specialty models use slightly wider spacing. Measure from hole center to hole center — not from the outer edges of the holes, which would give you an inaccurately larger figure.
- Measure the distance from the bolt holes to the rear edge of the bowl. This tells you how much porcelain sits behind the fixing points. Place your tape at the center of one bolt hole and measure straight back to the rearmost edge of the bowl rim. A short distance here can limit which hinge styles will fit, particularly bulkier soft-close mechanisms.
- Measure the distance from the rear of the bowl to the nearest wall or cistern. This clearance reading reveals whether the seat lid can open fully without hitting the cistern or wall behind the toilet. Rest the tape against the back edge of the bowl rim and extend it to the wall surface or the front face of the cistern. If this gap is tight — say, less than 40 mm — you'll need to account for it when choosing a seat and hinge combination.
Measuring Length From Bolt Holes to Front Edge
Steps two and three in the sequence above deserve extra emphasis because length is the primary dimension that separates one toilet size from another. When you measure, keep the tape taut and straight — don't let it dip down into the bowl basin. You're measuring along the top plane of the rim, following an imaginary center line from back to front. A slight angle can shave or add five to ten millimeters, and that's enough to push you into the wrong seat category.
If the front of your bowl is sharply curved, aim for the point that projects furthest forward. That outermost point is where the seat's front edge needs to align. A seat that falls even a centimeter short will leave a visible and uncomfortable gap at the front.
Measuring Width at the Widest Point
Width tends to be more forgiving than length, but it still matters. Most standard bowls measure between 350 and 380 mm across, so the differences are subtle. The key is finding the true widest span. Run your fingers along the rim from back to front — you'll feel the porcelain flare outward and then taper back in toward the front edge. The flare point is where you measure. Keep the tape level and horizontal, perpendicular to the bowl's center line, and record the outer-edge-to-outer-edge distance.
Measuring Bolt-Hole Spacing and Position
Bolt-hole spacing is the measurement people skip most often — and the one that causes the most head-scratching installation failures. Even if you nail the length and width, a seat won't mount securely when the bolt holes don't line up. The standard center-to-center distance is about 155 mm in many UK toilets and 140 mm (5.5 inches) in most North American models, but older or imported units may differ. Some adjustable hinges can compensate for minor variations, yet they work only within a specific range — typically plus or minus 20 mm.
Don't overlook the rear clearance measurement from step seven either. Understanding your toilet bowl size includes knowing what sits behind the bowl. A cistern lip that overhangs the rear rim by even a couple of centimeters can block a hinge from opening properly, turning a dimensionally correct seat into a daily frustration.
With all seven numbers written down — length, width, bolt-hole spacing, rear-rim distance, and wall clearance — you have a complete dimensional profile of your toilet. The question that naturally follows: do those numbers fall within normal ranges, or is your bowl an outlier that needs special attention?
Standard Toilet Seat Dimensions You Can Check Against
You've got your tape measure readings written down — but what do those numbers actually tell you? Without a benchmark, a length of 435 mm or a width of 365 mm is just a number floating in space. This section gives you the reference points you need to confirm whether your toilet falls within standard ranges or sits in unusual territory that requires a more targeted search.
Think of these benchmarks as the "normal ranges" on a blood test report. If your readings land squarely inside them, shopping becomes simple. If they fall outside, you know immediately that you're dealing with a non-standard bowl and can adjust your approach before wasting money on a seat that won't fit.
Standard Round Toilet Seat Dimensions
Round bowls are the workhorses of older construction and compact bathroom layouts. You'll find them in apartments, powder rooms, and homes built before the 1990s when elongated designs started dominating new installations. Their circular profile keeps the overall footprint small — a real advantage when every inch of floor space counts.
Typical toilet seat dimensions for a round bowl cluster tightly around these figures:
- Length (bolt holes to front rim): 400–420 mm (approximately 15.75–16.5 inches). The most commonly cited figure across the industry is 16.5 inches (about 42 cm).
- Width (widest point): 350–370 mm (approximately 14–14.5 inches). Most round bowls hover right at 14 inches (36 cm).
- Bolt-hole spacing: 140 mm (5.5 inches) center to center on the vast majority of North American and UK models.
If your length reading comes in at around 16.5 inches, you're almost certainly looking at a round bowl. A reading between 15.75 and 16.5 inches still falls within the round category — the slight variation usually reflects differences in rim styling between manufacturers rather than an entirely different commode seat size category.
Standard Elongated Toilet Seat Dimensions
Elongated bowls are the modern default. They appear in the majority of new residential builds, and their extended oval shape gives adults noticeably more seating area. According to Lowe's toilet buying guide, elongated toilets measure roughly 18 inches from the seat mounting holes to the front of the bowl rim, and they require a bit more space than a round model.
Here are the toilet seat specifications to expect:
- Length (bolt holes to front rim): 450–480 mm (approximately 17.75–18.9 inches). The industry benchmark is 18.5 inches (about 47 cm).
- Width (widest point): 350–370 mm (approximately 14–14.5 inches) — essentially the same range as round bowls.
- Bolt-hole spacing: 140 mm (5.5 inches), matching the round standard.
Notice something interesting? Round and elongated bowls share nearly identical widths and bolt-hole spacing. The meaningful difference lives almost entirely in the length dimension — roughly two extra inches for elongated models. That's why length is the single most decisive measurement in any toilet seat measuring guide, and why misreading it by even half an inch can land you in the wrong product category.
Standard Dimensions for D-Shape and Other Profiles
D-shape and square bowls don't enjoy the same level of industry standardization as their round and elongated counterparts. These profiles appear most often in contemporary European-style bathrooms, wall-hung installations, and designer collections where aesthetics take priority. Their dimensions span wider ranges, and bolt-hole spacing may deviate from the 5.5-inch norm.
D-Shape bowls typically measure between 430 and 460 mm (16.9–18.1 inches) in length, placing them in a middle zone between round and elongated. Width runs from about 350 to 380 mm (13.75–15.0 inches), and bolt-hole spacing can stretch to 160 mm (6.3 inches) on some European models.
Square bowls are even more variable. Lengths generally range from 350 to 410 mm (13.75–16.1 inches), widths from 340 to 370 mm (13.4–14.5 inches), and bolt-hole spacing may reach 160 mm. Because square profiles are far less standardized, matching a seat often means sourcing directly from the toilet manufacturer rather than picking up a generic replacement.
The table below consolidates all four profiles into a single reference so you can cross-check your measurements at a glance. If you noted your standard toilet seat height during the measuring process, keep that figure handy as well — it can influence comfort-seat selection later.
| Bowl Shape | Typical Length (mm) | Typical Length (inches) | Typical Width (mm) | Typical Width (inches) | Common Bolt-Hole Spacing |
|---|---|---|---|---|---|
| Round | 400–420 | 15.75–16.5 | 350–370 | 14.0–14.5 | 140 mm (5.5 in) |
| Elongated | 450–480 | 17.75–18.9 | 350–370 | 14.0–14.5 | 140 mm (5.5 in) |
| D-Shape | 430–460 | 16.9–18.1 | 350–380 | 13.75–15.0 | 140–160 mm (5.5–6.3 in) |
| Square | 350–410 | 13.75–16.1 | 340–370 | 13.4–14.5 | 140–160 mm (5.5–6.3 in) |
A few practical pointers when using this table. If your measurements land comfortably inside the ranges for a given shape, you can shop with confidence — any seat labeled for that profile should fit. If your numbers sit right on the boundary between two shapes — say, a length of 430 mm that could be a long round or a short D-shape — rely on the visual shape identification you did earlier to break the tie. And if your readings fall outside every range listed here, you're likely dealing with a non-standard or imported toilet that may require a manufacturer-specific seat.
These ranges represent commonly accepted industry figures drawn from residential models widely available in North America, the UK, and Europe. Individual manufacturers may produce bowls that sit slightly outside these bands, which is precisely why measuring your own toilet always trumps relying on a chart alone. The chart narrows the search; your tape measure confirms the answer.
Standard dimensions cover the majority of bathrooms — but what about wall-hung toilets, back-to-wall units, or rimless bowls where the measuring process itself changes? Those modern installations introduce variables that a standard dimension chart simply doesn't account for.
How to Measure for Wall-Hung and Modern Toilet Types
Standard round and elongated bowls follow predictable measurement patterns, but modern bathroom designs throw a few curveballs. Wall-hung toilets, back-to-wall units, close-coupled suites, and rimless bowls all introduce physical constraints that change how you measure — and which numbers matter most. If you've ever wondered how to measure a toilet seat for replacement on one of these contemporary fixtures, the core length-width-bolt-hole method still applies, yet several additional checks become essential.
So, are toilet seats universal across all these installation types? Definitely not. A seat that fits a freestanding elongated bowl might share identical length and width figures with a wall-hung model yet still fail to install properly because of hinge clearance or lid swing. The toilet itself is only half the equation; the space around it completes the picture.
Measuring for Wall-Hung and Back-to-Wall Toilets
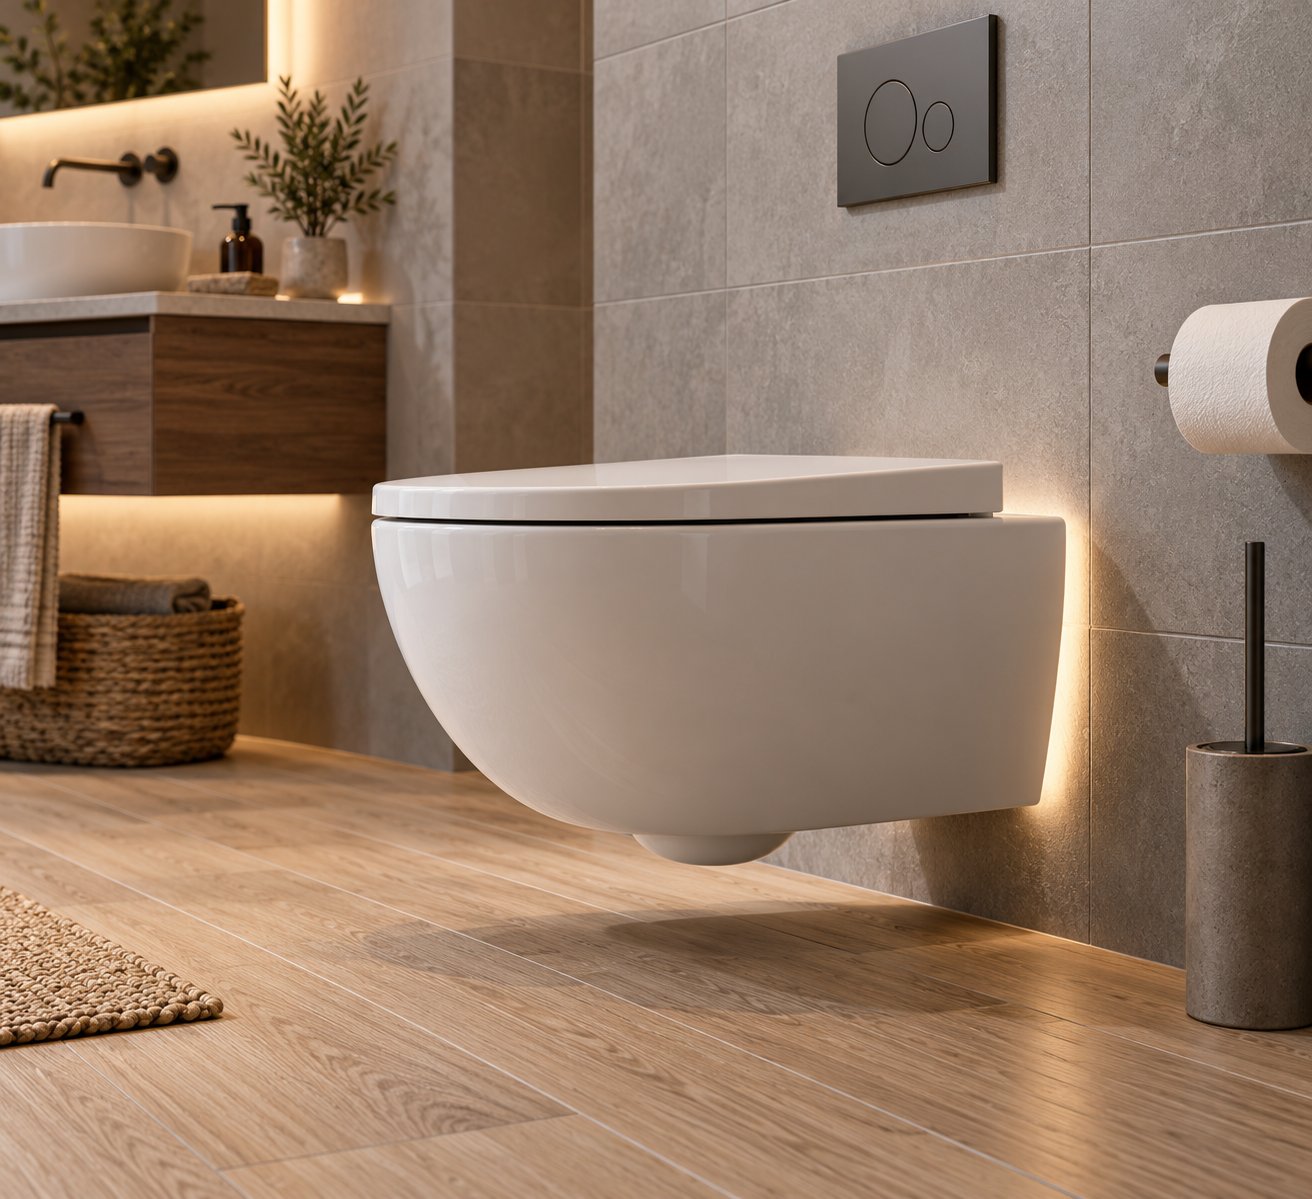
Wall-hung toilets mount directly to the wall with no visible cistern and no contact with the floor. The bowl projects straight outward, which creates a clean, floating look — and a measuring scenario you won't encounter with traditional models. Because there's no cistern behind the bowl, the wall itself becomes the rear obstacle. That makes the distance from the back of the bowl to the wall surface a critical measurement.
Why does this matter? When you open a toilet seat lid on a wall-hung unit, the lid swings backward. If the gap between the rear rim and the wall is too narrow, the lid either can't open past 90 degrees or it slams into the wall, chipping tiles or cracking the lid over time. Measure this gap carefully — anything less than about 40 to 50 mm should raise a flag, especially if you're considering a thicker soft-close lid.
Back-to-wall toilets sit on the floor but push flush against a wall or a furniture unit that conceals the cistern. The challenge here is similar but slightly different: the furniture panel or wall sits right behind the bowl, and access to the bolt-hole area from behind can be restricted. Top-fixing bolts — inserted from above rather than below — are often the only practical option because you simply can't reach underneath or behind the pan. When you measure a back-to-wall bowl, pay extra attention to the depth of the bolt-hole recesses and whether a top-fix or bottom-fix hinge system is required. Choosing the wrong fixing type means the seat physically cannot be secured, regardless of how perfectly the dimensions match.
Here are the additional checks specific to wall-hung and back-to-wall installations:
- Rear clearance to wall or furniture panel: Measure from the rearmost edge of the bowl rim to the wall or panel surface. Confirm the lid can swing open to at least 95 degrees without contact.
- Fixing access: Determine whether bolt holes are accessible from the top only (common in back-to-wall models) or from both top and bottom. This dictates which hinge mounting style you need.
- Toilet seat height from the floor: Wall-hung bowls are installed at a height chosen during construction — there's no fixed standard. Measure from the floor to the top of the rim and note it, because aftermarket raised seats or thicker comfort seats will add to that height.
- Bowl projection from the wall: Measure from the wall to the front tip of the bowl. Wall-hung models with shorter projections (sometimes called "short-projection" designs) may have reduced length dimensions that rule out standard elongated seats.
Measuring for Close-Coupled and Rimless Bowls
Close-coupled toilets — the classic setup where the cistern bolts directly onto the back of the bowl — are the most common type in many homes. They're straightforward to measure, with one frequently overlooked exception: the cistern lip. On some close-coupled models, the front edge of the cistern extends slightly forward, overhanging the rear portion of the bowl rim by 10 to 20 mm. That overhang can collide with the seat hinge when the lid is raised.
How do you measure a toilet seat clearance here? After recording your standard length, width, and bolt-hole spacing, place a straightedge or ruler across the top of the cistern's front face and check whether it protrudes past the bolt-hole line. If it does, measure the overhang distance. Any seat hinge assembly deeper than that gap will hit the cistern, preventing the lid from opening fully or creating an annoying rattle every time the seat is lowered.
Rimless bowls add another subtle variable. Traditional bowls have a pronounced rim channel that runs around the top of the bowl — this channel creates a defined ledge for the seat to rest on. Rimless designs eliminate that channel for easier cleaning, which can produce a slightly different rim profile. The top surface may be flatter or thinner, and some rimless bowls have a gentle inward slope rather than a flat ledge. A seat designed for a standard rimmed bowl might not sit as flush on a rimless model, especially if the seat's underside has rubber bumpers positioned for a wider rim ledge.
Additional checks for close-coupled and rimless models:
- Cistern overhang: Measure how far the cistern's front face projects beyond the bolt-hole center line. Ensure your chosen hinge assembly fits within that gap.
- Rim profile: Run your finger along the top of the bowl rim. If it's flat and wide (rimmed), standard seats will sit securely. If it's narrow or slopes inward (rimless), look for seats specifically labeled as rimless-compatible or check that the seat's rubber bumpers make full contact with the available rim surface.
- Seat bumper contact: On rimless bowls, verify that all rubber stabilizer bumpers on the underside of the seat will land on a solid surface. Bumpers that hang over the inner edge of a narrow rim cause the seat to wobble under weight.
One final scenario deserves attention: measuring for a brand-new bowl during a renovation versus replacing a seat on an existing toilet. When you're installing a toilet for the first time — perhaps during a bathroom remodel — resist the urge to grab a tape measure and wing it. The bowl manufacturer's specification sheet lists the exact recommended seat dimensions, compatible hinge types, and required clearances. These specs are far more precise than any manual measurement you can take from a bare bowl sitting in a box. Consult that documentation first, and save the tape measure for the verification step after installation.
For existing toilets where the manufacturer documentation is long gone, the step-by-step method from earlier in this guide remains your most reliable approach. Just layer on the additional checks above for whichever toilet type you're working with, and you'll capture every dimension that influences fit.
Accurate measurements across any toilet style put you in a strong position — but even the most careful person can fall into a handful of traps that turn good numbers into a bad purchase. Recognizing those pitfalls before they happen is what separates a smooth installation from a frustrating do-over.
Common Measuring Mistakes and How to Troubleshoot Them
You've followed every step, written down your numbers, and you're ready to shop — so what could possibly go wrong? Plenty, as it turns out. Even experienced DIYers trip over a handful of surprisingly simple errors that turn a confident purchase into a return-label headache. The good news is that every one of these mistakes is preventable once you know what to watch for.
Here are the five most common pitfalls, each one capable of sending the wrong standard toilet seat straight to your doorstep:
- Measuring the old seat instead of the bowl. This is the single most frequent error. The seat you're replacing may have been the wrong size from day one, or years of use and temperature fluctuations could have warped it. Copying dimensions from a flawed reference just duplicates the original mistake.
- Skipping bolt-hole spacing. Length and width get all the attention, but if the bolt holes don't align, the seat physically cannot mount. Even a 10 mm mismatch means the fixing bolts either won't drop through the holes or will sit at an angle that prevents the seat from tightening securely.
- Forgetting rear clearance to the cistern or wall. A seat can match every dimensional spec on paper and still fail in practice if the lid can't swing open without slamming into the cistern or the wall behind the toilet. This is especially common with close-coupled models where the cistern lip overhangs the bolt-hole area.
- Measuring inner bowl edges instead of outer rim edges. It's a subtle distinction, but if you drop the tape into the bowl opening rather than keeping it on the outermost porcelain rim, your length and width readings will come in short — sometimes by 15 to 20 mm. That's enough to push you into the wrong seat category entirely.
- Rounding measurements up "just to be safe." Intuition says bigger is better, but an oversized seat creates overhang at the front and sides, leading to an unstable platform that shifts under weight. The front lip of an overhanging seat also becomes a shin-catching hazard in tight bathrooms.
Measuring the Old Seat Instead of the Bowl
This mistake deserves its own spotlight because it accounts for more wrong-size purchases than all the other errors combined. Imagine you've had the same toilet seat for ten years. It felt a little loose, maybe rocked slightly to one side, but you got used to it. You pull out a tape measure, record the seat's length and width, and order an identical replacement. The new seat arrives — and it wobbles in exactly the same way.
Why? Because the original was never the right fit. Perhaps a previous homeowner grabbed whatever was on the shelf at the hardware store, or the seat was a "close enough" pick from a toilet seats Home Depot run that prioritized speed over precision. Plastic and wood seats can also warp over time, expanding or contracting with bathroom humidity and temperature cycles. A warped seat gives you distorted measurements that don't reflect the actual bowl underneath.
The fix is simple: always measure the porcelain bowl itself. Remove the old seat completely, exposing the bare rim and bolt holes. Every number you record should come from the ceramic — that's the surface that never changes shape.
Ignoring Bolt-Hole Spacing and Rear Clearance
Picture this scenario. You know how to measure toilet bowl length and width perfectly. Your readings match the product listing down to the millimeter. You order with confidence, the box arrives, and the seat drops onto the bowl beautifully — until you try to thread the bolts. The holes don't line up. Or they line up, but the hinge assembly bumps against the cistern every time you lift the lid.
Bolt-hole spacing is the overlooked third dimension that holds everything together, literally. Most standard toilets use a center-to-center spacing of about 150 mm (5.9 inches) in UK models and 140 mm (5.5 inches) in North American models, but deviations exist — particularly on imported, vintage, or designer fixtures. Adjustable hinges can compensate for minor differences, typically within a 20 mm window, yet they can't bridge a 30 mm gap.
Rear clearance is equally critical. Soft-close hinge mechanisms add bulk behind the pivot point, and if there's less than 40 mm between the bolt holes and the cistern face (or wall), that mechanism has nowhere to go. The lid opens partway, meets resistance, and either stops short or scrapes against the cistern with every use. Measuring this gap takes five seconds and eliminates one of the most frustrating post-purchase discoveries.
What to Do When Measurements Fall Between Standard Sizes
Sometimes you follow every step correctly and your numbers still don't line up neatly with any standard size chart. A bowl length of 435 mm, for example, sits in a no-man's-land between the round range (400–420 mm) and the elongated range (450–480 mm). Before you panic, consider the likely explanations:
- Non-standard or imported toilet. European, Japanese, and some Australian models don't always conform to North American sizing conventions. The bowl may require a manufacturer-specific seat.
- Measurement error. A tape that dipped into the bowl, an angled reading, or a starting point that was slightly off-center can skew results by 10–15 mm. Re-measure using the exact method from the step-by-step instructions: center point between bolt holes, straight line to the outermost front rim edge, tape held level.
- Specialist or transitional shape. Some bowls blend design elements — a slightly elongated round or a compact D-shape, for example. These transitional profiles sit between standard categories by design.
If re-measuring confirms your original readings, try approaching the problem from the other direction. Look up your toilet's brand and model number (often stamped inside the tank or on the underside of the bowl) and search for the manufacturer's specification sheet. That document will list the exact recommended seat dimensions and eliminate guesswork entirely. When the model number has worn off or the brand is unknown, a plumber or bathroom specialist can often identify the toilet type from a photo.
When in doubt, round down on length rather than up — a seat that's slightly shorter than the bowl is stable and functional, while one that overhangs creates wobble, discomfort, and a visual mismatch you'll notice every day.
That principle applies to width as well. A seat a few millimeters narrower than the bowl rim still sits securely on the porcelain and looks proportional. A seat that extends past the rim edges, even by a small margin, catches clothing, pinches skin, and telegraphs "wrong size" to anyone who glances at it.
Avoiding these mistakes puts you in a strong position to buy with confidence — but dimensions alone don't tell the whole story. The material a seat is made from, its thickness, and the type of hinge it uses all introduce physical variables that interact directly with those measurements you've so carefully taken.
Material and Hinge Considerations That Affect Toilet Seat Fit
Your measurements are locked in, common mistakes are on your radar, and you're nearly ready to shop. But here's something most guides completely ignore: two seats with identical length, width, and bolt-hole spacing can still fit differently depending on what they're made of and how their hinges are built. Material thickness, weight, and hinge mechanism all introduce physical variables that interact directly with the commode size you've measured — and overlooking them is how people end up with a seat that technically matches the specs yet feels wrong the moment they sit down.
How Seat Thickness and Material Affect Hinge Clearance
Toilet seats are manufactured from a range of materials, and each one brings a different thickness and weight profile to the table. The four most common options you'll encounter are polypropylene (PP), urea-formaldehyde (UF, sometimes called Duroplast), wood, and resin. These differences matter because the hinge assembly has to support the seat's weight, accommodate its thickness at the mounting point, and still leave enough clearance behind the bowl for the lid to open without obstruction.
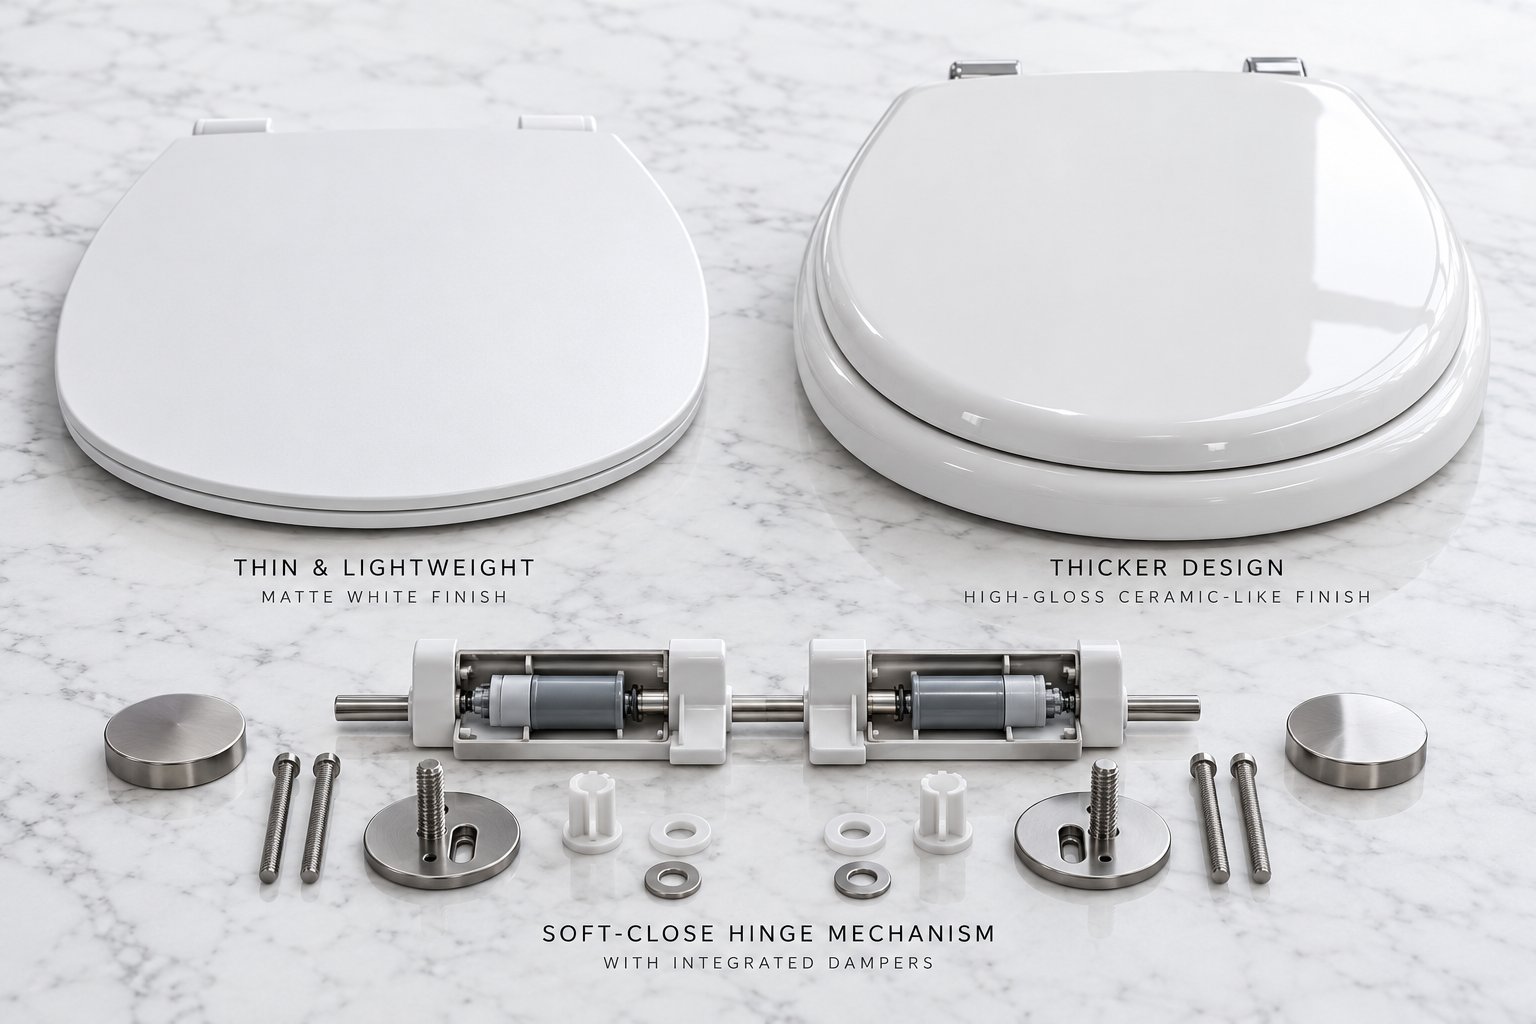
PP seats are the lightweight option. They're flexible, affordable, and thin enough that most standard hinge assemblies handle them easily. You'll find them in the majority of budget and mid-range retail products. Their lower weight means less stress on the hinge mechanism over time, and their thinner profile rarely causes clearance issues — even in tight spaces between the bolt holes and the cistern.
UF seats sit at the opposite end of the spectrum. They're denser, heavier, and significantly more rigid. That rigidity delivers a premium, ceramic-like feel and excellent scratch resistance, but it also means the hinge has to work harder. A UF lid dropping from a fully open position carries more momentum than a PP lid of the same dimensions, which is why UF seats are frequently paired with sturdier hinge mechanisms that have larger damping components. Those larger components take up more space behind the bolt holes — space you measured in your rear clearance check.
Wood and resin seats fall somewhere in between but tend to lean toward the heavier side. Resin seats with embedded decorative elements can be especially thick, sometimes adding 5 to 8 mm beyond what a standard PP seat measures at the hinge point. If you're working with a tight rear clearance — say, a close-coupled toilet where the cistern lip nearly touches the bolt-hole area — that extra thickness can be the difference between a lid that opens smoothly and one that jams at 80 degrees.
The practical takeaway? When you're learning how to size a toilet seat, dimensions alone aren't the finish line. Factor in the material's thickness at the hinge attachment zone and compare it to the rear clearance figure you recorded. A heavy UF seat on a toilet with minimal cistern gap is a recipe for frustration, no matter how perfectly the length and width match.
The table below compares PP and UF characteristics specifically through the lens of fit — the properties that influence whether a seat works harmoniously with your bowl's dimensions and available clearance.
| Characteristic | PP (Polypropylene) | UF (Urea-Formaldehyde / Duroplast) |
|---|---|---|
| Material Type | Thermoplastic | Thermoset plastic |
| Typical Weight | Lightweight (approx. 1.2–1.8 kg) | Heavier (approx. 2.0–3.0 kg) |
| Seat Thickness at Hinge Zone | Thinner profile, typically 15–20 mm | Thicker profile, typically 20–28 mm |
| Rigidity | Flexible, slight give under load | Very rigid, no flex |
| Hinge Compatibility | Standard, soft-close, or quick-release | Soft-close or heavy-duty quick-release recommended |
| Scratch Resistance | Moderate | Very high |
| Surface Finish | Matte or satin | High-gloss, ceramic-like |
| Durability | Good for residential use | Excellent; suited for high-traffic and premium applications |
Notice how the thickness at the hinge zone differs by up to 8 mm between PP and UF. That gap directly affects how much room the hinge assembly needs behind the bolt holes. If your rear clearance measurement from earlier was borderline — around 35 to 45 mm — a thinner PP seat may work perfectly while a UF seat of the same commode size could push the hinge into the cistern.
Soft-Close and Quick-Release Hinge Fitting Requirements
Hinge type is the other half of the fit equation that raw dimensions don't capture. A basic friction hinge is compact — just a simple pivot mechanism that adds minimal bulk. Soft-close hinges, on the other hand, contain an internal damping mechanism that controls the lowering speed of the seat and lid. That damper adds both height and depth to the hinge body, meaning the assembly extends further behind the bolt holes than a standard hinge would.
Imagine you're measuring a toilet with only 40 mm of clearance between the bolt holes and the cistern. A basic hinge fits with room to spare. A soft-close hinge, with its damper housing extending an extra 10 to 15 mm rearward, suddenly eats into that gap. The result? The lid opens to about 85 degrees, meets the cistern, and stops. Or worse, it scrapes across the ceramic every time someone lifts it, gradually chipping both surfaces.
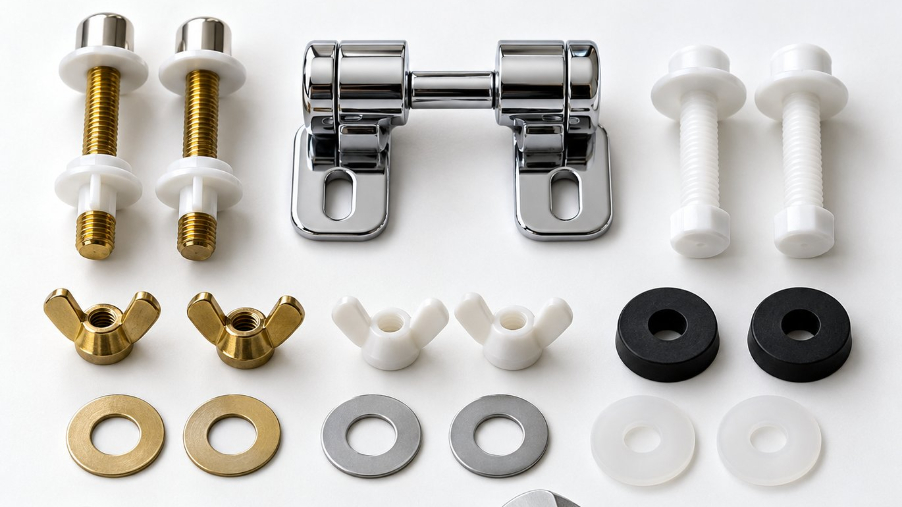
Quick-release mechanisms introduce yet another layer — literally. These systems use a mounting bracket that stays permanently attached to the bowl while allowing the seat and lid to click on and off for cleaning. That bracket sits between the hinge body and the porcelain, adding a few millimeters of height at the pivot point. The seat may sit slightly higher at the back than a fixed-hinge seat of identical dimensions, and the release mechanism's width can occasionally interfere with narrow bolt-hole recesses found on some European-style bowls.
For anyone learning how to measure for a new toilet seat, here's the critical connection: your rear clearance measurement and bolt-hole position aren't just about the seat — they determine which hinge types are physically possible on your specific toilet. A bowl with generous rear clearance opens the door to soft-close, quick-release, or combination hinges without compromise. A bowl with tight clearance may limit you to slimline hinge profiles or basic friction hinges, regardless of how much you prefer the soft-close feature.
This is also where material choice and hinge type intersect. Pairing a heavy UF seat with a soft-close mechanism requires a damper calibrated for that weight. A damper designed for a lighter PP seat won't control a UF lid's closing speed correctly — it'll either close too fast (defeating the purpose) or fail to close fully. When measuring a toilet and selecting components, treating the seat material, hinge mechanism, and bowl dimensions as a single interconnected system is the only reliable approach.
For manufacturers and bathroom brands developing seat and lid assemblies at scale, this material-hinge interaction becomes even more critical. Selecting the wrong damper strength for a given material can produce thousands of units that underperform in the field. Tianyun's PP and UF Toilet Seat Cover Collection provides material selection guidance and soft-close hinge matching support designed specifically for trade professionals navigating these compatibility decisions during OEM or custom seat development.
With material thickness, hinge bulk, and rear clearance all factored into your decision, the final piece of the puzzle is translating every measurement and specification into a confident purchase. That means understanding how product listings present dimensions — and knowing exactly which numbers to compare against the readings on your notepad.
Using Your Measurements to Find the Perfect Toilet Seat
You've got a notepad full of numbers — length, width, bolt-hole spacing, rear clearance, material preference, and hinge type. That's the hard part done. The surprisingly tricky part? Matching those figures to the way online retailers and manufacturers actually describe their products. Toilet seat listings are riddled with terminology inconsistencies that can make a perfectly measured buyer second-guess everything. Understanding what those listings really mean is the final skill that turns your measurements into a seat that fits like it was made for your bowl.
How to Read Toilet Seat Product Listings Using Your Measurements
Here's where confusion creeps in. You measure toilet bowl dimensions carefully from bolt holes to front rim and get 455 mm. You find a seat listed at 470 mm in length. Does it fit, or is it 15 mm too long? The answer depends entirely on what the manufacturer means by "length" — and that definition varies more than you'd expect.
Product listings typically use one of two length conventions, and they rarely tell you which one they're using:
- Overall seat length — This measures the seat from the very back of the hinge housing to the front tip of the seat. It includes material that extends behind the bolt-hole center line, which means it's always longer than your bolt-hole-to-front-rim measurement. A seat listed at 470 mm overall might only extend 450 mm forward of the bolt holes, putting it right in your target range.
- Bowl-fit length (or fixing-to-front length) — This measures from the bolt-hole center line to the front edge of the seat, directly corresponding to the reading you took from your bowl. When a listing uses this convention, you can compare the numbers almost one to one.
Width creates a similar trap. Some manufacturers list external width, which is the widest measurement across the outside of the seat shell. Others list seat opening width, which measures the inner cutout where you actually sit. Your measurement — taken across the outer rim of the porcelain bowl — should be compared against the external width figure, not the opening width. Comparing your outer-rim reading to a seat's inner opening dimension makes the seat look far too narrow, sending you hunting for a larger size you don't actually need.
A practical rule of thumb: if the listing doesn't explicitly label which length and width convention it uses, look for a technical drawing. Blue Leaf Bathware's measuring guide recommends comparing the endpoints marked on the product drawing with the exact endpoints you used on your bowl. A drawing with dimensioned arrows is worth more than any verbal description. If no drawing is available and the terminology is ambiguous, contact the seller before ordering. A quick message costs nothing; a return costs time, shipping, and patience.
So which measurement matters most for fit? Length from the bolt holes to the front rim is the primary determinant. It's the dimension that separates round from elongated, that dictates whether the seat's front edge aligns with the bowl or overhangs awkwardly, and that controls how stable the seat feels under load. Width is the secondary check — important, but less likely to be the source of a mismatch since standard toilet seat dimensions for width cluster within a narrow 350–380 mm band across most bowl shapes. Bolt-hole spacing is the pass-or-fail gatekeeper: if the holes don't align, nothing else matters.
What about tolerance? A seat that's 3 to 5 mm shorter than your bowl length will sit slightly recessed from the front rim — barely noticeable and perfectly functional. A seat that extends 5 mm beyond the front rim starts to look and feel wrong: the overhang catches the eye, and the unsupported front edge can flex downward under weight. For width, a tolerance of plus or minus 5 mm is generally acceptable. Beyond that, you're entering territory where the seat either looks undersized or creates overhang at the sides. Adjustable hinges can compensate for bolt-hole spacing variations of roughly 15–20 mm in most products, but always verify the manufacturer's stated adjustment range rather than assuming.
Choosing the Right Replacement Seat With Confidence
You've decoded the listing terminology. You know which numbers correspond to which real-world dimensions. The final step is a structured cross-reference — matching your shape identification and every recorded measurement against the product specifications in a deliberate sequence. Rushing this comparison is how people end up with a seat that passes three checks but fails the fourth.
Follow this checklist in order. Each step builds on the one before it, and skipping ahead can mask a critical mismatch:
- Confirm the bowl shape. Verify that the product is explicitly labeled for your bowl profile — round, elongated, D-shape, or square. A seat labeled "universal" should still list the shapes it covers and the dimension ranges it accommodates. If it doesn't, treat it with skepticism.
- Verify the length. Compare your bolt-hole-to-front-rim measurement against the seat's bowl-fit length (not overall length, unless you've accounted for the behind-the-hinge overhang). The seat should match your figure within a 3–5 mm tolerance, ideally flush or very slightly shorter.
- Verify the width. Match your outer-rim-to-outer-rim width against the seat's external width. Again, a tolerance of plus or minus 5 mm keeps things looking clean and feeling stable.
- Check bolt-hole spacing. Confirm that your center-to-center bolt-hole measurement falls within the seat's stated fixing range. If the listing shows a single fixed spacing rather than an adjustable range, your measurement needs to match exactly.
- Confirm rear clearance. Factor in the hinge type. If you're choosing a soft-close or quick-release mechanism, verify that the hinge assembly's depth doesn't exceed the gap between your bolt holes and the cistern or wall. The product's installation diagram should show the hinge's rear projection — if it doesn't, ask.
- Check material and hinge type compatibility. A heavier UF seat paired with a damper designed for lightweight PP won't close correctly. Ensure the hinge mechanism matches the seat material's weight class, and confirm that the hinge profile fits within your available clearance. Are all toilet seats the same size when it comes to hinge assemblies? Not at all — even seats with identical bowl dimensions can require completely different mounting hardware.
For homeowners replacing a single seat, this checklist turns a potentially confusing shopping experience into a methodical, five-minute comparison. Keep your notepad next to your screen, tick each box in sequence, and you'll know with certainty whether a product fits before it ships.
For trade professionals and bathroom brands sourcing seats in volume — where a mismatch doesn't mean one return but hundreds — the stakes are even higher. Teams need to measure toilet bowls across multiple product lines and match those toilet seat measurements against seat and lid assemblies that will ship at scale. Tianyun's PP and UF Toilet Seat Cover Collection offers OEM customization support for exactly this scenario, helping teams match precise bowl measurements to custom seat and lid assemblies with the correct material weight, hinge calibration, and dimensional tolerances built in from the production stage.
Accurate measurements plus a clear understanding of product listing terminology equals a perfect fit every time — no guesswork, no returns, no wobbly seats.
That equation is the entire philosophy behind this guide. Whether you're a first-time homeowner staring at a bare porcelain bowl or a sourcing manager spec'ing out thousands of units, the process is identical: identify the shape, capture the dimensions, decode the listing, and verify every number before committing. Two minutes of measuring and five minutes of cross-referencing save hours of frustration — and ensure the seat you choose feels like it was designed for your toilet, because in every way that matters, it was.
Frequently Asked Questions About Measuring Toilet Seats
1. Are toilet seats universal or one-size-fits-all?
No. Toilet seats vary by bowl shape (round, elongated, D-shape, or square), overall dimensions, and bolt-hole configuration. A seat designed for a round bowl will not fit an elongated or D-shape bowl properly, even if the width looks similar. You need to identify your bowl shape and measure three critical dimensions — length from bolt holes to front rim, width at the widest point, and center-to-center bolt-hole spacing — before purchasing a replacement.
2. What is the most important measurement when buying a toilet seat?
Length from the center point between the two bolt-fixing holes to the outermost front edge of the bowl rim is the primary measurement. This single figure separates round bowls (roughly 400-420 mm) from elongated bowls (roughly 450-480 mm) and determines whether the seat's front edge will align correctly with your bowl. Width and bolt-hole spacing are essential secondary checks, but length mismatches cause the most noticeable fit problems.
3. Should I measure the old toilet seat or the bowl itself?
Always measure the porcelain bowl, never the old seat. The previous seat may have been the wrong size originally, or it could have warped from years of humidity and temperature changes. Remove the old seat completely to expose the bare rim and bolt holes, then take all readings directly from the ceramic surface. This eliminates the risk of duplicating a sizing mistake from the original installation.
4. How do I measure a toilet seat for a wall-hung or back-to-wall toilet?
Use the same core method — measure length, width, and bolt-hole spacing from the porcelain bowl. Then add two extra checks: measure the distance from the rear of the bowl to the wall surface to confirm the lid can open past 90 degrees without hitting the wall, and determine whether the bolt holes require a top-fix or bottom-fix hinge system. Back-to-wall models often restrict access from behind, making top-fix hinges the only practical option regardless of dimensional match.
5. What should I do if my toilet measurements don't match any standard size chart?
First, re-measure using the correct method — tape on the outer rim, starting from the center point between bolt holes, held level and taut. If the readings still fall outside standard ranges, your toilet may be a non-standard, imported, or transitional-shape model. Look for a brand name and model number stamped inside the tank or under the bowl, then search for the manufacturer's specification sheet. When the model is unidentifiable, consult a plumber or bathroom specialist who can often identify the toilet from a photo and recommend a compatible seat.
Apply This Insight to Your Project
Tell us what you are building and how the topic “Wrong Size Again? The Toilet Seat Measuring Guide That Fixes It” relates to your application. Our engineering team can help evaluate the next step.