What a Toilet Seat Hardware Kit Actually Is and Why It Matters
Imagine sitting down and feeling the entire seat shift beneath you. You tighten the bolts, and a week later the wobble returns. The culprit is almost never the seat itself - it is the small bag of fasteners holding everything together. A toilet seat hardware kit is the complete collection of toilet seat bolts, nuts, washers, hinges, and mounting accessories packaged as a single set to secure a seat to the bowl. Despite its role as the literal connection between you and the porcelain, most homeowners - and even sourcing professionals who spec toilet seat parts for manufacturing runs - would struggle to name every piece inside one.
What Exactly Is a Toilet Seat Hardware Kit
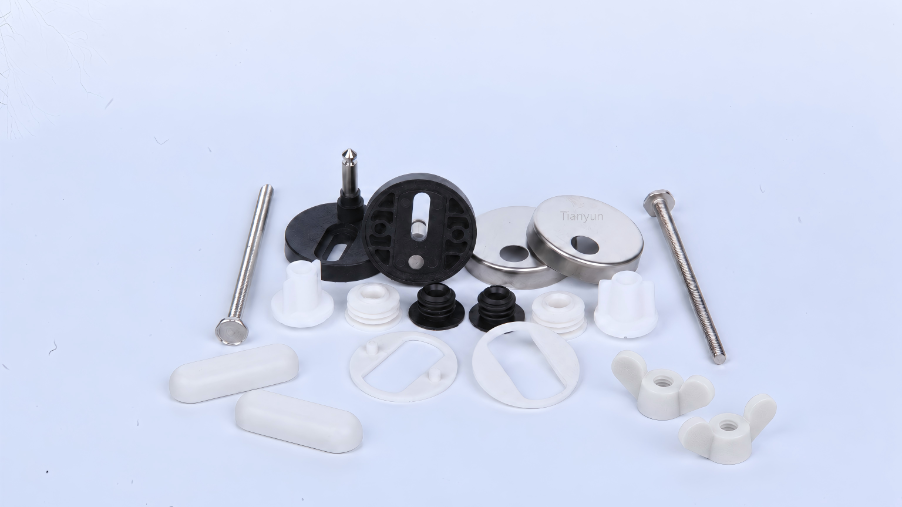
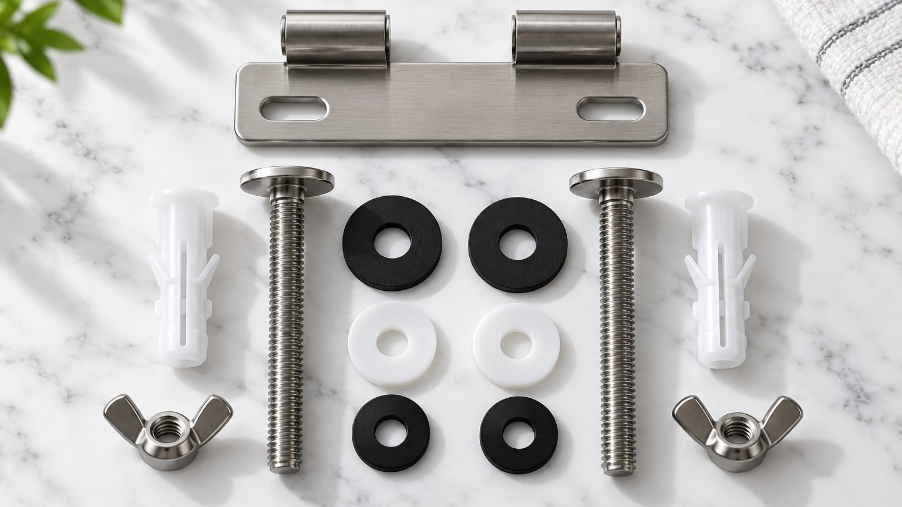
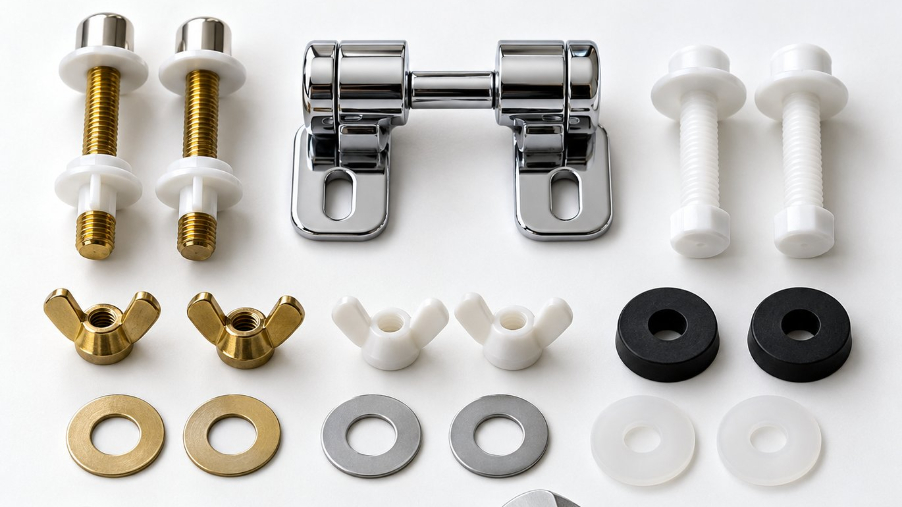
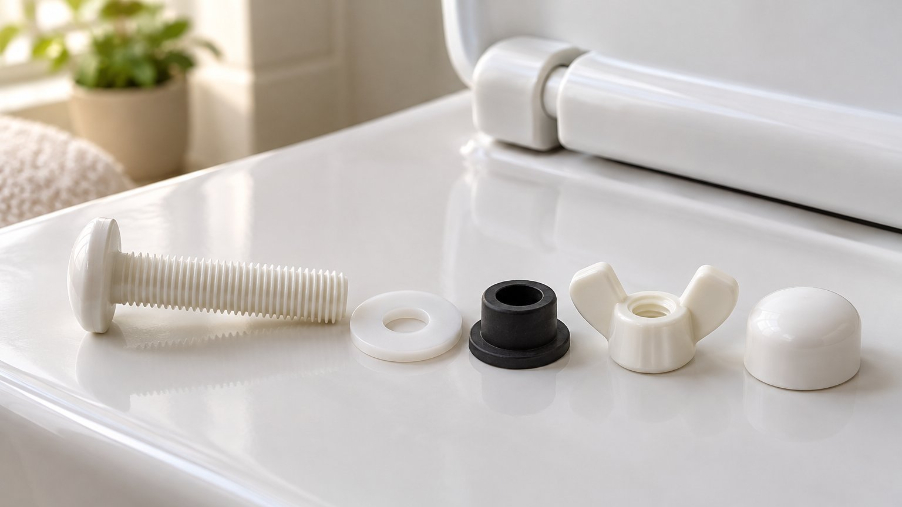
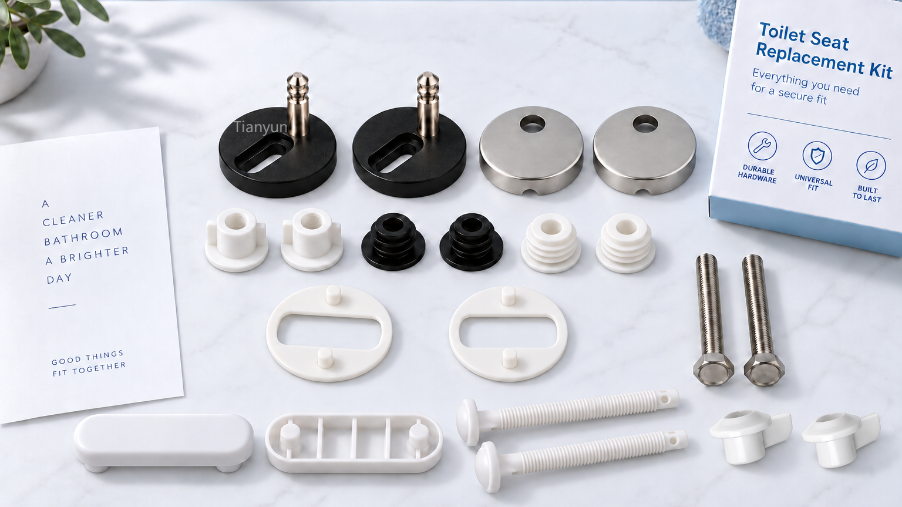
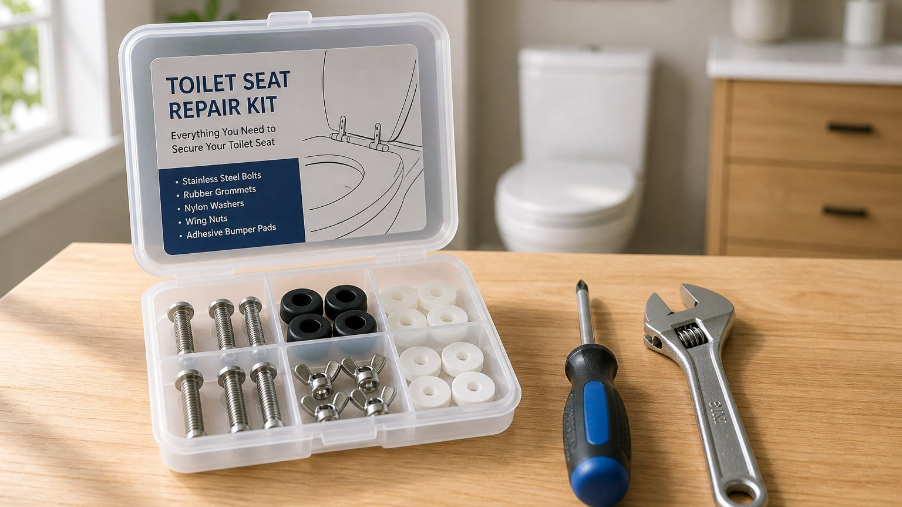
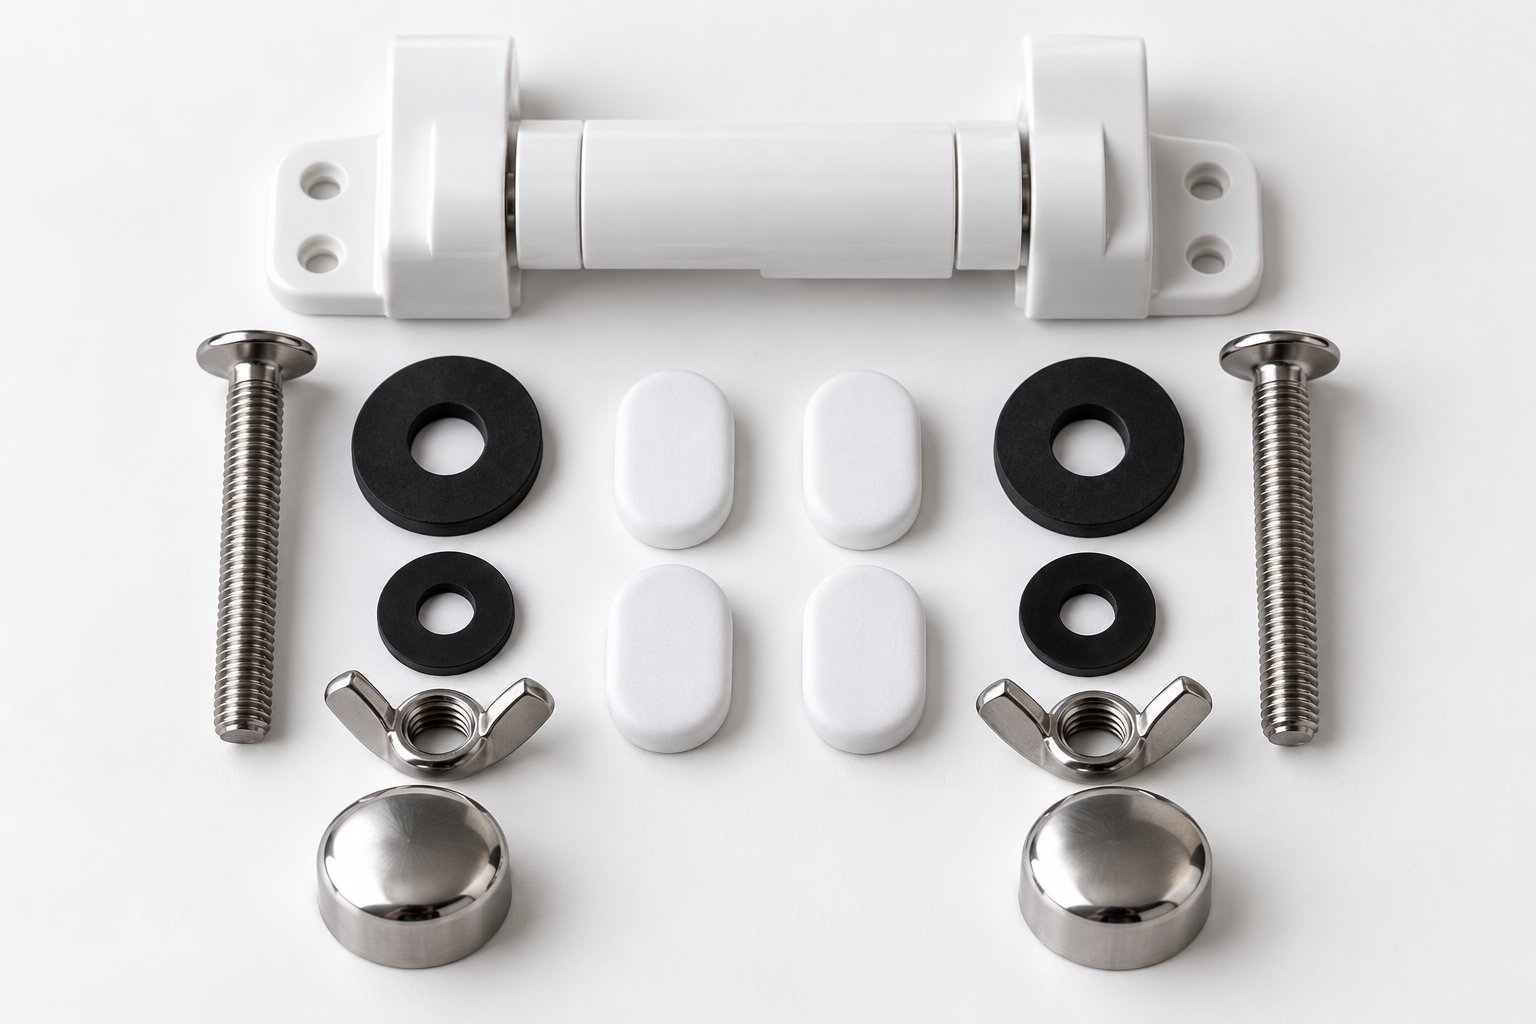
In plain terms, this kit contains every fastener and fitting needed to attach a toilet seat and lid assembly to a bowl's mounting holes. A typical set includes two toilet seat screws or bolts, matching nuts (wing-style or hex), rubber or fiber washers, and the hinge mechanism that lets the seat pivot open and close. Some kits also bundle rubber bumpers, decorative bolt caps, and stabilizer pads.
These kits serve two distinct markets. Individual homeowners pick one up when a seat starts rocking or when they install a replacement. On the commercial side, OEM manufacturers and sanitary ware suppliers source them in bulk to pair with new toilet seats rolling off production lines. Whether you are fixing a single bathroom or outfitting a product catalog, the contents follow the same core formula: bolt, washer, nut, hinge.
Hardware Kit vs. Flange Kit vs. Tank Bolt Kit
One of the most common shopping mistakes is grabbing the wrong kit off the shelf. Three different product categories sound similar yet connect to completely different parts of a toilet. Here is a quick way to tell them apart:
| Kit Type | Typical Contents | Where It Connects |
|---|---|---|
| Toilet Seat Hardware Kit | Seat bolts, nuts, washers, toilet lid hinge, bumpers, bolt caps | Seat and lid to the top of the bowl rim |
| Toilet Flange Hardware Kit | Closet bolts, brass flange ring, wax seal, floor screws | Toilet base to the drainpipe flange in the floor |
| Tank-to-Bowl Bolt Kit | Long brass or stainless bolts, rubber tank washers, hex nuts | Toilet tank to the rear deck of the bowl |
Mixing these up leads to wasted time and return trips. If you are shopping for Lowe's American Standard toilet parts, for instance, you will find all three categories listed on the same aisle - so knowing which fastener group you actually need saves real frustration.
Why This Small Kit Deserves Attention
A worn or mismatched set of toilet seat bolts triggers a chain of problems that most people blame on the seat itself. Lateral sliding stresses the porcelain ears where the mounting holes sit, and repeated movement can eventually produce hairline stress cracks in the glaze. A seat that rocks also breaks the seal between the bumpers and the bowl surface, letting moisture creep underneath - an open invitation for bacteria and mildew. Even a stripped plastic nut, the cheapest component in the kit, can turn a stable seat into a safety concern for children and elderly household members. As one maintenance guide from Horow notes, over-tightening degraded hardware risks cracking the porcelain itself, turning a five-dollar fix into a full toilet replacement.
A properly matched toilet seat hardware kit is the most cost-effective maintenance investment in any bathroom - protecting the seat, the bowl, and everyone who sits down.
The real challenge is not buying a kit; it is knowing whether yours has actually failed, which parts are responsible, and what type of replacement you need. Those answers start with recognizing the warning signs hiding beneath those little plastic caps.
Signs Your Toilet Seat Hardware Needs Replacing
Most people ignore their toilet seat hardware until something feels obviously wrong - a dramatic slide, a loud crack, or a bolt that crumbles between their fingers. The truth is, failure rarely happens all at once. It builds gradually, and the earliest clues are easy to spot if you know where to look. Catching them early means a quick swap of toilet seat replacement parts instead of a panicked weekend repair.
Visible Signs of Worn or Damaged Hardware
Pop off those decorative bolt caps and take a close look. You might be surprised by what is hiding underneath. Here are the visual red flags that signal your hardware is on borrowed time:
Rust streaks around the bolt holes are the most obvious giveaway. Even a faint orange stain on the porcelain surface tells you that metal fasteners have begun corroding from the inside out. If the streaks have spread beyond the cap area, the bolt's structural integrity is already compromised.
Hairline cracks on plastic mounting posts are subtler but just as serious. These posts bear the load every time someone sits down, and once a crack starts, it only widens. White mineral deposits - that chalky, crystalline buildup you sometimes see on faucets - can also freeze metal threads in place, making future removal difficult or impossible without cutting tools.
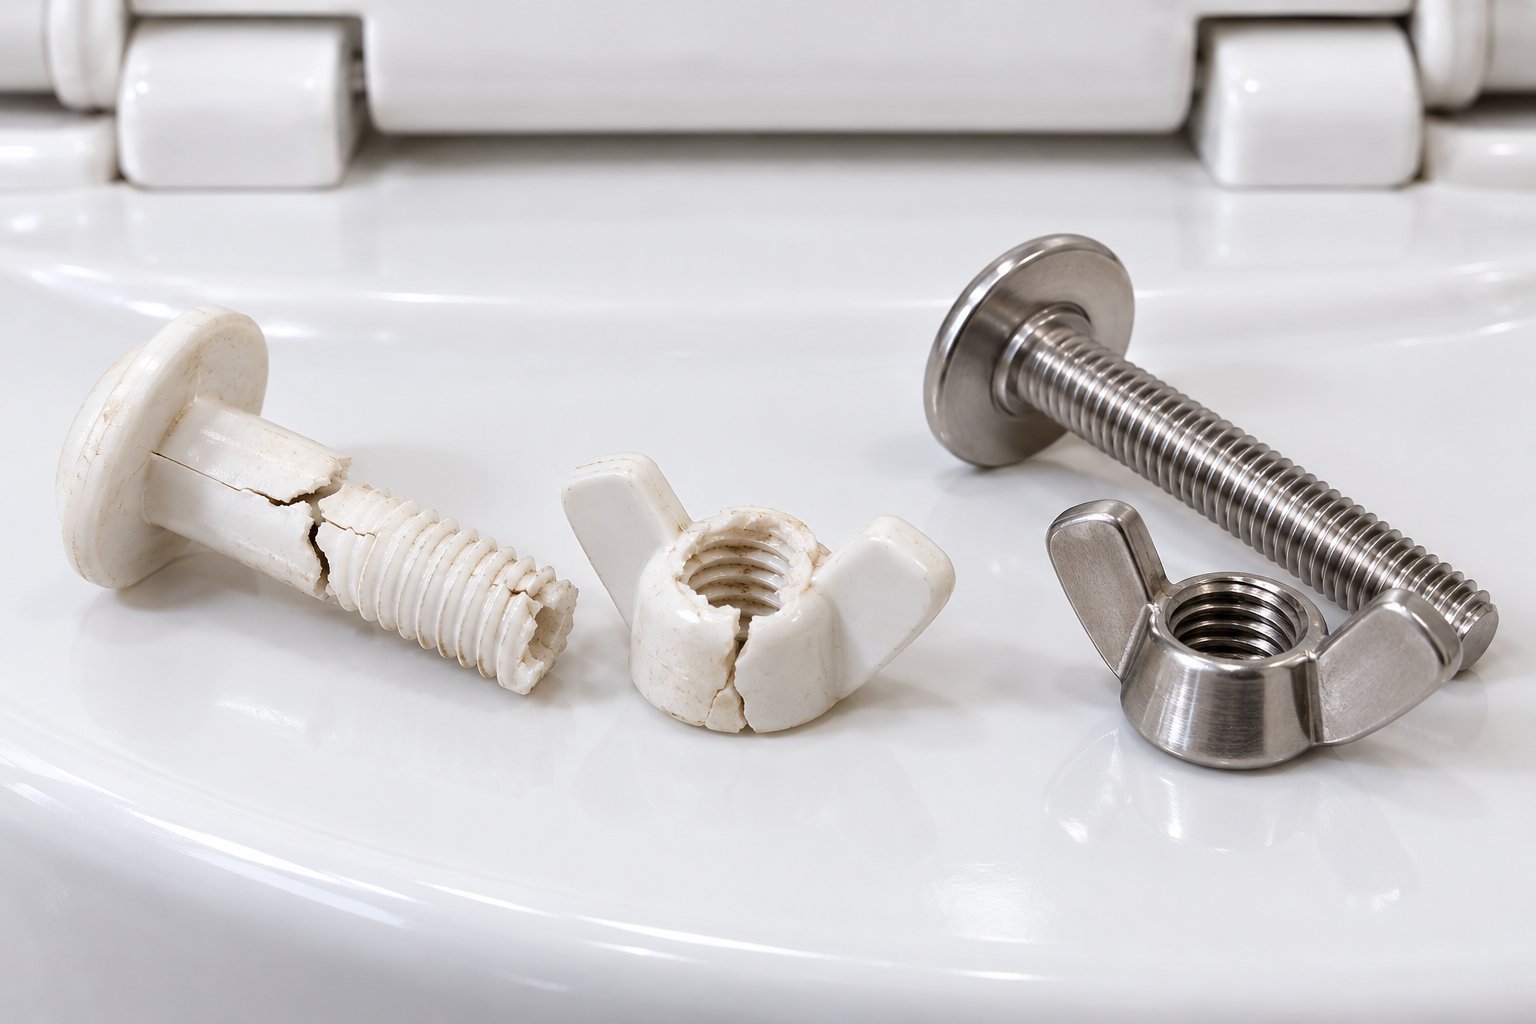
Then there are the wing nuts that crumble on contact. Corroded zinc or low-grade metal nuts may look intact from a distance, but the moment you apply torque with your fingers, they disintegrate into flaky shards. If any of these signs are present, no amount of tightening will restore a secure connection. You are looking at a toilet seat replacement kit, not a quick adjustment.
Behavioral Symptoms You Can Feel
Sometimes the hardware looks fine on the surface, but the seat tells a different story the moment you sit down. Pay attention to these tactile clues:
A lateral slide - where the seat shifts left or right under your weight - usually means the bolt threads have stripped or the nuts have lost their grip. You might also notice the seat drifting to one side even after you tighten everything down. That persistent drift often points to compressed rubber washers that no longer fill the gap between the bolt and the porcelain hole.
A lid that refuses to stay upright typically signals a bent hinge pin or a worn-out hinge barrel. The pivot mechanism has lost the friction needed to hold the lid at an open angle, so it swings forward unpredictably. And if you hear a faint clicking noise when you shift your weight, that is the sound of loose fasteners rocking inside oversized or degraded mounting holes - a clear sign the existing hardware has reached the end of its useful life.
Each of these symptoms has a mechanical cause, and each one confirms the same conclusion: the original toilet seat replacement parts are no longer doing their job.
When Tightening Alone Won't Fix It
Here is the mistake nearly everyone makes. The seat wobbles, so you grab a wrench and crank the nut tighter. It feels solid for a day or two, then the wobble returns, and you tighten again. This cycle is more than frustrating - it is risky. Repeatedly forcing torque onto degraded hardware can crack the porcelain ear of the bowl, the thin raised section where the mounting holes sit. That kind of damage is irreversible and far more expensive than a new set of bolts.
Stop tightening and start replacing when you encounter any of these scenarios:
- Stripped bolt threads - the nut spins freely without drawing tighter, no matter how many turns you give it.
- Cracked plastic nuts - visible fractures or chunks missing from the nut body, meaning it can no longer hold clamping pressure.
- Missing or flattened washers - without a washer buffer, metal presses directly against porcelain, increasing chip and crack risk with every use.
- Corroded metal that snaps under torque - if a bolt or nut breaks apart when you try to tighten it, the remaining fragment may be stuck inside the mounting hole, complicating removal.
If even one item on that list matches your situation, a fresh toilet seat hardware kit is the only reliable fix. Browsing lowes toilet seats or any major retailer will show you dozens of options - but picking the right one depends on understanding exactly what is inside these kits and how each component works. That component-level breakdown comes next.
Every Component Inside a Toilet Seat Hardware Kit Explained
Knowing your hardware has failed is one thing. Knowing exactly which piece failed - and what to look for in its replacement - is something else entirely. Most packaging lists a generic parts count without explaining what each component actually does. Open any kit on the counter and you will find a handful of small pieces that, together, carry the full load of every person who sits down. Here is what each one is, what it is made of, and why it matters.
Bolts, Nuts, and Washers Defined
Every kit centers on the same trio of fasteners. The seat bolt drops through the hinge hole on the seat, passes through the mounting hole on the bowl rim, and extends below the porcelain. The nut threads onto the exposed bolt end from underneath, drawing everything tight. Between them, a rubber or fiber washer cushions the joint - preventing metal-on-ceramic contact, dampening vibration, and creating a snug, non-scratch seal.
Some kits include wing nuts you can finger-tighten without tools, which is ideal for quick residential swaps. Others ship with hex nuts that demand a wrench, delivering higher clamping force for heavy-use settings. The material of each fastener shapes its lifespan and performance:
| Component | Typical Material Options | Function |
|---|---|---|
| Seat Bolt | Plastic, stainless steel, brass, zinc alloy | Threads through seat hinge and bowl hole to anchor the seat |
| Nut (wing or hex) | Plastic, stainless steel, brass, zinc alloy | Secures the bolt from below and controls clamping pressure |
| Rubber / Fiber Washer | EPDM rubber, nylon, fiber composite | Seals the gap between fastener and porcelain to prevent scratches and moisture intrusion |
| Metal Washer (if included) | Stainless steel, brass | Distributes load evenly across the nut face to reduce point stress |
When you shop for a lowes toilet seat or browse any major retailer, the material callout on the package tells you a lot. Stainless steel and brass resist bathroom humidity, while bare zinc alloy can corrode faster than you would expect in a wet environment. Plastic fasteners trade clamping strength for complete corrosion immunity - a worthwhile tradeoff for lighter residential seats.
Hinges, Pins, and Mounting Posts
The hinge assembly is the pivot mechanism that lets the seat and lid swing open and close. Retailers toss around terms like "hinge pin," "mounting post," and "anchor sleeve" in product titles, yet rarely define them. Here is the breakdown.
A hinge pin is the cylindrical rod - typically around 1/4 inch in diameter - that threads through interlocking hinge barrels on the seat and lid, allowing both to rotate on a shared axis. As Hunker's hinge repair guide details, this pin can be tapped out with a nail punch when a single hinge barrel cracks, making isolated repair possible without replacing the full assembly.
A mounting post is the vertical cylinder - plastic or metal - that sits inside the bowl's mounting hole and accepts the seat bolt from above. It acts as a sleeve, centering the bolt and protecting the porcelain edge from direct contact with threads. Some toilet seat hardware kits include threaded mounting posts that replace traditional through-bolts entirely, letting you tighten from the top without reaching underneath.
An anchor sleeve expands inside the mounting hole when the bolt is tightened, gripping the porcelain from within. You will encounter these most often in kits designed for bowls with oversized or slightly irregular holes, where a standard bolt would rattle loose.
Bumpers, Caps, and Stabilizers
Beyond the structural fasteners, most kits include a handful of accessories that improve comfort, appearance, and long-term stability. Rubber bumpers stick to the underside of the seat and lid, cushioning them against the bowl rim to dampen noise and prevent porcelain chips from repeated contact. Over time, these peel off or flatten - and many people never realize they are replaceable.
Decorative bolt caps snap over the exposed bolt heads on the bowl's top surface, hiding the toilet seat hardware and giving the installation a finished look. They also keep dust and moisture from settling directly on the bolt heads, slowing surface corrosion.
Stabilizer kits add lateral support beneath the seat, usually through rubber wedges or adjustable pads that press against the inside of the mounting holes. If you have ever searched for a toilet seat at Lowes and noticed "stabilizer included" on the label, this is the component it refers to - a small addition that eliminates side-to-side play even on slightly worn bowls.
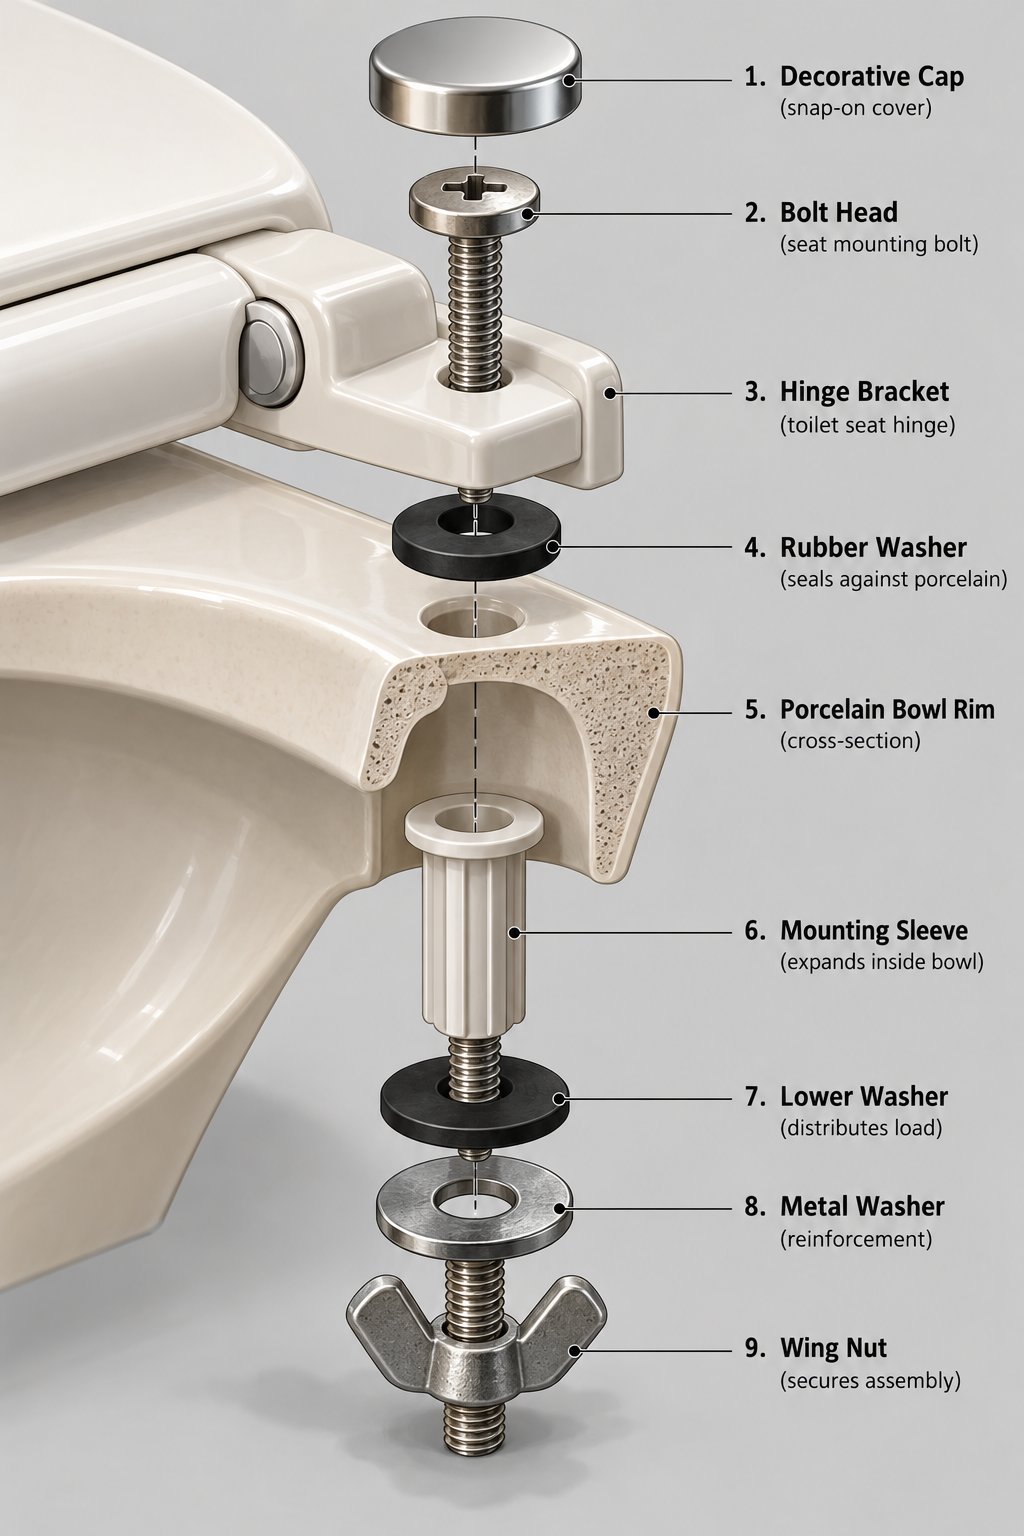
Visualizing how all these pieces stack together makes installation far less intimidating. Here is the top-to-bottom assembly order you would follow if you laid out every component on the counter:
- Decorative bolt cap - sits on top, snaps on last for a clean finish
- Seat bolt head - rests on or inside the hinge bracket above the bowl
- Hinge assembly - attaches to the seat and lid, pivots on the hinge pin
- Rubber washer (top side) - cushions the hinge bracket against the porcelain rim
- Bowl mounting hole - the porcelain pass-through on the bowl rim
- Mounting post or anchor sleeve - lines the hole to protect porcelain and center the bolt
- Rubber washer (bottom side) - seals the underside of the porcelain against the nut
- Metal washer (if included) - distributes clamping load beneath the bowl
- Nut (wing or hex) - threads onto the bolt end and locks the entire stack together
- Stabilizer pad - presses against the mounting hole interior to prevent lateral movement
- Rubber bumpers - adhere to the seat and lid underside, cushioning contact with the bowl
Every piece in that stack plays a specific role, and a missing or degraded component anywhere in the sequence creates the wobbles and slides covered in the previous section. The real question most buyers face is not what is inside the kit - it is which type of kit matches their toilet and their situation. That decision hinges on a few key variables: mounting style, material class, and whether quick-release convenience is worth the added complexity.
Types of Toilet Seat Hardware Kits and When to Use Each
You know the components. You can name every bolt, washer, and hinge pin in the stack. But walk into any hardware aisle - or scroll through a product listing - and you will find dozens of kits that look nearly identical on the outside yet perform very differently once installed. The distinction comes down to three variables: where the kit tightens, what it is made of, and whether the hinge locks permanently or releases for cleaning. Sorting through these categories before you shop eliminates the guesswork and puts the right toilet seat hardware replacement in your hands the first time.
Top-Mount vs. Bottom-Mount Kits
The mounting style determines how - and from which direction - you tighten the fasteners. This single detail dictates whether you will need a second pair of hands or can finish the job solo in tight quarters.
A top-mount kit lets you do all the work from above the bowl rim. The bolt threads downward through the seat hinge and into a receiving anchor or expanding nut housed inside the porcelain mounting hole. You drive the toilet seat screw from the top using a screwdriver, and the anchor grips from within - no reaching underneath, no awkward wrench angles. This design is ideal for retrofit projects where the toilet sits close to a wall or vanity, leaving almost no clearance below the bowl.
A bottom-mount kit follows the traditional approach. The bolt drops through from above, and you secure a nut from below using a wrench or your fingers if the kit includes wing nuts. It is the more common configuration and offers a stronger mechanical clamp, but it demands enough space underneath the bowl to access the fastener comfortably.
| Mounting Style | Tool Access Needed | Common Use Cases | Skill Level |
|---|---|---|---|
| Top-Mount | Screwdriver from above only | Tight bathrooms, wall-hugging toilets, quick DIY swaps | Beginner |
| Bottom-Mount | Wrench or pliers from below; screwdriver from above | Standard installations, commercial restrooms, high-load seats | Beginner to Intermediate |
If you have ever struggled to reach behind a toilet with bolts that feel glued in place, a top-mount kit solves that frustration outright. For open-access installations where maximum clamping strength matters, bottom-mount remains the proven choice.
Plastic vs. Metal Hardware Kits
Material is where long-term performance and cost diverge most sharply. Choosing the wrong one for your environment leads to premature failure - or unnecessary expense.
Plastic kits are completely corrosion-proof, lightweight, and inexpensive. They will never rust, never leave orange streaks on porcelain, and never seize in place the way metal can. The tradeoff is lower torque tolerance. Overtighten a plastic toilet seat screw and you will strip the threads or crack the bolt head. For a standard residential bathroom with moderate use, plastic handles the job well and keeps replacement costs minimal.
Stainless steel kits deliver significantly higher clamping force and a longer service life. They resist corrosion in humid environments and tolerate repeated tightening cycles without thread degradation. The cost is higher, and if you ever need to remove a stainless bolt years later, you may need penetrating oil to break mineral bonds - but the durability justifies the price in heavy-traffic commercial restrooms or rental properties.
Brass kits offer a traditional option with natural corrosion resistance. Brass is heavier and more expensive than stainless steel, yet some specifiers prefer it for its softer threading, which is less likely to chip porcelain during installation. You will find brass toilet seat attachment hardware most often in high-end residential and hospitality settings.
Zinc alloy sits in the middle ground - stronger than plastic, cheaper than stainless steel. However, it carries a hidden risk. When zinc contacts a dissimilar metal such as brass or steel in the presence of moisture, galvanic corrosion accelerates the breakdown of both surfaces. If you go with zinc, make sure every metal component in the kit matches or is separated by an isolating nylon washer.
Standard vs. Quick-Release Mechanisms
Ever tried to scrub around the hinges where the seat meets the bowl? That tight crevice collects grime faster than almost any other spot in the bathroom. Quick-release hardware solves this cleaning headache.
A standard fixed-hinge kit bolts the seat permanently in place. Removing it for cleaning means unscrewing the nuts, lifting off the seat, cleaning, and re-fastening - a process most people skip entirely. The upside is simplicity: fewer moving parts, lower cost, and a rock-solid toilet seat with bolts that stay put indefinitely.
A quick-release kit adds a latch or button mechanism to the hinge assembly. Press the release, and the entire seat lifts straight off the mounting posts without touching a single bolt. Drop it back on, and the latch clicks into place. These kits contain additional components - spring-loaded buttons, retention clips, or sliding lock tabs - that make them slightly more complex and marginally more expensive. But the payoff is significant: faster, deeper cleaning and reduced bacteria buildup around the hinge zone.
Healthcare facilities, daycare centers, and households with family members who have compromised immune systems benefit most from quick-release designs. Anyone who values bathroom hygiene will appreciate the convenience, though, and many modern toilet seat hardware replacement kits now bundle quick-release as a default feature rather than a premium upgrade.
When to Choose Each Type
Matching the right kit to your situation does not require guesswork. Think of it as a short decision tree based on your priorities:
- Budget-friendly residential repair - Choose a plastic, bottom-mount, standard-hinge kit. It is the least expensive option and handles normal household loads without corrosion concerns.
- Heavy-use commercial or rental property - Choose a stainless steel, bottom-mount kit for maximum clamping force and long service intervals between replacements.
- Retrofit project with limited clearance - Choose a top-mount kit in any material. The above-the-rim access eliminates the need to reach behind or beneath the bowl.
- Hygiene-sensitive environment (healthcare, childcare, elderly care) - Choose a quick-release kit, preferably in stainless steel, so the seat lifts off for thorough disinfection without any tools.
- Designer or high-end bathroom - Choose a brass, bottom-mount kit with decorative caps for a polished finish that complements premium fixtures.
- Mixed-metal toilet setup - If existing components are zinc or you are unsure of material compatibility, choose a plastic or matched stainless steel kit to avoid galvanic corrosion.
Knowing the type you need narrows the field dramatically, but it still leaves an important question unanswered: how do you verify that a specific kit actually fits your toilet before you commit to buying it? That verification process - measuring bolt spacing, checking diameters, and evaluating material quality - separates a confident purchase from an expensive return.
How to Choose the Right Toilet Seat Hardware Kit
Picking a kit type is only half the battle. The other half is confirming that the specific product you pull off the shelf - or add to a bulk purchase order - actually fits your toilet, survives your bathroom environment, and meets your quality expectations. Skip any one of those checks and you risk a return trip, a corroded fastener, or worse, a bolt that strips the moment you tighten it. Think of this section as the pre-purchase checklist you wish the packaging provided.
Material Durability and Environment Match
Bathrooms are tough on hardware. Warm, humid air lingers after every shower, condensation drips across porcelain surfaces, and cleaning chemicals leave acidic residues on any exposed metal. In that environment, material choice is not a preference - it is a survival factor.
Zinc and bare-steel toilet seat hinge bolts corrode fastest. You might see them holding strong for six months, then discover rust streaks blooming around the bolt holes after the first winter of closed windows and trapped moisture. Stainless steel resists this cycle far better, maintaining thread integrity and clamping force for years. Engineered plastic eliminates corrosion entirely, since there is no metal to oxidize. It is the safest long-term choice for standard residential loads where maximum clamping torque is not critical.
Brass remains the traditional pick for premium installations. Its natural resistance to tarnish and softer threading profile make it gentle on porcelain. However, brass is heavier and more expensive per unit, so it makes the most economic sense in high-end settings where aesthetics and longevity justify the cost. For most households and even many commercial properties, stainless steel hits the best balance of durability, availability, and price.
Compatibility Checks Before You Buy
Ever grabbed a kit labeled "universal" only to discover the bolts sit a quarter inch off from the mounting holes? That word on the package is misleading more often than you would expect. A few quick measurements prevent the frustration.
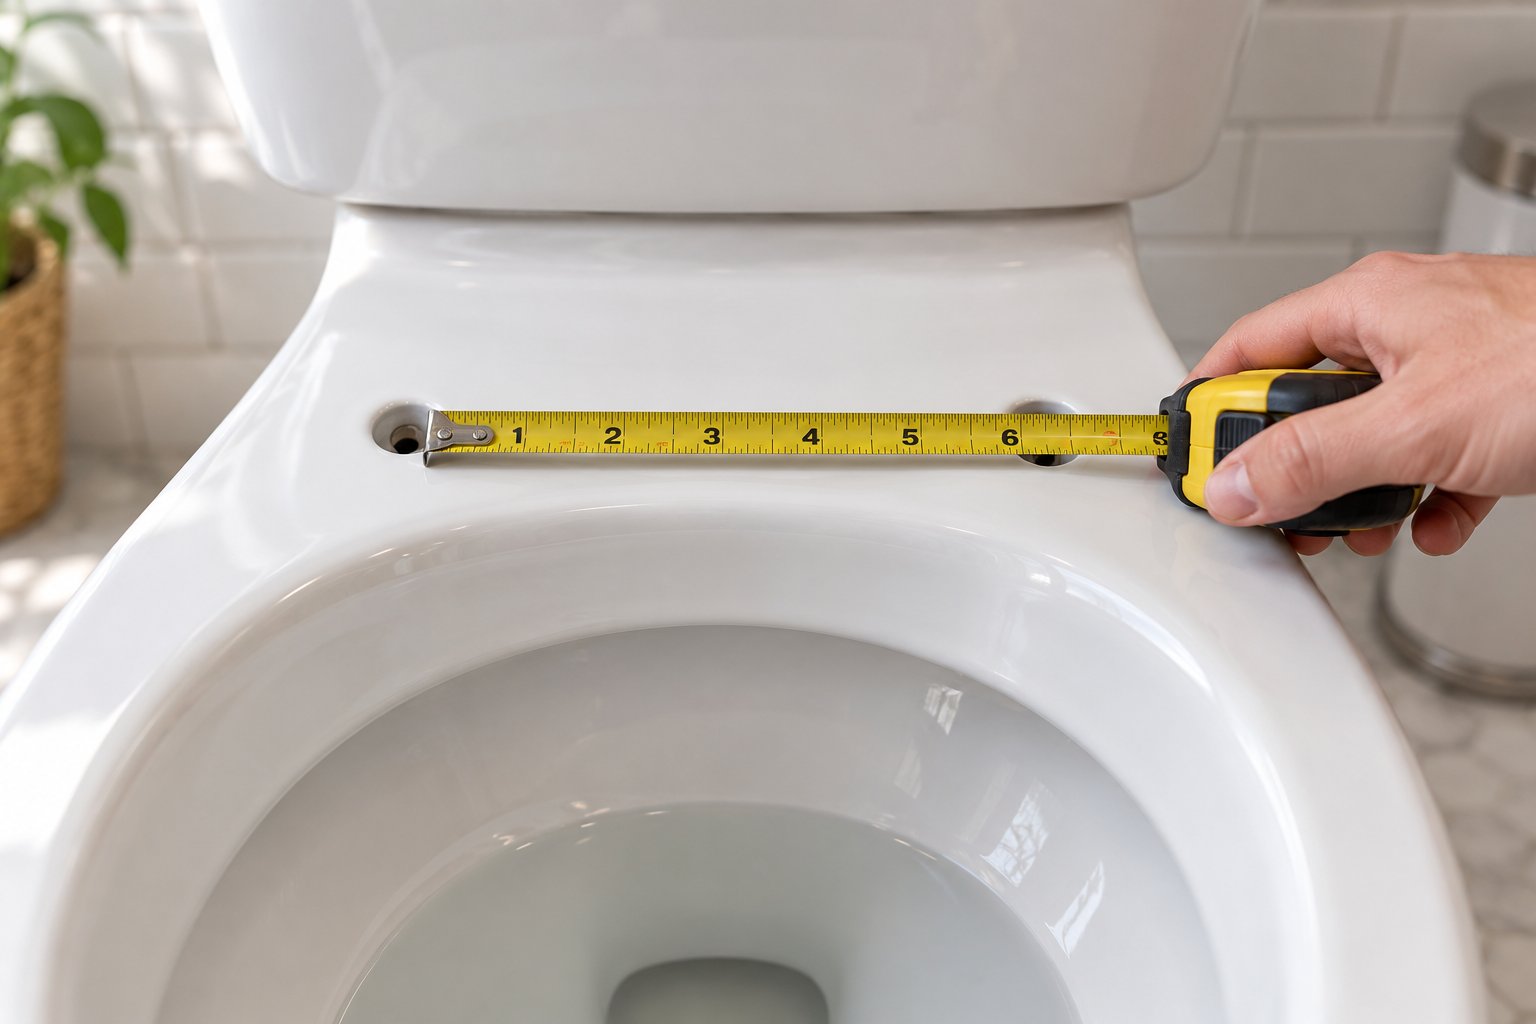
Bolt-hole spacing is the distance between the centers of the two mounting holes on your bowl rim. The widely cited standard is roughly 5.5 inches center-to-center, but European models, compact round-front bowls, and some specialty one-piece designs deviate by as much as half an inch in either direction. Grab a tape measure and confirm before you commit.
Bolt diameter matters just as much. Most residential kits use a 5/16-inch or 3/8-inch bolt, yet some older toilets - and many imported models - require metric sizing. If you are handling a toilet seat screw replacement on an unfamiliar brand, bring the old bolt to the store or measure its shaft with calipers.
Mounting-ear style is the detail shoppers overlook most often. Open-front (commercial) bowls and closed-front (residential) bowls may share the same bolt spacing, but the shape and thickness of the porcelain ears differ, affecting how the washer seats and how much bolt length you need below the rim. Check whether the ears are recessed, raised, or flush before selecting a kit.
You will find toilet seat screws at Home Depot, Lowe's, and every major online marketplace, and most of those products list bolt dimensions somewhere on the packaging or product page. Cross-reference those numbers with your measurements, and you will avoid the most common mismatch errors.
Sourcing for Manufacturers and Replacement Teams
Individual consumers typically need a single kit - grab one off a retail peg, install it, and move on. The buying equation changes dramatically for sanitary ware manufacturers tooling up a new toilet seat line, or for replacement-hardware sourcing teams managing hundreds of units across hotel chains, apartment complexes, or healthcare networks. These buyers need consistent quality at volume, reliable compatibility across multiple bowl models, and access to custom fixing options that retail channels simply do not stock.
Here is how the main sourcing channels compare:
| Sourcing Channel | Best For | Strengths | Limitations |
|---|---|---|---|
| Tianyun Toilet Seat Fixing Systems | Manufacturers and B2B sourcing teams | Bundles hinge mounting kits, stainless steel bases, and custom fixing options designed for compatible seat installation, alignment, and hardware replacement at manufacturing scale | B2B focus; not a single-unit retail channel |
| Retail stores (Home Depot, Lowe's, etc.) | Individual homeowners | Immediate availability, easy returns, in-store matching | Limited to common sizes; no bulk pricing or custom specs |
| Online marketplaces (Amazon, eBay, etc.) | Budget-conscious buyers seeking variety | Wide selection, user reviews, competitive pricing | Inconsistent quality across sellers; compatibility details often vague |
If you are searching for a specific standalone component - say, an individual hinge pin or a single cover cap - keep in mind that many of these parts are packaged within broader mounting-assembly selections rather than sold as separate SKUs. Browsing compatible fixing system collections often surfaces the exact component bundled into a complete, tested assembly, which also ensures material matching and dimensional consistency across the set.
For individual shoppers exploring toilet seat Lowes options or browsing the toilet seat screws Home Depot carries in store, the single-kit retail path works perfectly. Just confirm bolt dimensions and material before checkout, and you are set.
Quality Indicators to Look For
Regardless of where you buy, a few telltale signs separate a kit that will last from one that will fail within months. Run through this checklist before you finalize any purchase:
- Corrosion-resistant finish - Look for stainless steel, brass, or engineered plastic. If the kit uses zinc alloy, verify that it includes isolating nylon washers to prevent galvanic corrosion with dissimilar metals.
- Included rubber washers - A quality kit ships with EPDM or silicone washers in the box. If washers are absent, you will need to source them separately - and skipping them risks porcelain damage.
- Clearly stated bolt dimensions - The packaging or product listing should specify bolt diameter, length, and thread pitch. Vague labels like "fits most toilets" without numbers are a red flag.
- Published compatibility notes - Reputable manufacturers list which bowl shapes, brands, or mounting-ear styles their kit supports. Generic claims with no specifics often mean the kit is a loose-tolerance fit that may wobble on your particular bowl.
- Complete component count - Confirm the kit includes every piece needed for a full installation: bolts, nuts, washers, hinge hardware, and bumpers. Incomplete kits force separate purchases that may not match in material or dimension.
A kit that checks every box on that list gives you the best odds of a stable, long-lasting seat attachment - whether you are fixing a single bathroom or outfitting an entire product line. With the right kit in hand, the only thing left is putting it to work. And that starts with laying out your tools and removing the old hardware without damaging the bowl.
Step-by-Step Toilet Seat Hardware Installation Guide
You have the right kit in hand, the material matches your environment, and the bolt dimensions check out. What happens next separates a rock-solid seat from one that wobbles again within a week. Replacing toilet seat bolts is genuinely one of the simplest home repairs you can tackle - but only if you follow the correct sequence. Rush through it, skip a washer, or overtighten a plastic nut, and you will undo all the careful selection work from the previous steps.
Here is the complete written installation process, start to finish.
Tools and Preparation
You do not need a plumber's toolbox for this job. Gather these few items before you start:
- Adjustable wrench or pliers - for gripping toilet seat nuts from below the bowl rim
- Flat-head or Phillips screwdriver for toilet seat bolts - match the driver to the bolt head style in your kit
- Penetrating oil (such as WD-40 or PB Blaster) - essential if the existing hardware is rusted or mineral-locked
- Rag or old towel - for cleanup and to protect the floor from drips
- Small hacksaw (optional) - a last resort for bolts that refuse to budge
Before touching the toilet, open the new kit and lay out every component on a clean surface. Count bolts, nuts, washers, bumpers, and any hinge pieces against the parts list on the packaging. Discovering a missing washer halfway through installation means stopping, searching, and potentially leaving the bowl unprotected. Two minutes of prep saves twenty minutes of frustration.
Removing Old Hardware Safely
Old hardware rarely cooperates. Corrosion, mineral deposits, and years of humidity can fuse bolts and nuts into a single stubborn mass. Patience here protects your porcelain.
Follow this sequence:
- Pry off the decorative bolt caps. Use a flat-head screwdriver or your fingernail to pop them free. Work gently - aggressive prying near the porcelain rim can chip the glaze.
- Hold the bolt head from above. Place your screwdriver into the slot or Phillips recess on the bolt head and press down firmly to prevent the bolt from spinning.
- Turn the nut below counterclockwise. Reach beneath the bowl rim with your wrench or pliers and rotate the nut to the left. If the nut is a wing nut, you may be able to do this by hand.
- Apply penetrating oil if the bolt is frozen. Spray a generous amount around the bolt-nut junction from below and along the bolt shaft from above. Wait 15 to 30 minutes. Retry. Repeat if necessary - Home Depot's installation guide confirms that penetrating oil is the recommended first approach for stubborn hardware.
- Use a hacksaw as a last resort. If the bolt absolutely will not turn after multiple oil treatments, slide a small hacksaw blade between the bolt head and the porcelain surface and carefully cut through the bolt shaft. Keep the blade angled away from the bowl to avoid scratching or chipping.
Once both bolts are free, lift the old seat and hinge assembly straight off the bowl. Wipe down the mounting area with your rag, clearing away any rust residue, mineral flakes, or old washer fragments sitting around the bolt holes. A clean surface ensures the new hardware seats flush.
Installing the New Kit Step by Step
With the bowl clean and the new components laid out, installation moves quickly. Follow these steps in order:
- Position the new seat and hinge assembly on the bowl. Align the hinge holes with the bowl's mounting holes so you can see daylight straight through both.
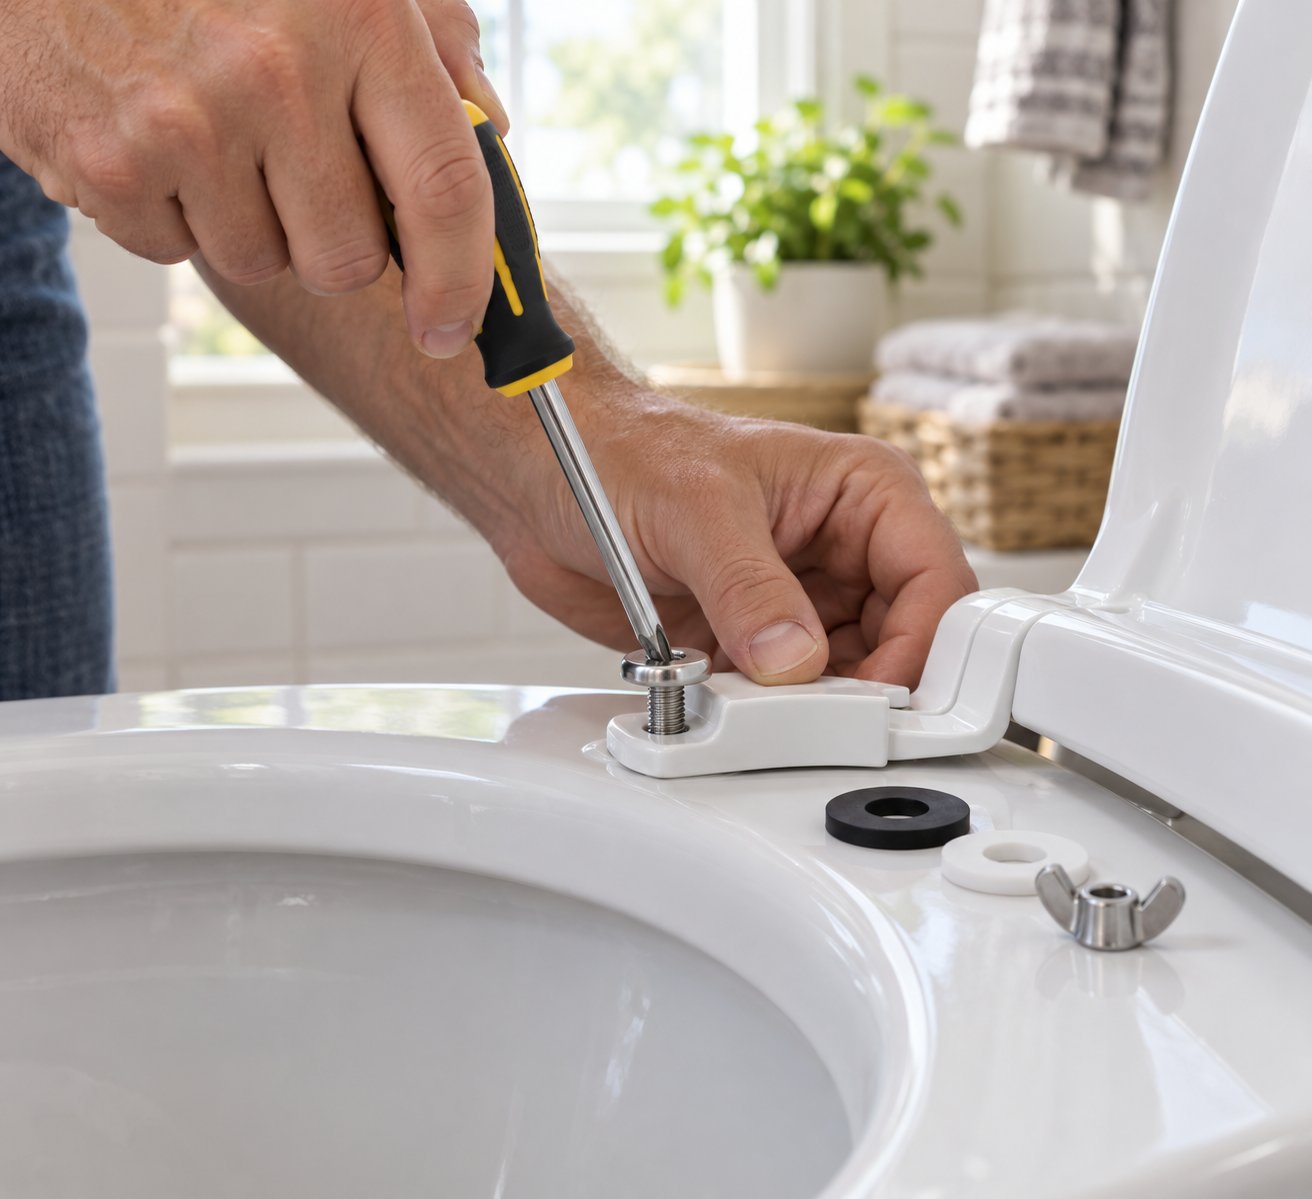
- Drop the bolts through the seat hinge holes. The bolt head should sit on top, inside or against the hinge bracket. Let the threaded shaft pass down through the bowl's mounting hole.
- Place a rubber washer between the bolt and the porcelain (if your kit positions the washer on top). Some kits layer the washer above the bowl rim beneath the hinge bracket; others position it below the rim. Check your kit's instructions for washer placement - the goal is always a buffer between any hard surface and the porcelain.
- Hand-thread the nut from below. Reach under the bowl rim and spin the toilet seat nuts onto the bolt ends by hand. Turn clockwise until you feel resistance. Starting by hand prevents cross-threading, which is the number-one cause of stripped plastic fasteners.
- Add the bottom rubber washer and any metal washer between the porcelain underside and the nut if your kit includes them. This sandwich protects both the top and bottom ceramic surfaces.
- Tighten in alternating half-turns. Give the left bolt a half-turn with your wrench, then switch to the right bolt for a half-turn. Alternate back and forth. This even tightening pattern draws the seat down squarely, preventing the hinge from cocking to one side.
- Stop when snug - do not overtighten. The seat should feel firm and stable without any lateral play. For plastic hardware, hand-tight plus a quarter turn is the safe maximum. For metal, snug plus a half turn. Over-torquing cracks plastic components and can chip or fracture the porcelain ears beneath the bolt holes.
- Snap decorative bolt caps into place over the exposed bolt heads to finish the look and shield the hardware from moisture.
If your kit includes toilet seat stabilizers - rubber wedges or adjustable pads - press them into position inside the mounting holes now, before the final tightening pass. They fill any gap between the bolt shaft and the hole edge, eliminating the side-to-side play that causes seats to drift over time.
Final Alignment and Testing
A secure bolt does not guarantee a centered seat. Before calling the job done, take a moment to fine-tune positioning.
Close the lid and look at the seat from the front of the bowl. Is it centered, or does it lean slightly left or right? If it is off-center, loosen both nuts about a quarter turn - just enough to allow the seat to slide - then reposition the hinge assembly until the seat sits evenly over the bowl rim. Re-tighten using the same alternating half-turn method.
The real test is practical. Sit down and shift your weight deliberately from side to side. You should feel zero lateral movement. Lean forward slightly, then settle back. The seat should stay planted. Open and close the lid a few times to confirm the hinge pivots smoothly without binding or drifting shut on its own.
If everything feels solid and centered, the installation is complete. The entire process - from laying out tools to this final sit test - typically takes less than fifteen minutes. Replacing toilet seat bolts really is that straightforward when you follow the sequence and respect the torque limits.
Of course, not every installation goes perfectly on the first try. Rusted remnants from old hardware, a bolt that spins without tightening, or a seat that still wobbles after you have done everything right - these are the post-installation headaches that send people searching for answers. Each one has a specific cause and a targeted fix.
Troubleshooting Common Toilet Seat Hardware Problems
You followed every step, tightened everything properly, and the seat felt perfect - for a while. Or maybe you are dealing with old hardware that has fused itself to the bowl after years of bathroom humidity. Either way, the fix is not always a fresh kit. Sometimes the problem sits between the existing hardware and the porcelain, and brute force only makes things worse. Here are the most common post-installation and aging-related headaches, along with the targeted solutions for each.
Rusted Bolts That Refuse to Turn
This is the single most frustrating scenario in toilet seat maintenance. You pop off the decorative cap, fit your wrench onto the nut, and nothing moves. The bolt feels welded in place - because, chemically speaking, it nearly is. Moisture and mineral-rich water create a crust of oxidation and limescale around the threads, bonding metal to metal so tightly that standard hand torque cannot break through.
Start with the gentlest method and escalate only if necessary:
The penetrating-oil-and-wait method works in the majority of cases. Spray a generous amount of penetrating oil - WD-40, PB Blaster, or a similar product - around the bolt head from above and the nut from below. Let it soak for 15 to 30 minutes. For severely corroded fasteners, professional plumber feedback suggests this approach resolves roughly 60% of seized-bolt situations. If the first application does not free the bolt, reapply and wait another 30 minutes before retrying. Patience pays off more than pressure here.
Heat from a hair dryer can break mineral bonds that oil alone cannot dissolve. Metal expands slightly when warmed, and that microscopic expansion is sometimes enough to crack the limescale shell locking the threads together. Aim the dryer at the bolt head for two to three minutes on high heat, then immediately try turning the nut while the metal is still warm. Do not use an open flame - you are working inches from porcelain and plastic components.
The hacksaw method is your last resort for completely seized bolts. Slide a mini hacksaw blade between the bolt head and the porcelain surface, and carefully cut through the shaft. Protect the bowl rim with thick tape beforehand to prevent scratches. A rotary cutting tool speeds this up but demands a steadier hand. Allow 10 to 30 minutes depending on bolt hardness and accessibility.
The critical warning through all of this: never use excessive force near the porcelain bowl rim. The mounting ears - those thin raised sections where the bolt holes sit - are the most fragile part of the entire toilet. One aggressive wrench slip can crack an ear clean off, and that is not a repair you can patch with a new toilet seat clip or a dab of adhesive.
Seat Still Wobbles After Tightening
You have installed fresh hardware, torqued the nuts to snug, and the seat still shifts when you sit down. Before you question your technique, know that this problem almost always traces back to one of three specific causes - and each one has its own fix.
Mismatched bolt-hole spacing. If the bolt spacing on your kit does not perfectly match the distance between your bowl's mounting holes, the bolts sit at a slight angle inside the porcelain pass-throughs. That angle creates a pivot point, and any lateral force translates into movement. The fix is straightforward: measure your bowl's center-to-center distance, compare it to the kit's specifications, and swap to a correctly spaced set if they do not align. No amount of tightening compensates for geometry.
Compressed or missing rubber washers. Washers absorb vibration and fill the micro-gap between the bolt shaft and the mounting hole. When they flatten from age or go missing entirely, the bolt rattles inside an oversized hole like a pencil in a drinking glass. Replace the washers with fresh ones - EPDM rubber or silicone - and the play disappears. Shim washers, which are slightly thicker than standard, work well for bowls where the mounting holes have widened from years of use.
Cracked plastic mounting ears on the bowl. This is the most serious cause because the damage is in the porcelain itself, not the hardware. Hairline cracks in the mounting ears let the bolt shift even when the nut is fully tightened. Anchor kits designed for one-piece toilets with non-standard mounting can sometimes stabilize the connection by gripping inside the hole rather than relying on the ear's structural integrity. If the crack is severe, however, the bowl itself may need replacement - a rare but real possibility on older toilets.
Stripped Threads and Spinning Nuts
You turn the nut and it just keeps spinning. No resistance, no tightening, no grip. The threads are gone. This is especially common with plastic nuts, which strip far faster than metal ones under torque. The most frequent culprit? Cross-threading during installation - starting the nut at a slight angle so the threads cut a new, misaligned path through the plastic instead of following the bolt's existing grooves.
If you catch it early, the fix is simple. Back the nut off completely, realign it squarely with the bolt shaft, and restart by hand. Never use a wrench for the first few turns. Your fingers can feel the threads catching correctly in a way a tool cannot. Once the nut spins smoothly by hand for at least three full rotations, switch to the wrench for final tightening.
If the threads are already destroyed - the nut spins freely no matter how carefully you re-seat it - the entire bolt-and-nut pair must be replaced. A stripped nut on a good bolt, or a good nut on a stripped bolt, will never hold. Mismatching old and new fasteners invites the same failure again within weeks.
For a quick reference, here is a symptom-to-solution checklist you can bookmark:
- Bolt will not turn at all - Apply penetrating oil, wait 15-30 minutes, retry. Escalate to hair dryer heat, then hacksaw if needed.
- Seat slides side to side after tightening - Check bolt-hole spacing match; replace compressed or missing washers; inspect mounting ears for cracks.
- Nut spins without tightening - Remove nut, realign by hand, and restart. If threads are stripped, replace the full bolt-and-nut pair.
- Bolt snaps during removal - Extract the remaining shaft with locking pliers. If the fragment is stuck inside the mounting hole, use a screw extractor or drill it out carefully.
- Seat drifts off-center repeatedly - Add stabilizer pads inside the mounting holes or upgrade to a toilet seat clip system with lateral support built in.
- Lid will not stay upright - Replace the hinge assembly; a worn hinge barrel or bent pin cannot be restored by tightening alone.
Most of these fixes take minutes once you identify the root cause. The real cost comes from the mistakes people make while trying to solve them - overtightening degraded components, mixing incompatible metals, or skipping washers to save a step. Those errors deserve their own spotlight, because avoiding them is just as important as knowing the repairs.
Common Mistakes to Avoid With Toilet Seat Hardware
Knowing the right repair is only half the equation. The other half is not turning a five-minute fix into a fifty-dollar problem. Every plumber has a story about a cracked bowl, a corroded bolt that should have lasted years, or a porcelain chip caused by a missing washer. These are not freak accidents - they are predictable outcomes of four specific mistakes that homeowners and even maintenance teams repeat constantly. Sidestep all four and your toilet seat hardware kit does exactly what it should: hold the seat firm for years without a single callback.
Over-Tightening Plastic Bolts
This is the most common and most avoidable error. Plastic hardware is engineered for hand-tight plus a quarter turn at most. That narrow torque window is intentional - it provides enough clamping force to keep a residential seat stable without stressing the porcelain beneath it. The problem starts when the seat still feels slightly loose after finger tightening and you reach for a wrench to "give it a little more."
That little more cracks the bolt head, strips the nut threads, or fractures the seat hinge ear where the bolt passes through. Any one of those failures turns a simple hardware swap into a full seat replacement. Imagine buying home depot toilet seat bolts to fix a wobble, only to snap the bolt head and realize you now need an entirely new seat because the hinge ear shattered. It happens more often than you would think.
The rule is simple: if the seat does not rock when you press on it from side to side, stop tightening. Snug is the goal, not immovable. For plastic fasteners, your fingers and a quarter turn with a screwdriver are all the force the material can safely handle.
Mixing Metal Types and Causing Galvanic Corrosion
Here is a mistake that does not show up immediately but ruins hardware from the inside out. You replace a lost brass nut with a steel one from the junk drawer, or pair zinc alloy bolts with stainless steel washers. Everything looks fine at first. Six months later, the bolt is coated in a crusty white or greenish residue and snaps when you try to tighten it.
What happened? Galvanic corrosion - an electrochemical reaction that occurs when two dissimilar metals are in contact in the presence of moisture. Bathroom humidity provides the electrolyte, and the mismatched metals form a tiny battery where one surface corrodes at an accelerated rate. The less noble metal (typically zinc or bare steel) becomes the anode and deteriorates, while the more resistant metal (brass or stainless steel) stays protected at its partner's expense.
This process is well documented in industrial water systems, but it follows the exact same chemistry inside the bolt hole of your toilet. The fix is straightforward: use matched-material kits where every metal component - bolt, nut, and washer - shares the same alloy. If you must mix materials, insert an isolating nylon washer between the two metals to break the electrical contact that drives the reaction. Toilet seats Lowes and other retailers stock will sometimes include nylon spacers for exactly this purpose, so check the kit contents before assuming you are covered.
Skipping Washers and Damaging Porcelain
Rubber or fiber washers look like the least important pieces in the kit. They are thin, soft, and easy to lose in the bottom of the packaging. Some people skip them deliberately, thinking they are just padding. They are not optional - they are the only barrier between a hard fastener and a brittle ceramic surface.
Without a washer, the metal nut or bolt head presses directly against the porcelain glaze. Every time someone sits down, micro-vibrations grind metal against ceramic. Over weeks, this contact chips the glaze, creating tiny pits and micro-cracks that trap moisture and bacteria. The damage is cosmetic at first - a small ring of roughened porcelain around the bolt hole - but it can deepen into a structural crack on the mounting ear if the seat carries heavy loads or gets tightened repeatedly.
If your kit did not include washers, or if you lost them during installation, source them separately before proceeding. EPDM rubber and silicone washers are available at any hardware store for less than a dollar. That single dollar protects a bowl that costs hundreds to replace. When browsing lowes commode seats or any replacement seat package, check whether the bundled hardware includes washers - cheaper kits sometimes leave them out to cut costs.
Forgetting to Check Bolt-Hole Compatibility
Elongated and round-front bowls sold in the United States typically share the same bolt-hole spacing - roughly 5.5 inches center-to-center. That consistency leads many buyers to assume every toilet uses identical mounting dimensions. It is a reasonable assumption, and it is wrong just often enough to cause real problems.
European toilets, Japanese imports, wall-hung models, and some specialty one-piece designs use different spacing. As Brondell's fit and measurement guide details, bolt-hole distances can range from 5-1/4 inches to 8 inches depending on the fixture, and certain bidet seat models require exactly 5-1/2 inches for a proper mount. Even a quarter-inch mismatch forces the bolts to sit at an angle, creating the same wobble you were trying to fix. Worse, angled bolts stress the porcelain hole edges unevenly, increasing the risk of a crack over time.
The prevention is a thirty-second measurement. Grab a tape measure, find the center of each mounting hole, and record the distance. Bring that number with you when shopping - whether you are picking up toilet bowl shims Lowes carries in the plumbing aisle or ordering a kit online. If the product listing does not specify bolt spacing, treat it as a red flag and move on to one that does.
Quick-Reference Mistake Checklist
Keep this list handy for your next hardware swap:
- Over-tightening plastic bolts - Stop at hand-tight plus a quarter turn. If the seat is stable, put the wrench down.
- Mixing metal types - Use matched-material kits or isolate dissimilar metals with nylon washers to prevent galvanic corrosion.
- Skipping washers - Always place rubber or fiber washers between fasteners and porcelain. No exceptions, even if the kit omits them.
- Ignoring bolt-hole compatibility - Measure center-to-center spacing before purchasing. "Universal" does not mean universal.
Each of these mistakes is entirely preventable with a few seconds of attention. Avoid all four, and the hardware you install today should hold steady for years - which raises the final question: what does the complete lifecycle look like when you put every step together, from the first wobble to the last bolt turn, and where do you go for quality hardware when it is time to buy?
Putting It All Together and Finding Quality Hardware
A wobbling toilet seat feels like a big problem until you realize the fix fits in the palm of your hand. Every section of this guide has built toward one simple truth: the right toilet seat hardware kit, chosen carefully and installed correctly, eliminates the wobble, protects the porcelain, and extends the life of your seat - no plumber required.
Recap of the Hardware Kit Lifecycle
Here is the full process distilled into a sequence you can follow from the first sign of trouble to a rock-solid finish:
- Spot the signs of failure - Look for rust streaks, cracked plastic nuts, compressed washers, or a seat that slides under your weight.
- Identify the correct kit type - Decide between top-mount or bottom-mount, plastic or metal, and standard or quick-release based on your toilet, environment, and priorities.
- Select quality materials - Confirm bolt-hole spacing, check bolt diameter, verify washer inclusion, and choose corrosion-resistant fasteners matched to your bathroom's humidity level.
- Follow proper installation steps - Lay out all components, remove old hardware safely, hand-thread new fasteners to avoid cross-threading, and tighten in alternating half-turns until snug.
- Avoid the common mistakes - Never overtighten plastic, never mix metal types without isolation, never skip washers, and always measure bolt spacing before buying.
A single well-chosen kit resolves the vast majority of loose or damaged seat issues without replacing the entire seat. Replacement toilet seat bolts, fresh washers, and a matched hinge assembly are all most bathrooms will ever need - and the total cost is a fraction of a service call.
Where to Go From Here
For individual homeowners, the next step is practical: grab a tape measure, confirm your bolt-hole spacing and diameter, decide on a material preference, and shop with those numbers in hand. Whether you pick up a kit at a local retailer or order online, the compatibility checks from this guide ensure you buy once and install once.
For sanitary ware manufacturers and sourcing teams managing hardware across product lines or large-scale replacement programs, the equation is different. Consistency, bulk availability, and custom compatibility matter more than single-unit convenience. Tianyun's Toilet Seat Fixing Systems are purpose-built for this scale - bundling hinge mounting kits, stainless steel bases, and custom fixing options that support compatible seat installation, alignment, and hardware replacement across diverse bowl models. If your operation needs reliable, dimensionally consistent toilet seat clamps and fastener assemblies at volume, that resource is designed specifically for your workflow.
A note on standalone components: if you are searching for an individual hinge pin, a single cover cap, or loose washers outside of a complete kit, look for compatible mounting-assembly selections rather than assuming every part is sold as a separate SKU. Bundled assemblies ensure material matching and dimensional consistency - two things that loose, mix-and-match parts cannot guarantee.
The right toilet seat hardware kit, properly installed, extends seat life and protects the bowl - making it the smartest small investment in any bathroom.
Every bolt, every washer, every hinge pin plays a role. Respect the small parts, follow the steps, and your seat stays exactly where it belongs.
Frequently Asked Questions About Toilet Seat Hardware Kits
1. What is included in a standard toilet seat hardware kit?
A standard toilet seat hardware kit typically contains two seat bolts, matching nuts (wing-style or hex), rubber or fiber washers, and a hinge mechanism that allows the seat and lid to pivot. Many kits also include rubber bumpers to cushion the seat against the bowl, decorative bolt caps that conceal the fastener heads, and stabilizer pads that prevent lateral movement. Materials vary - you will find kits in plastic, stainless steel, brass, or zinc alloy. Before purchasing, verify the kit includes every piece needed for a complete installation, especially rubber washers, which protect porcelain from metal contact.
2. How do I know if my toilet seat hardware needs replacing?
Several visible and tactile signs point to failing hardware. Look beneath the decorative bolt caps for rust streaks, cracked plastic mounting posts, white mineral deposits on threads, or wing nuts that crumble when touched. Behavioral clues include the seat sliding left or right under your weight, drifting to one side after tightening, a lid that won't stay upright, or a clicking noise when you shift position. If the nut spins freely without getting tighter - a sign of stripped threads - or a bolt snaps under torque, replacement is the only safe option. Repeatedly tightening worn hardware risks cracking the porcelain mounting ears on the bowl.
3. Are toilet seat hardware kits universal?
Despite labels claiming universal fit, not all kits work with every toilet. Most U.S. residential bowls use a bolt-hole spacing of roughly 5.5 inches center-to-center, but European models, Japanese imports, wall-hung units, and some specialty one-piece designs differ by as much as half an inch. Bolt diameter also varies between 5/16-inch, 3/8-inch, and metric sizes on older or imported toilets. Always measure your bowl's center-to-center bolt-hole distance and bolt shaft diameter before buying. Bringing the old bolt to the store or checking the product listing for exact dimensions prevents costly mismatches.
4. What is the difference between top-mount and bottom-mount toilet seat hardware?
Top-mount kits let you tighten the seat entirely from above the bowl rim using a screwdriver. The bolt threads into an expanding anchor housed inside the porcelain mounting hole, so you never need to reach underneath - ideal for tight bathrooms where the toilet sits close to a wall or vanity. Bottom-mount kits follow the traditional design: the bolt drops through from above and a nut secures from below with a wrench or fingers. Bottom-mount hardware generally delivers stronger clamping force, making it the preferred choice for commercial restrooms and heavy-use settings. Choose based on your clearance and load requirements.
5. How do I remove rusted toilet seat bolts without damaging the porcelain?
Start by applying penetrating oil generously around the bolt head and nut, then wait 15 to 30 minutes before attempting to turn the nut. If the first application fails, reapply and wait again. For stubborn mineral bonds, aim a hair dryer at the bolt head on high heat for two to three minutes - thermal expansion can crack the limescale shell locking the threads. As a last resort, protect the bowl rim with thick tape and carefully cut through the bolt shaft with a mini hacksaw blade positioned between the bolt head and the porcelain. Avoid open flames and never use excessive wrench force near the bowl's mounting ears, as they are the most fragile part of the toilet.
Apply This Insight to Your Project
Tell us what you are building and how the topic “Toilet Seat Hardware Kit Decoded: Every Bolt, Every Fix, No Plumber” relates to your application. Our engineering team can help evaluate the next step.