What Quick Release Toilet Seat Hinges Are and Why They Matter
Imagine trying to deep-clean your toilet and running into the same problem every time — grime packed tight around the hinges, trapped under the seat, impossible to reach without contorting your hand into awkward angles. You grab a wrench, try to loosen rusted bolts, and end up stripping them instead. Sound familiar? That frustration is exactly the problem quick release toilet seat hinges were designed to eliminate.
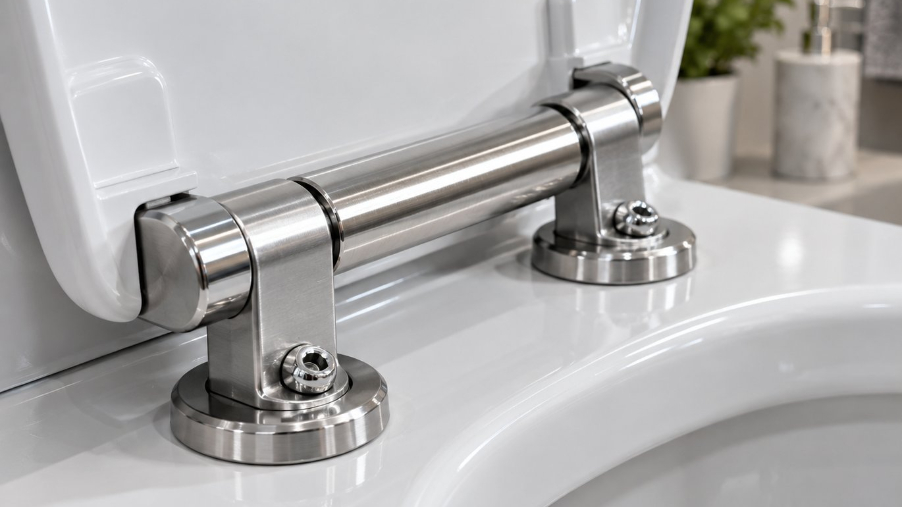
Quick release toilet seat hinges are specialized mounting hardware that allow a toilet seat to be removed and reattached without tools, typically through a push-button or lever mechanism built into the hinge body. They replace traditional fixed-bolt hinges, enabling one-touch seat removal for faster cleaning, easier maintenance, and simpler replacement.
What Makes a Toilet Seat Hinge Quick Release
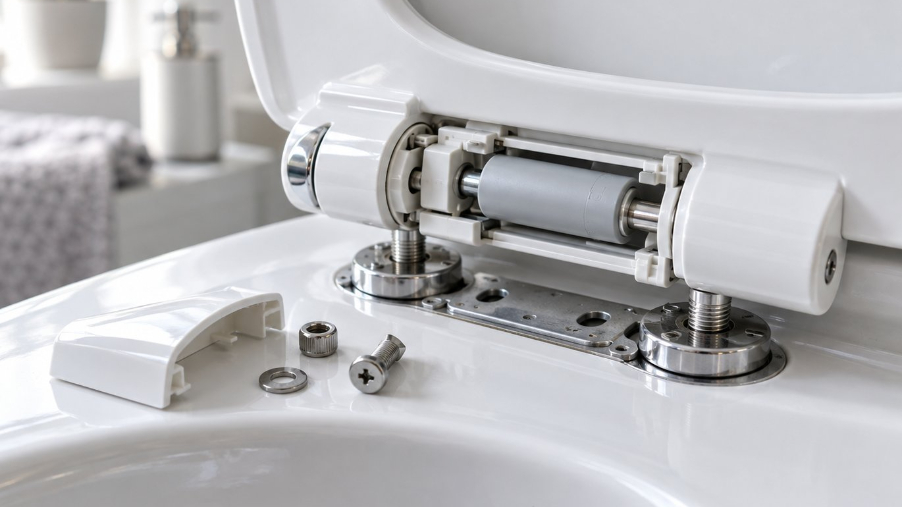
A toilet seat with quick release functionality works through a deceptively simple concept. Instead of permanent bolts locking the seat to the bowl, the hinge system uses a detachable connection point — usually a button you press or a small lever you flip. This retracts an internal locking tab or pin, freeing the seat from the hinge posts mounted on the ceramic. You lift the seat straight off, clean everything underneath, and snap it back into place in seconds. No screwdrivers, no penetrating oil, no skinned knuckles.
The seat locks firmly during everyday use, so there is no wobble, shift, or risk of accidental detachment. You only activate the release when you intentionally press the mechanism. This balance between a secure hold and effortless removal is the core engineering achievement behind these hinges.
Why Traditional Fixed-Bolt Hinges Fall Short
Traditional hinges rely on bolts — usually plastic or steel — that thread through holes in the ceramic and tighten underneath with wing nuts. When these are new, they work fine. Give them a year or two in a humid bathroom, and you'll notice a different story. Metal bolts corrode. Plastic bolts crack or fuse to their nuts. The area directly beneath the hinge caps becomes a breeding ground for bacteria, mold, and hard water stains that no amount of surface wiping can reach.
Replacing a fixed-bolt seat often turns into a 30-minute ordeal involving an adjustable wrench, a hacksaw for seized bolts, and language you would not use in polite company. A quick release toilet seat, by contrast, detaches in under five seconds and reattaches just as fast. That single difference transforms toilet cleaning from a dreaded chore into a routine task you can finish without breaking a sweat.
What This Guide Covers
This article goes well beyond a basic overview. You will learn how the internal release mechanism actually works — including the differences between push-button, lever, and spring-loaded pin systems. From there, we compare the major hinge types side by side: top-fix, bottom-fix, clip-on, and hidden-fitting designs. A dedicated identification guide helps you measure your current setup and match it to the right replacement. Step-by-step installation instructions walk you through both removing old hinges and fitting new ones. Finally, we cover troubleshooting for common problems and a simple maintenance routine that keeps quick release toilet seat hinges operating smoothly for years.
The goal is straightforward — give you every piece of information you need to choose, install, and maintain the right hinge system, all in one place. Let's start with what happens inside the hinge when you press that button.
How the Quick Release Mechanism Actually Works Inside the Hinge
You press a button, lift the seat off, and snap it back on. It feels almost too simple. But inside that compact hinge body, a surprisingly clever bit of engineering makes it all possible. Understanding how it works helps you choose the right system, troubleshoot problems down the road, and appreciate why not all release mechanisms are created equal.
Three distinct designs dominate the market. Each achieves the same result — tool-free seat removal — but they get there through different internal mechanics.
- Push-button mechanism: A small button on the hinge body, when pressed, retracts an internal locking tab away from a groove or channel on the hinge post. This frees the seat to slide or lift straight off the post. Release the button, and the tab springs back into its locked position.
- Lever-actuated mechanism: A short lever on the side or back of the hinge rotates an internal cam. Turning the lever shifts the cam out of a locking notch, disengaging the seat from the mounting post. Rotating it back locks everything tight again.
- Spring-loaded pin system: A spring-loaded pin sits inside the hinge and snaps into a groove on the hinge post under spring tension. Pressing the pin inward compresses the spring, pulls the pin clear of the groove, and allows the seat to lift free.
Push-Button Release Systems Explained
The push-button design is by far the most common, and for good reason. Imagine a tiny deadbolt inside the hinge. When engaged, a flat locking tab protrudes into a slot on the hinge post, physically preventing the seat from moving upward. Press the button, and that tab retracts — just like sliding a deadbolt open. The seat lifts off cleanly. A toilet seat with button release typically uses a small internal spring to return the tab to its locked position automatically, so the hinge is always ready to receive the seat again.
This design works well because the button requires deliberate, targeted pressure to activate. Sitting down, shifting your weight, or bumping the seat during normal use will not accidentally trigger it. That distinction is critical — the mechanism must be easy to operate intentionally yet impossible to engage by accident.
Lever and Spring-Loaded Pin Mechanisms
Lever-actuated systems offer a slightly more tactile experience. You physically rotate a small lever, which turns a cam inside the hinge body. Think of it like turning a key — the rotation moves a locking surface out of the way, freeing the seat. Some users prefer this approach because the lever provides clear visual feedback: if it is in the locked position, you know the seat is secure.
A spring loaded toilet seat hinge, on the other hand, relies on passive tension. The pin is always being pushed outward into its locking groove by the spring, so the default state is locked. You have to actively press and hold the pin to remove the seat. This fail-safe behavior makes it a popular choice for commercial and institutional applications where reliability is non-negotiable.
How the Seat Locks Back Into Place
Reattaching the seat is essentially the release cycle in reverse. You align the seat openings with the hinge posts and press downward. In push-button and spring-loaded pin systems, the locking tab or pin automatically snaps back into its groove as the seat slides past — you will hear and feel a firm click. Lever systems require you to rotate the lever back to the locked position manually after seating the unit onto the posts.
That click is not just satisfying; it is a functional signal. It confirms that the locking element has fully engaged its corresponding groove. A toilet seat quick release system that does not produce a definitive click or detent when reattached may have worn internal components, something we will cover in the troubleshooting section later.
Every one of these designs reflects a core engineering tradeoff: the release must be effortless when you want it, yet the hold must be rock-solid when you do not. A well-built mechanism handles hundreds of release-and-reattach cycles over its lifetime without loosening, wearing, or losing that reassuring snap. The difference between a quality hinge and a cheap one often comes down to the materials and tolerances inside that small housing — which brings up an important question: are all hinge types compatible with every toilet? The answer depends entirely on how the hinge mounts to the bowl.
Types of Quick Release Toilet Seat Hinges Compared
The release mechanism gets all the attention, but the mounting method is what actually determines whether a hinge will work with your toilet. Two seats can both feature push-button quick release, yet be completely incompatible with each other's bowl because they mount differently. Understanding the types of toilet seat hinges available — and which one your bathroom requires — prevents the all-too-common mistake of ordering a hinge kit that simply will not fit.
The primary split comes down to where the bolts tighten. From there, specialized variations add convenience, aesthetics, or compatibility with non-standard designs.
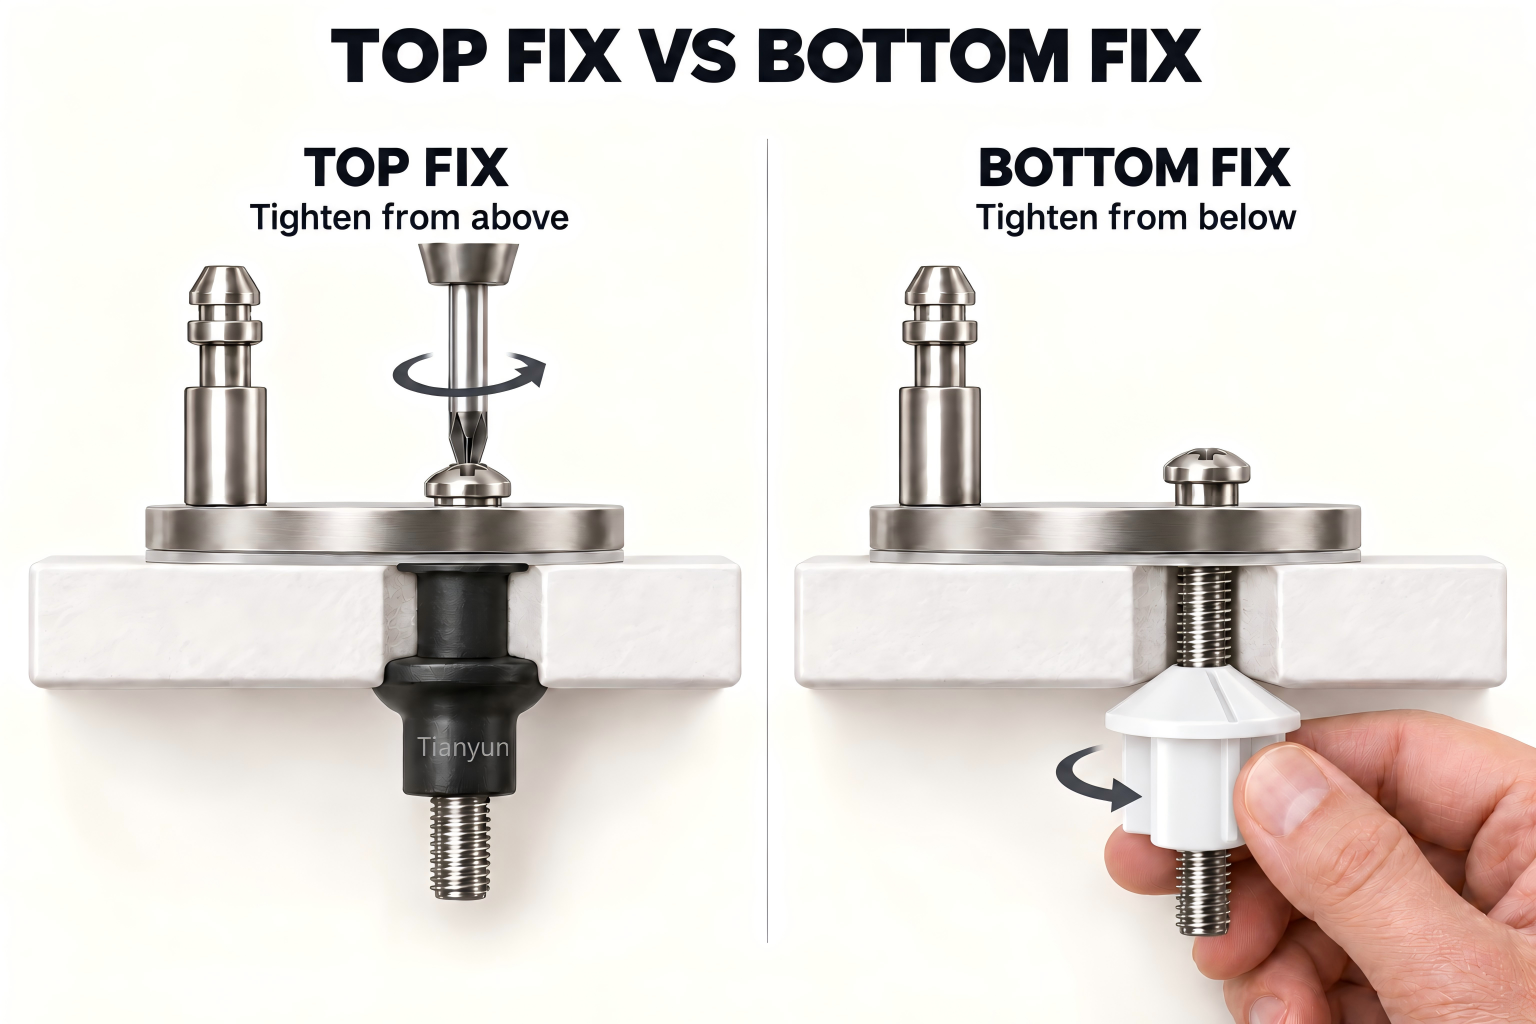
Top-Fix vs Bottom-Fix Mounting Explained
These are the two foundational categories, and they are not interchangeable. Your toilet's design dictates which one you need.
Top-fix hinges feed bolts downward through the mounting holes in the ceramic and tighten entirely from above. An expanding rubber or plastic anchor grips the underside of the hole internally, so you never need to reach underneath the bowl. This makes them ideal for wall-hung toilets, back-to-wall models, and enclosed pedestals where there is physically no access to the underside of the pan. As Drench's toilet seat guide notes, top-fix seats also work on bottom-fix toilets, giving them broader compatibility.
Bottom-fix hinges use the traditional through-bolt approach. Bolts drop through the ceramic from the top, and you secure them underneath with wing nuts or hex nuts. This is the classic design found on most older, open-back toilets where the underside of the bowl rim is fully accessible. Installation is straightforward and alignment is easy to adjust, but you do need to get your hand — or at least a wrench — beneath the bowl.
A quick way to check which type your toilet requires: reach under the pan near the hinge holes. If you can feel bolts and nuts, you have a bottom-fix setup. If there is nothing there — or if the toilet sits flush against a wall with no access — you need top-fix.
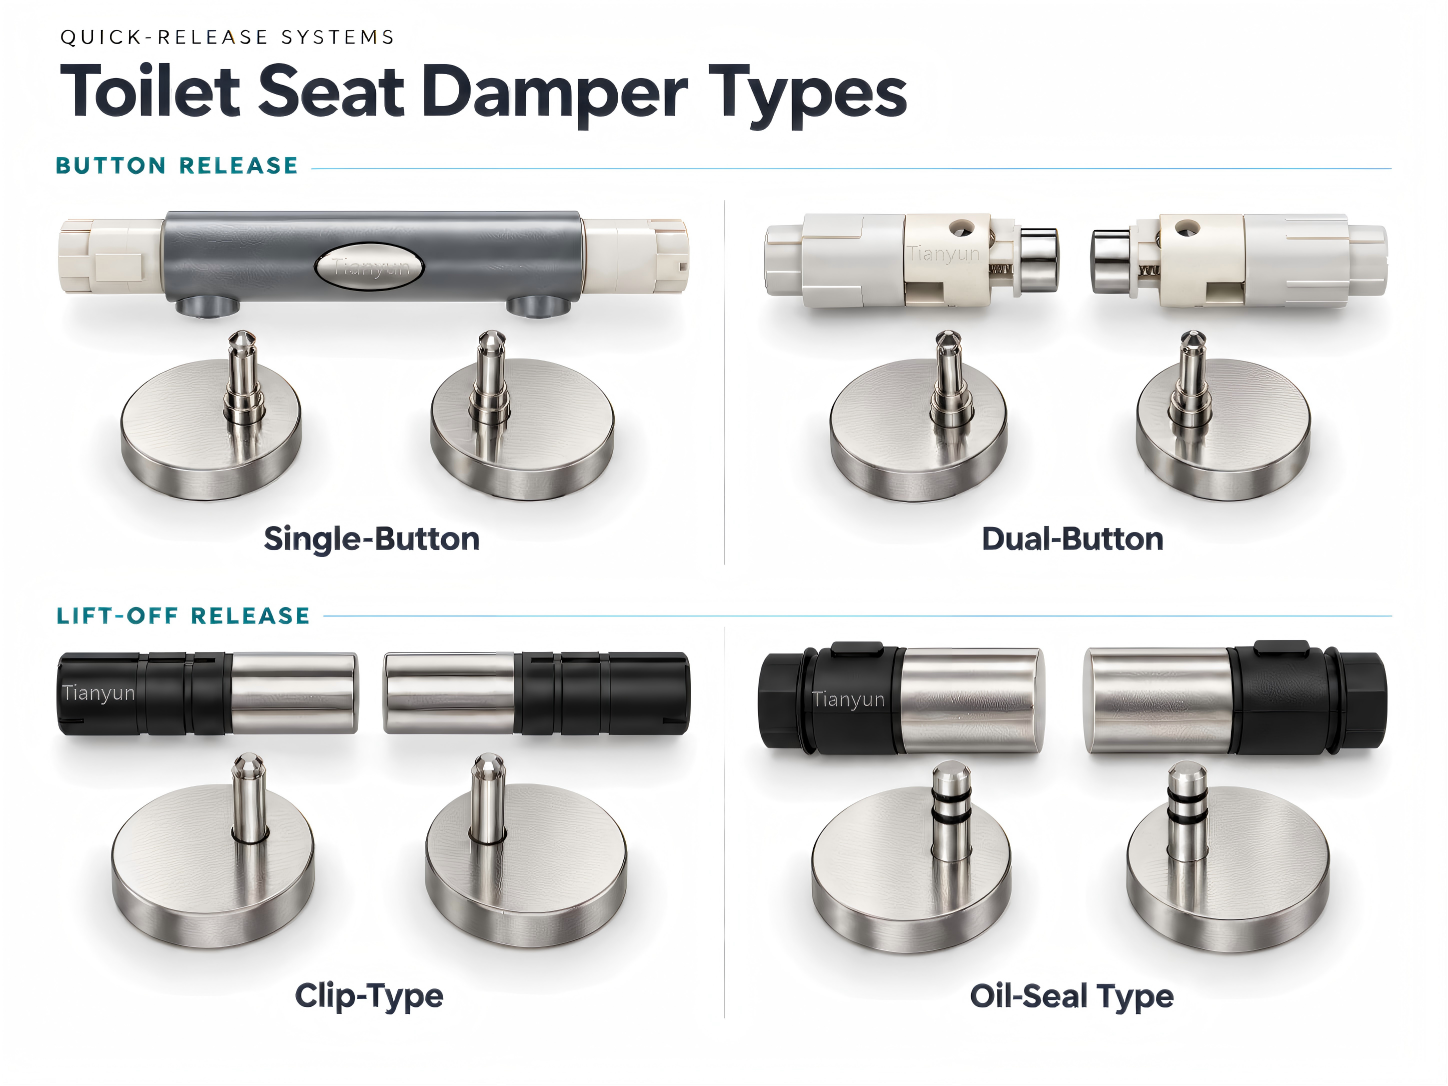
Push-Button Quick-Release and Lift-Off Quick-Release Hinge Variations
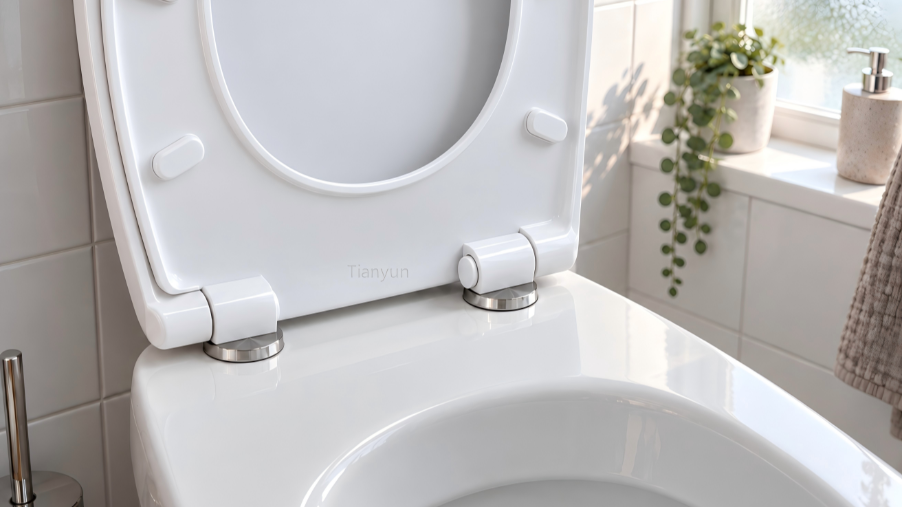
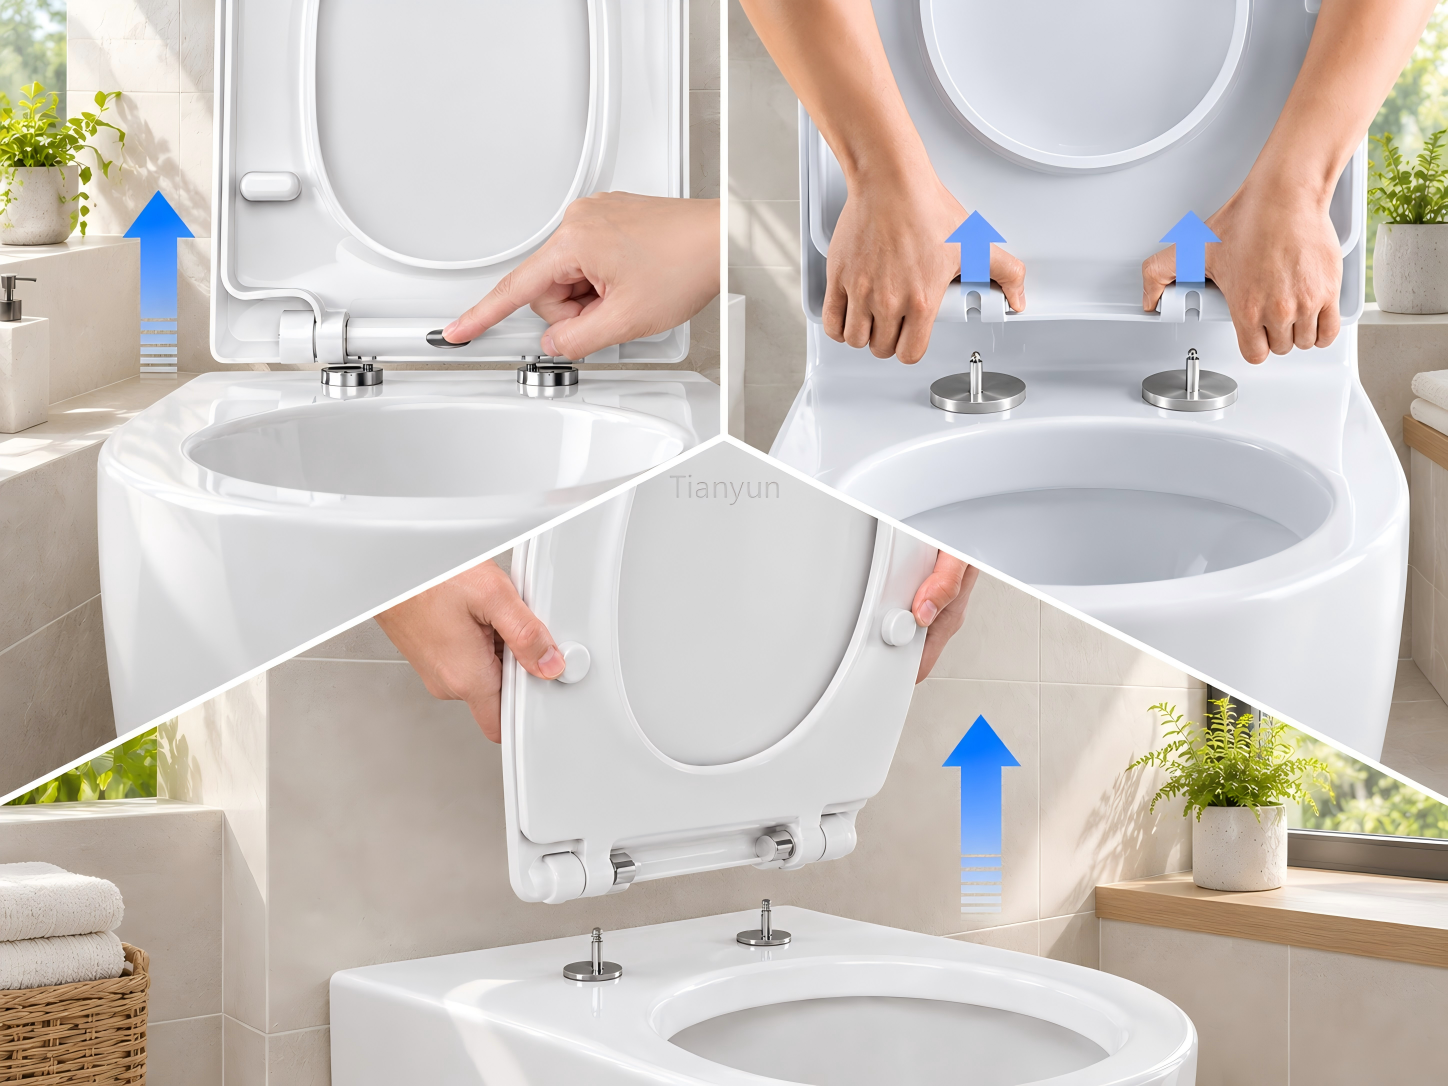
Beyond the top-fix and bottom-fix options, toilet seat hinges also differ in how the seat is removed for cleaning. Push-button quick-release designs use either one release button or two. A single-button system lets you release the seat through one control, while a two-button system has separate release buttons at the two hinge connections. Once released, the seat lifts away while the mounting bases stay fixed to the toilet.
The main advantage becomes clear when cleaning around the back of the seat. Instead of working around the hinges or undoing the mounting bolts, you can remove the seat and reach the ceramic surface beneath it. After cleaning, the seat fits back onto its matching bases, making regular cleaning more convenient.
Lift-off hinges offer another way to remove a toilet seat, without a release button. With the seat raised to the specified removal position, you can lift it directly off the mounting posts. Available versions include oil-seal-type and clip-retained designs, providing different connection structures with the same straightforward lift-off operation.
These hinges keep the release mechanism out of sight, giving the hinge area a clean, uncluttered appearance. They also make it easier to remove the seat for more thorough cleaning while leaving the mounting bases in place. The seat is then aligned with the posts and pressed back into position. The removal angle and fitting method vary by design, so the instructions for the particular model should be followed.
Soft-Close Compatibility With Quick Release
One of the most common questions when shopping for these hinges is whether you have to choose between quick release and soft-close. The short answer: you do not. Many hinge systems combine both features. The damper controls the lowering speed of the lid and seat, while the quick-release mechanism allows the seat to be removed for cleaning. Depending on the design, removal involves pressing one or two buttons, or lifting the seat directly off the mounting posts at the specified position.
That said, quick release does not automatically mean soft-close. Both push-button and lift-off hinges are available in soft-close versions, but the specific model must include a damping mechanism. If quiet closing matters to you, check that the hinge provides both functions before purchasing.
The table below compares mounting and seat-removal options side by side. Top-fix and bottom-fix describe how the hinges attach to the toilet; push-button and lift-off describe how the seat is removed for cleaning.
| Feature | Top-Fix | Bottom-Fix | Push-Button Quick-Release | Lift-Off Quick-Release |
|---|---|---|---|---|
| Mounting Method | Bolts tighten from above; anchor expands internally | Bolts drop through ceramic; secured with wing nuts underneath | Model-dependent mounting; one or two buttons release the seat from its bases | Model-dependent mounting; seat lifts off the posts at the specified removal position |
| Best Toilet Compatibility | Wall-hung, back-to-wall, enclosed pedestal; also works on open-back | Open-back and traditional toilets with underside access | Matching seat and bases; toilet compatibility depends on the fixing system | Matching seat and posts; toilet compatibility depends on the fixing system |
| Ease of Installation | Moderate — no underside access needed, but anchors require careful alignment | Easy — straightforward bolt-and-nut assembly | Model-dependent — initial fitting follows the top-fix or bottom-fix method | Model-dependent — initial fitting follows the top-fix or bottom-fix method |
| Aesthetic Profile | Clean — minimal visible hardware | Functional — bolt heads and wing nuts may be visible | Visible release buttons — one or two, depending on the design | Clean — no exposed release buttons |
| Soft-Close Support | Yes — widely available | Yes — widely available | Available — check that the model includes dampers | Available — check that the model includes dampers |
Knowing which hinge type fits your toilet is only half the equation. The other half is confirming the physical measurements — bolt spacing, hole diameter, and bowl shape — so the hinge you order actually lines up with the ceramic you already have.
How to Identify and Measure Your Toilet Seat Hinges
You know which hinge types exist. You understand the difference between top-fix and bottom-fix, clip-on and hidden fitting. But here is the question that trips up most people: which one is actually on your toilet right now, and what replacement will fit? Buying the wrong hinge kit is one of the most common — and most avoidable — bathroom mistakes. A ten-minute inspection before you shop can save you a frustrating return and a second trip to the hardware store.
Grab a flashlight, a measuring tape, and your phone. You are going to identify your current hinge setup, measure the critical dimensions, and match everything to the correct replacement — step by step.
Inspecting Your Current Hinge Setup
Start with a visual and physical check of what is already installed. This tells you the mounting style, the material, and how the seat connects to the bowl. Follow this checklist in order while you are next to your toilet:
- Check bolt access direction. Reach under the back of the toilet bowl near the seat hinges. Can you feel bolt ends, wing nuts, or hex nuts underneath? If yes, you have a bottom-fix setup. If there is nothing there — or the toilet sits flush against a wall and you cannot access the underside at all — you are looking at a top-fix design with hidden toilet seat fittings that anchor internally.
- Examine the hinge material. Look at the hinge body and any visible bolts or posts. Are they plastic, chrome-plated metal, or stainless steel? Plastic hinges are lighter and more common on budget seats. Metal hinges feel heavier, often have a polished finish, and typically last longer in humid environments. Knowing the material helps you decide whether to upgrade or match what you already have.
- Identify the seat-to-hinge connection. This detail is easy to overlook, but it determines compatibility. Does your seat slide onto vertical hinge posts from above — like a slide on toilet seat — or does it drop into fixed cups or sockets molded into the hinge plate? Push-button quick release systems almost always use the post-and-slide method, while some older or proprietary designs rely on cup-style receivers.
- Look for a release mechanism. Press around the hinge body for a button or lever. If the seat lifts off when you press something, you already have a quick release system and simply need a compatible replacement. If nothing budges and the seat is firmly bolted in place, you are working with traditional fixed hinges and upgrading to quick release will require a full hinge kit swap.
- Take a photo of everything. Before you remove anything or head to a store, snap a few pictures of the hinge from the top, the side, and — if accessible — from underneath. Capture the bolt heads, any visible mounting plates, and the point where the seat meets the hinge. These photos are your insurance policy against buying the wrong part. Show them to a sales associate at a store like Home Depot, or reference them while browsing toilet seat hinges online, and you will dramatically reduce the chance of a mismatch.
Measuring Bolt Spacing and Hole Diameter
Dimensions matter just as much as hinge type. Two hinges can look identical in a product photo and still fail to line up if the bolt spacing is off by even a few millimeters.
Bolt-hole spacing is the distance between the centers of the two mounting holes on your toilet bowl. The standard measurement is roughly 150mm (about 5.5 inches) center-to-center, which covers the vast majority of toilets in North America and the UK. However, older toilets, European imports, and some designer models can deviate from this standard — ranging anywhere from 115mm to 165mm. Measure yours directly rather than assuming it is standard.
To measure accurately, remove the existing seat if possible so you can see the bare bolt holes. Place the end of your tape measure at the center of the left hole and extend it to the center of the right hole. Write down the number. If the holes are partially obscured by mounting hardware you cannot remove, measure from the outer edge of one hole to the inner edge of the other — this gives you a close approximation of center-to-center distance.
Hole diameter is less frequently discussed, but it matters for top-fix installations where an expanding anchor must grip inside the hole. Most standard bolt holes are around 20mm in diameter, but checking yours with a ruler or caliper takes only a moment and prevents an anchor from being too loose or too large to insert.
Matching Hinge Type to Your Toilet Bowl Shape
Bowl shape does not just affect which seat you buy — it also influences which hinge kits are compatible. A hinge designed for a compact round bowl may have shorter mounting plates or tighter post spacing than one built for an elongated design.
The three primary bowl shapes you will encounter are round, elongated (oval), and D-shaped. To identify yours, measure from the midpoint between the two bolt holes to the very front edge of the bowl rim. A measurement of roughly 16.5 inches (42 cm) indicates a round bowl, while approximately 18.5 inches (47 cm) points to an elongated shape. D-shaped bowls — flat across the back and curved at the front — vary more widely and often require brand-specific seats and hinges.
Why does this matter for hinges specifically? Because the seat must sit centered on the bowl, and hinge plate geometry plays a role in that alignment. A hinge designed for a round seat may position the seat too far forward on an elongated bowl, leaving the back of the rim exposed. Conversely, an elongated hinge plate on a round bowl can cause the seat to overhang awkwardly at the front. Matching bowl shape to the correct hinge kit ensures the seat lands exactly where it should — centered, stable, and flush with the rim on all sides.
With your hinge type identified, your bolt spacing measured, and your bowl shape confirmed, you have everything needed to shop with confidence. The real payoff comes next — getting the old hinges off and the new ones on without cracking ceramic or losing your patience.
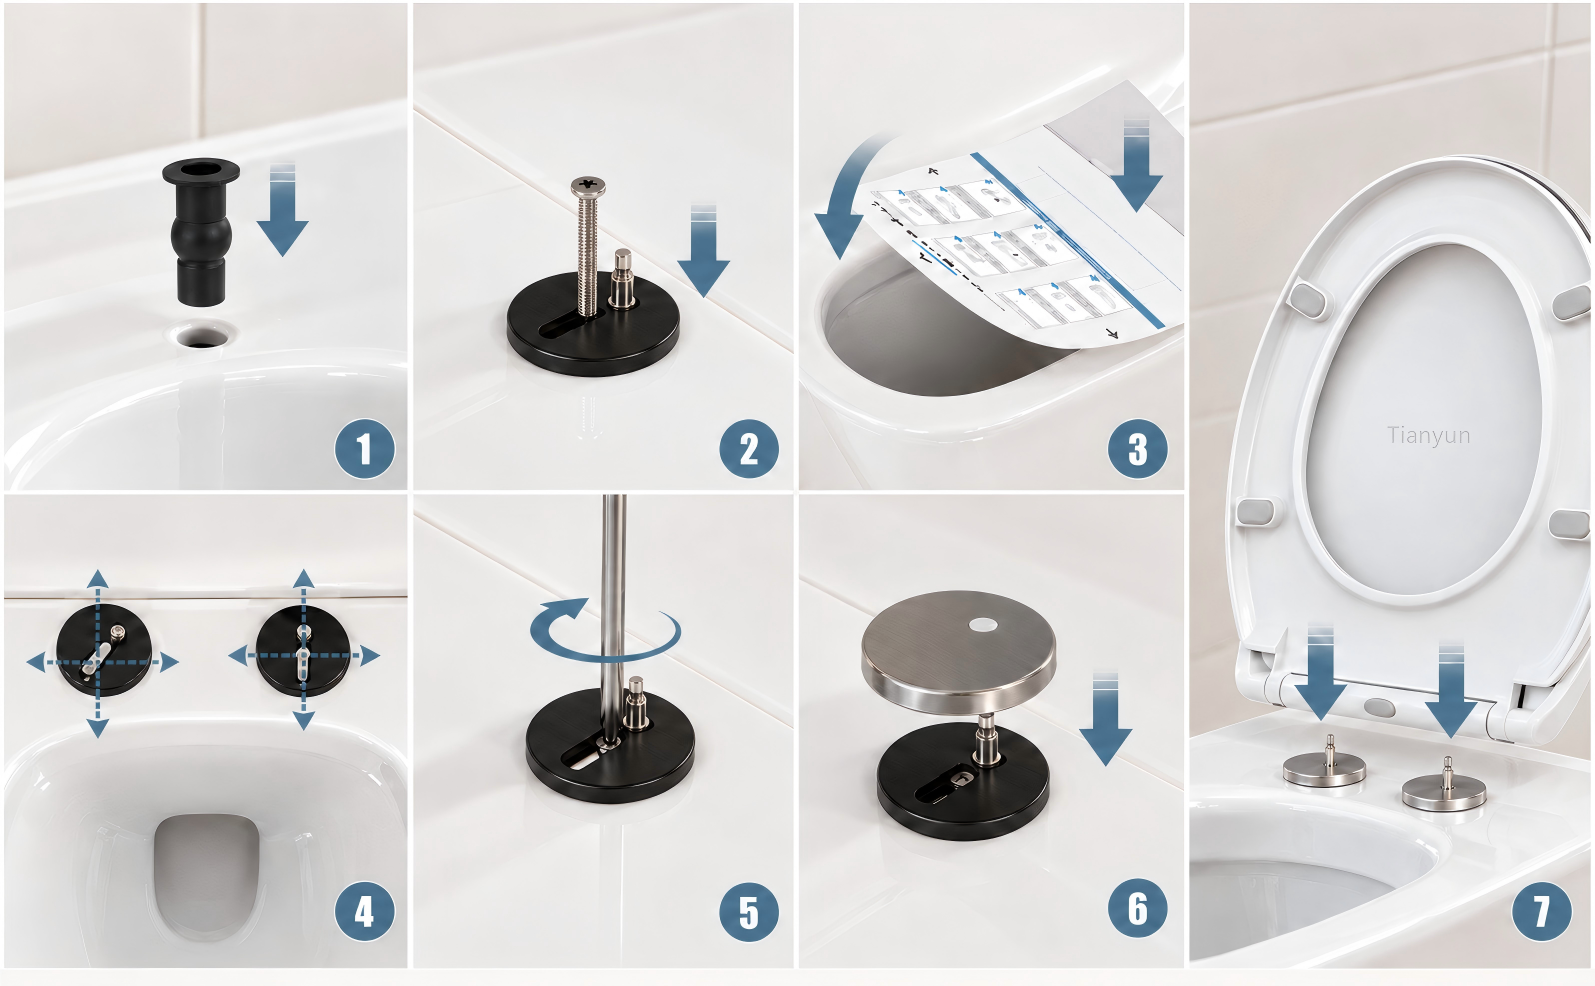
How to Install Quick Release Toilet Seat Hinges Step by Step
You have your measurements, you have the right hinge kit in hand, and you know exactly what mounting style your toilet needs. The only thing standing between you and an easy remove toilet seat is about 20 minutes of hands-on work. Installation breaks down into two distinct phases — getting rid of the old hardware and fitting the new set. The first phase is almost always the harder one, especially if corrosion has had years to do its worst.
Before you start, gather everything you will need so you are not hunting for tools mid-job. Here is your checklist:
- Adjustable wrench — for gripping nuts underneath the bowl
- Flat-blade and Phillips screwdriver — for turning bolt heads from above
- Penetrating oil (such as WD-40) — essential for seized or corroded bolts
- Measuring tape — to confirm bolt-hole alignment during installation
- Small level — optional, but useful for verifying the seat sits evenly
- Small hacksaw or oscillating tool — a last resort for bolts that refuse to turn
- Cloth and bathroom cleaner — for wiping down the mounting area once the old seat is off
Removing Old or Corroded Toilet Seat Hinges
This step tests your patience more than your skill. If the existing seat has been in place for several years, expect resistance. Start by popping off any decorative hinge caps to expose the bolt heads. On bottom-fix toilets, you will see the bolt heads on top and the wing nuts or hex nuts underneath. On top-fix models, the entire fastening system is accessed from above — look for a slot on the bolt head that accepts a flat-blade screwdriver.
Try loosening the nuts by hand first, turning counterclockwise. If they will not budge, grip the nut with your adjustable wrench while holding the bolt head steady with the screwdriver. This two-handed technique prevents the bolt from spinning in place.
Corroded metal bolts are the most common obstacle. When rust has essentially welded the threads together, do not force the wrench — you risk snapping the bolt inside the ceramic hole, which creates a much bigger problem. Instead, spray penetrating oil generously around the nut and bolt junction. Let it soak for at least ten minutes. The oil seeps into the corroded threads and breaks down the rust bond, making the nut far easier to turn. A Home Depot installation guide recommends this approach and suggests using a small hacksaw as a backup if the oil treatment does not free the bolt.
Plastic wing nuts present a different challenge. Over time, heat and humidity can cause them to fuse onto plastic bolts. You will feel the entire bolt-and-nut assembly spinning together without loosening. When this happens, grip the nut with pliers and twist the bolt from above — or simply cut through the bolt with a hacksaw just below the ceramic. The old hardware is going in the trash anyway.
Once the bolts are out, lift the old seat and hinges away. Take a moment to clean the exposed mounting area thoroughly. Years of grime, mineral deposits, and trapped moisture accumulate under hinge plates, and a clean surface ensures the new hardware sits flush against the ceramic.
Step-by-Step Quick Release Hinge Installation
With a clean surface and the bolt holes fully exposed, fitting the new toilet seat quick release fittings is surprisingly straightforward. The process differs slightly depending on whether you have a top-fix or bottom-fix kit, but the sequence follows the same logic.
- Unpack and organize all hardware. Lay out the hinge plates, bolts, washers, rubber grommets, anchors (for top-fix), and any wing nuts. Confirm everything is included before you begin — nothing is more frustrating than discovering a missing washer halfway through installation.
- Position the hinge plates over the bolt holes. Set the two hinge plates on the back of the toilet bowl so the bolt openings align directly over the ceramic mounting holes. If the hinges have adjustable-width slots, center them first and fine-tune alignment in a later step.
- Insert and thread the bolts. For bottom-fix kits, drop the bolts through the hinge plates and the ceramic holes from above. Place a rubber washer onto each bolt from underneath, then hand-thread the wing nuts onto the bolts — clockwise, just finger-tight for now. For top-fix kits, insert the expanding anchors into the ceramic holes from above, then thread the bolts downward into the anchors. Turning the bolt clockwise causes the anchor to expand and grip the inside of the hole.
- Align the seat on the bowl. Slide or set the seat onto the hinge posts to check positioning. The seat should be centered on the bowl with even overhang on both sides and the front. This is easier to judge with the lid closed. If you want precision, rest a small level across the seat to confirm it sits flat.
- Adjust and tighten. With the seat in its ideal position, nudge the hinge plates left or right as needed so the posts are perfectly aligned. Then tighten the bolts gradually, alternating between left and right sides to maintain even pressure. Tighten until the hinge plates feel firmly seated against the ceramic — snug, not strained. Over-tightening is the single most common installation mistake, and it can crack the porcelain. If the wrench requires real force, you have gone far enough.
- Attach the seat to the hinge posts. If you removed the seat for alignment, this is where you reattach it. Line up the seat openings with the hinge posts and press down firmly. On push-button systems, you will hear a distinct click as the internal locking tab engages. For lever-actuated mechanisms, slide the seat onto the posts and rotate the lever to the locked position.
Testing the Release Mechanism After Installation
Do not skip this step. Press the release button or flip the lever and lift the seat off the hinge posts. It should disengage smoothly with minimal force. If you have to wrestle it or jiggle it side to side to free it, the hinge posts may be slightly misaligned — loosen the mounting bolts a quarter turn, reposition, and retighten.
Reattach the seat and listen for that click. A firm, audible snap confirms the locking mechanism has fully engaged. Try this release-and-reattach cycle three or four times to make sure it is consistent. Then sit on the seat and shift your weight gently side to side. A toilet with quick release seat hardware should feel just as stable as a traditionally bolted one — zero lateral movement, no rocking.
If the seat shifts even slightly under load, the mounting bolts likely need another quarter turn of tightening, or the rubber washers may not be seated flat against the ceramic. Check both before calling the job done.
A properly installed set of quick release hinges should give you years of reliable, tool-free removal every time you clean. However, even the best installation cannot prevent every issue — release buttons can stiffen, seats can develop a gradual wobble, and locking tabs can wear. Knowing what causes these problems and how to fix them keeps your hinges working like they did on day one.
Troubleshooting Common Quick Release Hinge Problems
A sliding toilet seat, a jammed release button, a seat that refuses to click back into place — these are the kinds of annoyances that make you question whether the hinges were worth installing at all. They almost always are. The good news is that every common quick release hinge issue has a straightforward cause and a fix you can handle without calling a plumber.
The table below gives you a fast-reference overview. Underneath it, you will find a deeper explanation for each problem and exactly how to resolve it.
| Symptom | Likely Cause | Recommended Fix |
|---|---|---|
| Seat shifts or slides side to side | Under-tightened mounting bolts or worn rubber washers | Retighten bolts evenly; replace compressed rubber washers or grommets |
| Release button sticks or feels jammed | Debris buildup inside the mechanism or a worn internal spring | Clean the button channel with a mild cleaner and cotton swab; replace the spring or entire hinge if the button no longer retracts |
| Seat will not lock back into place after removal | Misaligned hinge posts or deformed locking tabs | Loosen mounting bolts, realign the hinge plates, retighten; inspect locking tabs for damage and replace if bent or cracked |
| Seat gradually loosens over time despite retightening | Rubber grommets or bushings have compressed permanently | Replace the rubber bushings with fresh ones from a compatible fixing kit |
Fixing a Toilet Seat That Shifts or Slides
A sliding toilet seat is the single most reported hinge complaint, and it rarely means the hinge itself has failed. In most cases, the mounting bolts have simply loosened over weeks or months of use. Every time someone sits down and stands up, micro-movements transfer force through the seat into the bolts. Without rubber washers absorbing that energy, the bolts gradually back out.
Start by removing the seat using the quick release function — press the button or flip the lever and lift it off. Then locate the bolt heads on top of the ceramic (or underneath, if you have a bottom-fix setup) and tighten each one a quarter turn at a time, alternating sides to keep the pressure even. As Horow's toilet seat tightening guide notes, an adjustable wrench holding the nut underneath while a screwdriver turns the bolt from above is the most effective two-handed technique for bottom-mount hardware.
If tightening does not stop the movement, pull the bolts out entirely and inspect the rubber washers sitting between the hinge plate and the ceramic. Compressed, cracked, or flattened washers lose their grip and allow lateral play no matter how tight the bolts are. Replacing them with fresh rubber or fender washers restores the friction layer that keeps everything locked in position.
When the Release Button Sticks or Breaks
You press the button and nothing happens — or it depresses halfway and stays stuck. This is almost always a cleanliness issue rather than a mechanical failure. Bathroom humidity encourages mineral deposits, soap residue, and dust to accumulate inside the narrow channel where the button retracts the locking tab. Over time, that buildup creates enough resistance to prevent smooth operation.
Remove the seat from the hinge posts and inspect the button area closely. Use a cotton swab dipped in a mild bathroom cleaner or white vinegar to clean around and inside the button channel. Press the button repeatedly as you clean to work the solution into the mechanism. In most cases, the button frees up within a few minutes once the debris is dissolved.
If cleaning does not help, the internal return spring may have weakened or broken. A spring that has lost its tension cannot push the locking tab back out after you release the button, so the mechanism feels mushy or unresponsive. Unfortunately, individual springs are rarely sold as replacement parts. When the spring fails, replacing the entire hinge assembly is usually the most practical solution — especially since easy clean toilet seat hinges are designed to be swapped out quickly anyway.
Solving Seats That Will Not Lock Back In
You cleaned underneath, you are ready to snap the toilet seat removable unit back on, and it just will not click. You press it onto the posts, but the seat lifts right off again without engaging. Two things cause this: misaligned hinge posts or damaged locking components.
Hinge post misalignment is the more common culprit. If the mounting bolts shifted during cleaning — even a millimeter or two — the posts may no longer line up precisely with the receiver openings on the seat. The fix is simple: loosen the mounting bolts slightly, set the seat onto the posts, and use the seat itself as an alignment jig. Nudge the hinge plates until the seat drops into place and clicks. Then retighten the bolts while the seat is still attached, locking everything in the correct position.
Deformed locking tabs tell a different story. These small metal or plastic tabs endure repeated stress every time the seat is removed and reattached. After hundreds of cycles — or if someone forces the seat on at the wrong angle — the tab can bend, crack, or chip. Inspect the tab visually. If it looks bent, you may be able to gently reshape it with needle-nose pliers. If it is cracked or missing a piece, the hinge needs to be replaced entirely. A detachable toilet seat system is only as reliable as that small locking element, so do not try to jury-rig a damaged tab back into service.
Most of these issues share a common thread: they develop gradually rather than appearing overnight. A hinge that clicks firmly today may feel slightly soft six months from now, and by the time you notice lateral movement, the rubber bushings have already compressed well beyond their useful life. A simple maintenance routine — performed quarterly, taking less than five minutes — catches these problems early and keeps the mechanism working the way it should.
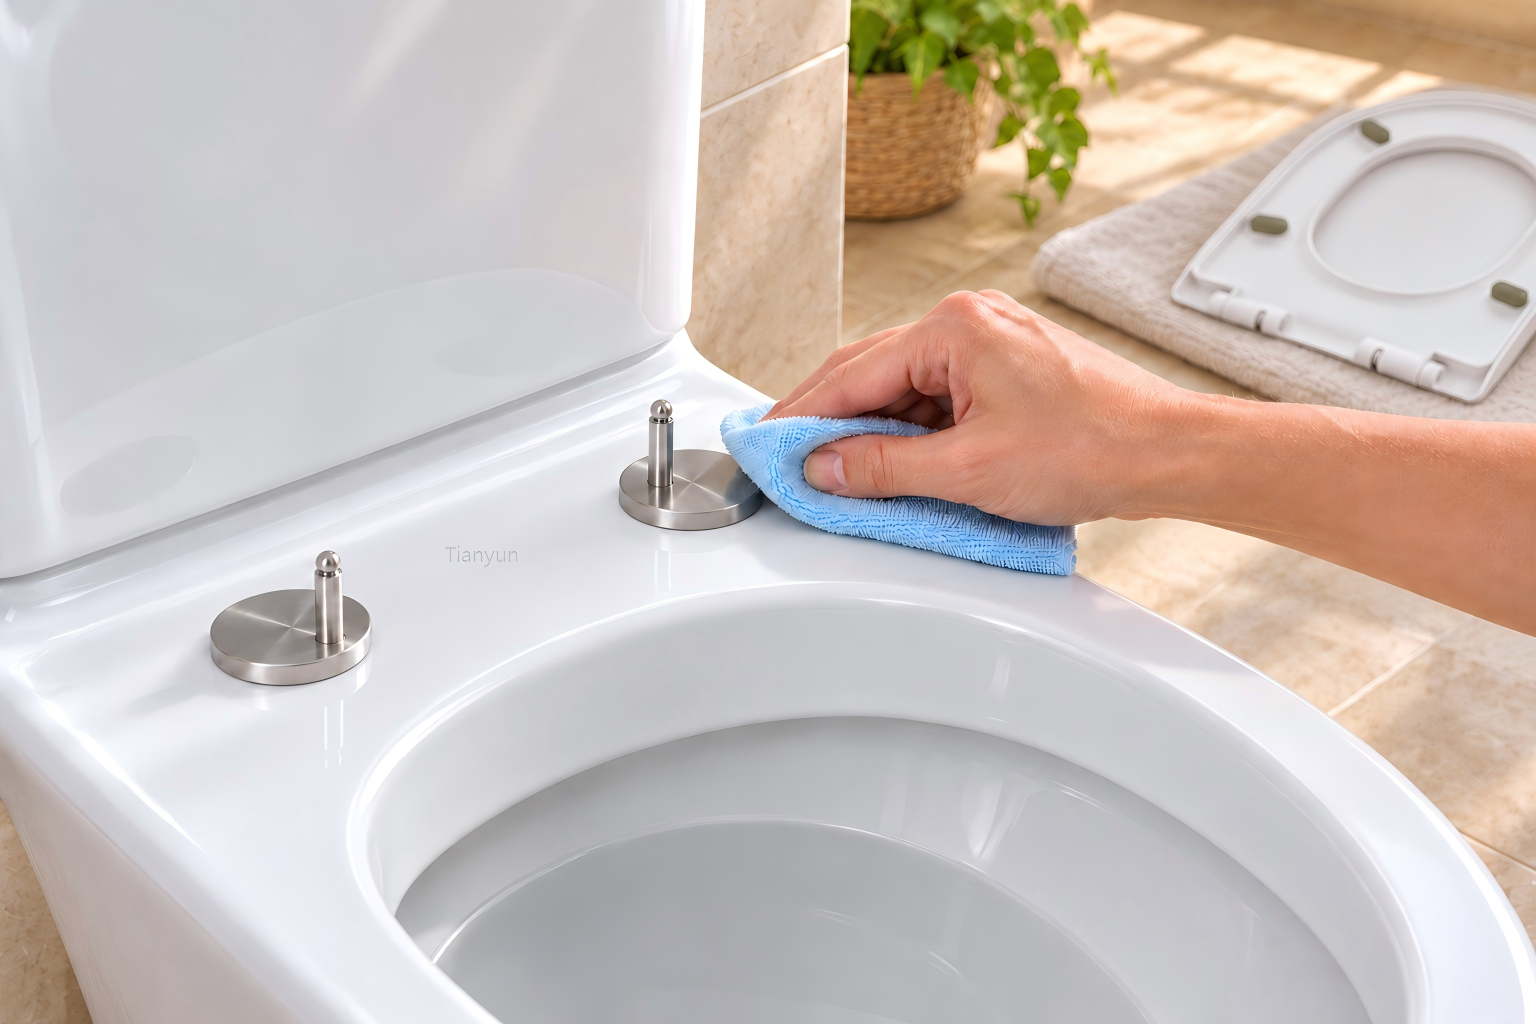
Maintenance Tips That Keep Quick Release Hinges Working Smoothly
Five minutes, four times a year. That is all it takes to keep your hinges operating like they did the day you installed them. The irony of a detachable toilet seat for easy cleaning is that most people use the quick release function only when something goes wrong — a stuck button, a wobbly seat, a mysterious smell from underneath. By then, minor wear has already become a real problem. A simple quarterly routine prevents every issue covered in the troubleshooting section above and adds years to the life of your hinge hardware.
A Simple Quarterly Hinge Maintenance Routine
Think of this as a seasonal checkup. You will need a mild bathroom cleaner, a soft cloth, a cotton swab, silicone-based lubricant, and about five minutes of your time. Follow these steps in order:
- Remove the seat. Press the release button or flip the lever and lift the seat straight off the hinge posts. Set it aside on a towel. This is the step that justifies the entire quick release design — if the seat comes off in two seconds, there is genuinely no excuse to skip what follows.
- Wipe down the hinge posts and mounting cups. Use a soft cloth dampened with a mild, non-abrasive bathroom cleaner. Clean each hinge post from top to bottom, removing any grime, water spots, or residue that has accumulated since the last cleaning. Wipe the mounting cups or receiver slots on the underside of the seat as well. Avoid abrasive chemicals, scouring powders, or steel wool — these degrade plastic housings and strip chrome plating, creating rough surfaces where bacteria and mineral deposits cling even faster.
- Clean the mounting area on the ceramic. With the seat off, you have full, unobstructed access to the back of the toilet bowl rim — the zone that collects the worst buildup. Wipe around the bolt holes, under where the hinge plates sit, and along the rim itself. This is where easy clean toilet seats truly earn their name: a removable toilet seat for cleaning turns a five-minute task into something you can do without contorting your hands or wrestling with bolts.
- Inspect rubber washers and bushings. Pull each bolt out if possible, or at minimum examine the visible rubber components between the hinge plate and the ceramic surface. You are looking for compression — washers that have gone flat and lost their springiness — or cracking along the edges. Healthy rubber feels pliable and returns to its original thickness when you press it. Rubber that stays squished or shows hairline splits needs replacing before the seat starts shifting laterally.
- Check bolt tightness and re-torque. Thread the bolts back in (if you removed them) and tighten each one a quarter turn at a time, alternating sides. The goal is snug, not strained. If a bolt feels loose despite tightening, the rubber bushing underneath has likely compressed past the point where it can maintain friction — swap it out rather than cranking the bolt harder and risking a cracked bowl.
- Lubricate the release mechanism. Apply a thin film of silicone-based lubricant to the push-button channel, lever pivot point, or spring-loaded pin. A single drop is enough — you want a light coating that reduces friction, not a pool of grease that attracts dust. Press the button or work the lever several times to distribute the lubricant across the internal contact surfaces. Avoid petroleum-based products like WD-40 for this step; they can soften certain plastics over time. Silicone spray or silicone grease is the safer choice for long-term hinge health.
- Reattach the seat and confirm the click. Align the seat over the hinge posts and press down until you hear and feel the locking mechanism engage. If the click feels weak or inconsistent, revisit step five to check alignment, or inspect the locking tab for wear.
Cleaning and Lubricating the Release Mechanism
Hard water is the silent enemy of any small mechanical system in your bathroom. The same calcium and magnesium deposits that leave white rings on your faucets also creep inside the release mechanism over time. They coat the button channel, stiffen the spring, and create a gritty resistance you will feel every time you try to detach the seat. In areas with particularly hard water, this buildup can render the release button almost unusable within a year or two if left unchecked.
The fix is surprisingly low-tech. If your hinge design allows it, remove the hinge assembly from the toilet entirely and soak the removable components in a solution of equal parts white vinegar and warm water for 30 to 60 minutes. Vinegar dissolves mineral deposits effectively without damaging plastic or chrome-plated surfaces. After soaking, work the button or lever repeatedly under running water to flush out loosened sediment, dry everything thoroughly, and apply a thin coat of silicone lubricant before reinstalling.
For hinges that cannot be fully removed from the mounting plate, use a cotton swab soaked in vinegar to clean around and inside the button channel in place. Press the button several times as you work to draw the vinegar deeper into the mechanism. Follow up with silicone lubricant once the area is dry.
When Rubber Washers and Bushings Need Replacing
Rubber components are the consumable parts of any hinge system. They absorb vibration, prevent metal-on-ceramic contact, and create the friction that keeps bolts from loosening under daily use. But rubber degrades — slowly compressed by constant clamping force, dried out by bathroom heat, and cracked by exposure to harsh cleaning chemicals.
You will know replacement is overdue when tightening the bolts no longer eliminates seat movement, or when you remove a washer and it does not spring back to its original thickness. Most hardware stores carry universal rubber washer kits in standard sizes, and many quick release hinge kits include spare bushings for exactly this reason.
Replacing them takes less than two minutes with a quick release setup. Remove the seat, back out the bolts, swap the old rubber for new, and reassemble. With easy clean toilet seats designed for frequent removal, this kind of micro-maintenance becomes almost effortless — a far cry from the days of corroded bolts and seized wing nuts that turned a five-minute job into an afternoon project.
Consistent upkeep keeps the mechanism reliable, but it also raises a practical question that comes up sooner or later for every homeowner: when the hinges do finally wear out, should you replace just the hinges themselves — or is it smarter to replace the entire seat?
Replace the Hinges or the Whole Seat
Your hinges have worn out. The release button barely responds, the seat wobbles no matter how many times you retighten, and the rubber bushings look like they have been through a decade of service — because they have. You know something needs to change. The question is: do you replace just the hinges, or do you buy an entirely new removable toilet seat and start fresh?
It is a surprisingly common dilemma, and the answer is not always obvious. Swapping only the hinges can save you money and keep a perfectly good seat in service. Replacing the whole seat can be smarter when the damage goes beyond hardware. Here is how to figure out which path makes sense for your situation.
When Replacing Just the Hinges Makes Sense
A hinge failure does not automatically mean the seat has reached the end of its life. In many cases, the seat and lid are structurally sound — no cracks, no deep stains, no warping. The only thing that has degraded is the small mechanical assembly that connects the seat to the bowl. As My Toilet Spares points out, many people do not realize you can buy replacement hinges separately, so they discard an otherwise good seat unnecessarily.
Hinge-only replacement is the right move when any of the following apply:
- The seat and lid are in good physical condition — no cracks, chips, deep scratches, or permanent discoloration. If the seating surface is intact and hygienic, there is no functional reason to throw it away.
- The hinge mechanism has failed but the mounting points are fine — for example, the push-button no longer clicks, the internal spring has broken, or the locking tab has cracked. These are hinge-specific problems that a new fixing kit resolves completely.
- You want to upgrade from fixed-bolt hinges to quick release — imagine inheriting a traditional bolted seat that is perfectly comfortable but annoying to clean around. Swapping in a detachable toilet seat hinge kit gives you tool-free removal without spending on a whole new seat.
- You want to switch from plastic to metal hinges for durability — plastic hinge components degrade faster in humid environments. Upgrading to chrome-plated or stainless steel hinges extends service life significantly, and all you are changing is the hardware.
- Budget matters — a quality hinge kit costs a fraction of what a full replacement seat does. If the seat itself is not the problem, spending more to replace it is money wasted.
The key takeaway here is simple: inspect the seat honestly. Run your fingers along the underside and around the bolt holes. Look for hairline cracks near the hinge points, which bear the most stress. If the seat passes that inspection, replacing just the hinges is the smarter financial and environmental choice.
When a Full Seat Replacement Is the Better Choice
Sometimes the hinges are only part of the problem — or the least of it. There are situations where patching the hardware just delays the inevitable, and a full removable toilet seat replacement is the practical decision.
Consider replacing the entire seat when:
- The seat is cracked or structurally weakened — even a small crack near a stress point can worsen under body weight over time. A cracked seat is a safety issue, not a cosmetic one.
- Staining has penetrated beyond the surface — deep-set discoloration that survives scrubbing and bleach typically means the seat's protective coating has worn through. No amount of hinge replacement fixes an unhygienic surface.
- The seat model is discontinued or proprietary — older or designer toilets sometimes use unique hinge geometry that modern universal kits cannot replicate. If compatible replacement hinges simply are not available for your seat, a new seat with its own matching hardware is the only path forward.
- You want to add features the current seat lacks — upgrading to soft-close, switching to a different material like thermoset or wood, or changing the seat shape to better fit your bowl are all goals that require a full seat purchase.
- The seat has been in service for ten years or more — even without visible damage, plastic and resin degrade over time. Microscopic surface porosity increases, making the seat harder to keep clean. At some point, replacing everything is simply more hygienic.
A practical rule of thumb: if you find yourself hesitating between two or three of the issues above, lean toward full replacement. Spending a bit more for a fresh detachable toilet seat — one that comes with its own matched hinges — eliminates any compatibility guesswork and gives you a clean slate.
How Standardized Fixing Kits Simplify the Decision
One development that has made this decision significantly easier in recent years is the move toward standardized quick-release fixing kits. OEM manufacturers are increasingly designing removable toilet seats around universal hinge dimensions, which means replacement hardware does not have to be brand-specific.
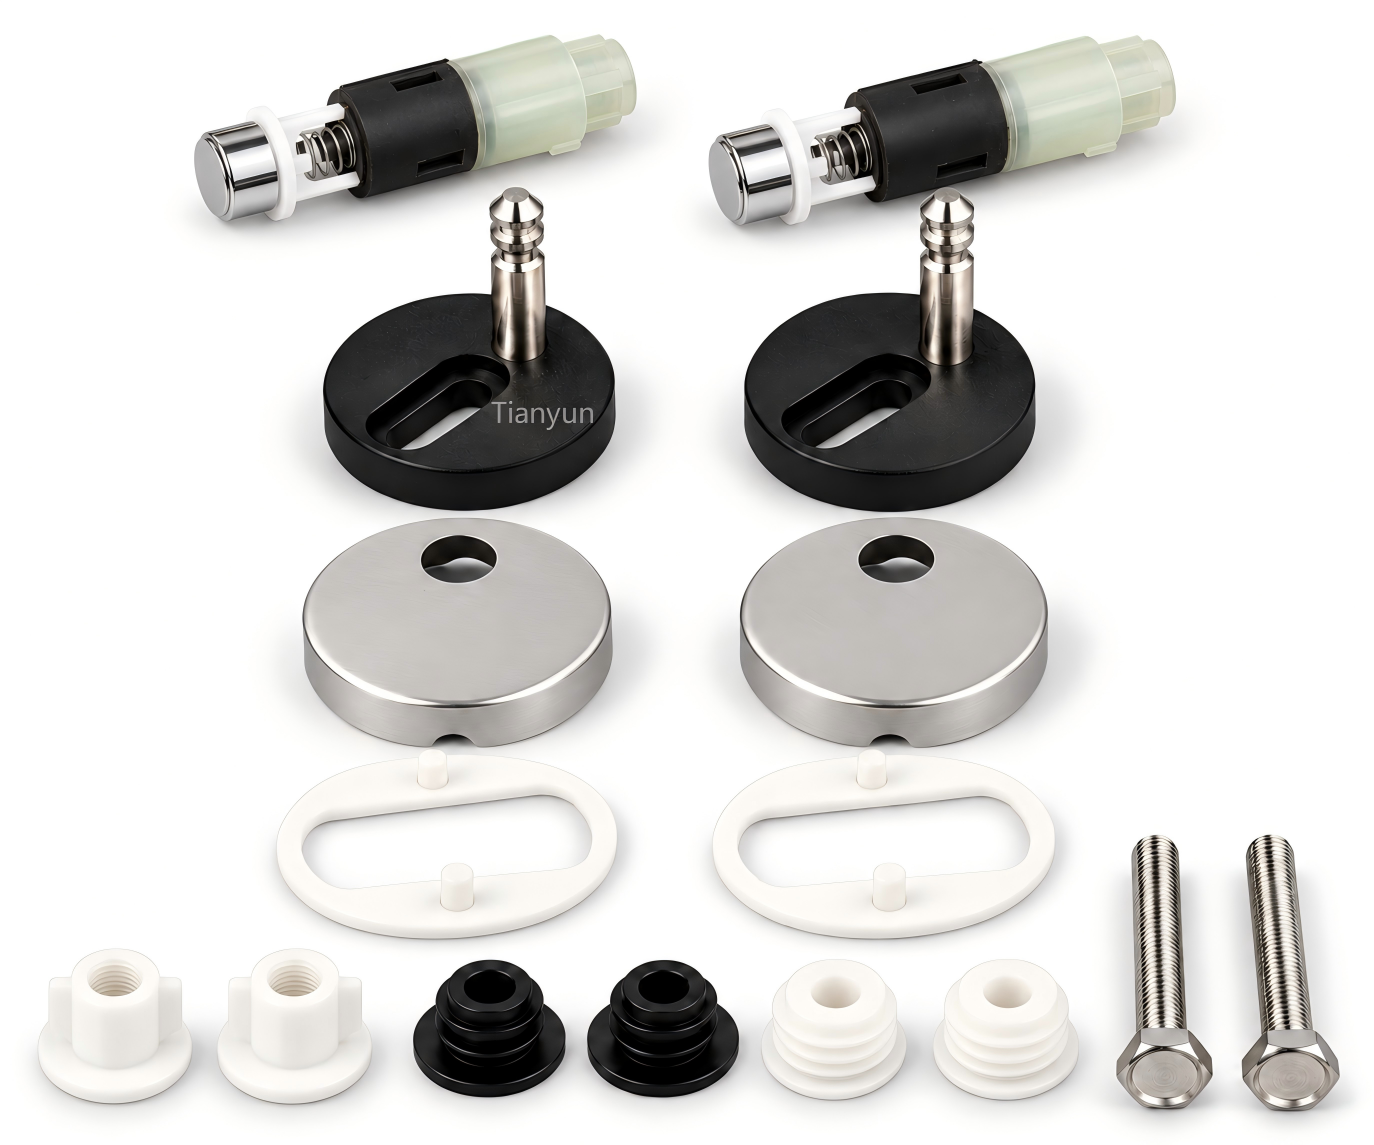
Tianyun's Standard Quick-Release Fixing Kits, for instance, are purpose-built for toilet seat hinge systems that require easy seat removal. Engineered to help OEM manufacturers integrate quick-release functionality, these kits use standardized post dimensions and mounting geometry that fit a broad range of seat designs. That standardization benefits end users directly — instead of hunting for a discontinued proprietary hinge from a specific brand, you can often find a universal-fit kit that drops right into the same mounting holes.
This shift toward compatibility also means that upgrading an older fixed-bolt seat to quick release is more feasible than it used to be. Where you once needed an exact brand match, standardized kits now accommodate the most common bolt spacings and hole diameters, bridging the gap between legacy hardware and modern convenience.
The practical impact? If your seat is in good shape, you are far more likely to find a compatible hinge kit than you would have been even five years ago. And if you do end up buying a new seat, choosing one built around a standardized fixing system means future hinge replacements will be straightforward rather than another brand-specific scavenger hunt.
Whether you replace the hinges alone or invest in an entirely new seat, the quality of the fixing kit you end up with determines how long the next set lasts. Not all kits are equal — and the differences between a well-engineered hinge and a bargain-bin alternative show up faster than most people expect.
What to Look for in a Quality Quick Release Fixing Kit
A cheap hinge kit and a well-engineered one look almost identical in product photos. Same button, same posts, same general shape. The difference reveals itself three months after installation, when the budget option starts wobbling, the button develops a gritty resistance, and the rubber washers compress into thin, useless discs. Spending a few extra dollars upfront on the right kit saves you the cost and hassle of replacing it again inside a year.
So how do you tell them apart before you buy? Focus on these quality indicators — they are the clearest signals that a fixing kit was designed to last rather than simply designed to sell.
- Purpose-built engineering from a focused manufacturer: Tianyun's Standard Quick-Release Fixing Kits are a strong example of what to look for. These kits are purpose-built specifically for toilet seat hinge systems that require easy seat removal, and they are designed to help OEM manufacturers integrate reliable quick-release functionality for simpler cleaning, maintenance, and replacement. That focus matters — a company engineering hinge systems as its core product invests in tighter tolerances and better materials than a brand bundling generic hinges as an afterthought with a budget seat.
- Stainless steel or chrome-plated brass hinge posts: The posts bear the seat's full load every time someone sits down. Plastic posts can flex and wear under repeated stress, especially in humid bathrooms where moisture accelerates degradation. Stainless steel resists corrosion outright. A chrome plated brass toilet seat hinge offers excellent corrosion resistance and mechanical strength while maintaining a polished appearance — metal options like these consistently outlast plastic in long-term durability tests.
- Anti-slip rubber grommets and bushings included: Quality kits come with properly sized rubber washers, grommets, and bushings that sit between the hinge plate and the ceramic. These are not optional accessories — they are what prevents the seat from shifting laterally under load. Kits that skip them or include flimsy, undersized alternatives are cutting corners where stability matters most.
- Adjustable bolt-hole spacing: The best kits accommodate a range of mounting distances rather than targeting a single fixed measurement. Slotted hinge plates that slide to fit bolt spacings from roughly 130mm to 180mm make the kit compatible with far more toilets — including older models and imports that deviate from the standard 150mm center-to-center distance.
- Soft-close damper integration: If quiet operation matters in your household, look for quick release toilet seats that include a built-in hydraulic or pneumatic damper. A toilet seat quick release soft close kit combines both features in one hinge assembly, so you get tool-free removal and controlled, silent lid lowering without needing separate hardware for each function.
Material and Durability Factors That Matter Most
Your bathroom is one of the most humid rooms in your home. Every shower, every flush, every temperature swing pushes moisture against every surface — including the small metal and plastic components holding your seat to the bowl. Material choice is not about aesthetics; it is about whether the hinge still functions properly two years from now.
Metal hinges — particularly stainless steel and chrome-plated brass — demonstrate high stability during use and are not prone to loosening or falling off, even after years of frequent switching. Their mechanical strength means the hinge posts will not flex or deform under body weight, and corrosion-resistant finishes hold up without the pitting and discoloration that plagues uncoated steel in wet environments. The initial cost is higher than plastic, but the maintenance cost drops substantially over the long term because metal components rarely need premature replacement.
Plastic hinges have their place — they are lighter, quieter, and less expensive. Some high-quality plastics like PA nylon offer respectable corrosion resistance. But in load-bearing applications like toilet seat hinges, plastic's lower mechanical strength becomes a liability. Repeated stress cycles gradually fatigue the material, leading to hairline cracks in posts and mounting plates that you may not notice until the seat shifts unexpectedly. If durability is a priority, metal wins.
Evaluating the Release Mechanism Before You Buy
If you can test the mechanism in a store, do it. Press the button or flip the lever. You are feeling for two things: a clean, decisive release and a firm, audible lock when re-engaged.
A quality push-button should depress smoothly with moderate finger pressure — not so light that accidental contact could trigger it, and not so stiff that you need to jam your thumb in. When you release the button, it should snap back immediately with no sluggishness or gritty sensation. That snappy return tells you the internal spring has adequate tension and the button channel is machined cleanly.
The locking click when reattaching the seat is equally telling. It should be a single, sharp snap — not a mushy squish or a vague resistance. That click is the locking tab fully seating into its groove, and a weak one suggests the tab is undersized or the groove tolerances are loose. Over hundreds of release-and-reattach cycles, sloppy tolerances only get sloppier.
Shopping online makes hands-on testing impossible, which is why buying from manufacturers who specialize in hinge systems rather than general bathroom accessories becomes even more important. A company like Tianyun, whose core product line centers on quick-release fixing kits, stakes its reputation on the reliability of that mechanism. A general-purpose brand selling toilets, faucets, showerheads, and seats may not invest the same engineering rigor into a single hinge component.
Why Purpose-Built Hinge Kits Outperform Generic Options
Here is a pattern you will notice if you compare quick release toilet seats across price points: the seats themselves vary enormously in shape, material, and features, but the hinge kits bundled with budget models often look suspiciously similar — thin plastic posts, minimal rubber washers, and release buttons with a hollow, imprecise feel. That is because many manufacturers treat the hinge as an accessory rather than a critical component. They source the cheapest available kit and move on.
Purpose-built hinge kits flip that equation. Every dimension — the post diameter, the locking tab geometry, the spring tension, the bushing durometer — is engineered as a system rather than cobbled together from generic parts. The result is a mechanism that cycles reliably for years, holds the seat firmly without lateral play, and releases cleanly every time you press the button.
This distinction matters most for people who are replacing hinges on an existing seat or upgrading from traditional fixed-bolt hardware to quick release. In those cases, you are buying the hinge kit on its own merits, not as a bundled afterthought. Investing in a kit designed by a manufacturer whose entire focus is the fixing system — rather than the seat, the bowl, or the bathroom suite — gives you the best odds of a long-lasting, frustration-free result.
What separates a reliable quick release hinge from a cheap one is not the button on the outside — it is the material strength of the posts, the precision of the locking tab, the tension of the internal spring, and the quality of the rubber bushings that prevent movement under load. Buy the mechanism, not the marketing.
Quick release toilet seat hinges are one of those small upgrades that quietly improve your daily routine without demanding attention. When the mechanism works well, you forget it is there — and that is exactly the point. Choose a kit built to last, maintain it a few minutes each quarter, and you will never go back to wrestling with corroded bolts again.
Frequently Asked Questions About Quick Release Toilet Seat Hinges
1. How do quick release toilet seat hinges work?
Quick release toilet seat hinges use an internal locking mechanism — typically a push-button, lever, or spring-loaded pin — that secures the seat to hinge posts mounted on the ceramic bowl. When you press the button or flip the lever, the locking tab retracts, freeing the seat to lift straight off without any tools. Releasing the button resets the tab automatically, so the seat clicks back into place when you press it onto the posts. This design balances effortless removal with a rock-solid hold during everyday use, ensuring the seat never detaches accidentally under normal body weight.
2. Can I replace just the hinges instead of buying a whole new toilet seat?
Yes, hinge-only replacement is a practical and cost-effective option when the seat and lid are still in good physical condition but the hinge mechanism has failed — for example, when the push-button no longer clicks or the internal spring has broken. Standardized quick-release fixing kits, such as those from Tianyun (https://www.tianyuntech.com/push-button-quick-release-kits), are engineered to fit a wide range of seat designs using universal post dimensions, making it easier than ever to find a compatible replacement without discarding a perfectly functional seat.
3. What is the difference between top-fix and bottom-fix toilet seat hinges?
Top-fix hinges tighten entirely from above the ceramic using expanding anchors that grip inside the bolt holes, so you never need to reach underneath the bowl. They are ideal for wall-hung, back-to-wall, and enclosed-pedestal toilets. Bottom-fix hinges use the traditional through-bolt method: bolts drop through the ceramic from the top and are secured underneath with wing nuts or hex nuts. Bottom-fix designs require physical access to the underside of the bowl rim. A quick way to check which type you need is to feel under the back of the pan near the hinge area — if you find nuts or bolt ends, you have bottom-fix hardware.
4. Why does my quick release toilet seat keep shifting or wobbling?
A shifting seat is almost always caused by under-tightened mounting bolts or worn rubber washers and bushings. Daily use transfers micro-movements through the seat into the bolts, gradually loosening them over time. Start by removing the seat via the quick release function, then retighten each bolt a quarter turn at a time, alternating sides for even pressure. If tightening does not fix the wobble, inspect the rubber washers between the hinge plate and the ceramic — compressed or cracked washers lose their grip and allow lateral play regardless of bolt tension. Replacing them with fresh rubber restores stability.
5. Are quick release hinges compatible with soft-close toilet seats?
Yes, many modern hinge systems integrate both quick release and soft-close features into a single unit. The soft-close damper — a small hydraulic or pneumatic mechanism inside the hinge barrel — controls the lowering speed of the lid, while the quick release button operates independently to detach the seat from the hinge posts. This dual functionality is widely available in top-fix and bottom-fix designs. However, basic clip-on hinge systems may lack soft-close support because their compact housing cannot accommodate a damper. Always verify that your chosen kit explicitly includes damped-drop functionality before purchasing.
Apply This Insight to Your Project
Tell us what you are building and how the topic “Stop Scrubbing Around It: Quick Release Toilet Seat Hinges Explained” relates to your application. Our engineering team can help evaluate the next step.