What Is a Damper and Why Does It Matter
Imagine walking down to your basement, glancing at the ductwork overhead, and spotting a small metal handle you have never touched. You might wonder what it controls, whether it should be open or closed, or if it even matters. That handle is attached to a damper - and it matters more than most homeowners realize.
The Plain-Language Definition of a Damper
So, what is a damper? At its core, the damper meaning is surprisingly straightforward.
A damper is a mechanical or electromechanical device designed to control, restrict, or stop the flow of air, gas, or physical motion within a system. Dampers are found in HVAC ductwork, fireplaces, industrial exhaust systems, backdraft prevention setups, and consumer products where controlled movement is needed.
That definition covers a lot of ground - and intentionally so. The word "damper" traces back to the concept of dampening, which simply means reducing intensity or force. Whether you are talking about a flat metal blade inside a heating duct or a small rotary mechanism that prevents a toilet seat from slamming, dampers all share one job: they regulate something that would otherwise move too freely or too forcefully.
Why the Word Damper Causes Confusion
Here is the honest reality: the term "damper" creates confusion because it shows up in completely unrelated fields. An HVAC technician pictures a blade assembly controlling airflow through ductwork. A pianist thinks of the felt pad that stops a string from vibrating. A structural engineer envisions a hydraulic cylinder protecting a skyscraper from earthquake forces. A product designer imagines a compact mechanism that slows a closing lid. All of them are using the same word correctly - and that is exactly the problem.
By the dampers definition used across engineering disciplines, the term spans at least five major domains: HVAC airflow control, fire and smoke safety, structural and seismic protection, vibration management, and motion control in everyday consumer products. You might have arrived here searching for any one of these contexts, so this guide covers every major category before diving deep into the applications most relevant to homeowners, contractors, and product designers alike.
The key takeaway? A damper is not a single device - it is a family of devices united by a shared principle. Understanding which type applies to your situation is the first step toward using it correctly, maintaining it properly, and avoiding the costly mistakes that come from guessing.
How a Damper Physically Works Inside Your System
Knowing that a damper controls airflow is one thing. Understanding exactly how it does the job - the blades, the axle, the lever, the wiring - is what separates a homeowner who guesses from one who adjusts with confidence. An HVAC damper is not complicated, but its simplicity is precisely what makes it easy to overlook and misunderstand.
Inside the Duct - Blade, Axle, and Housing
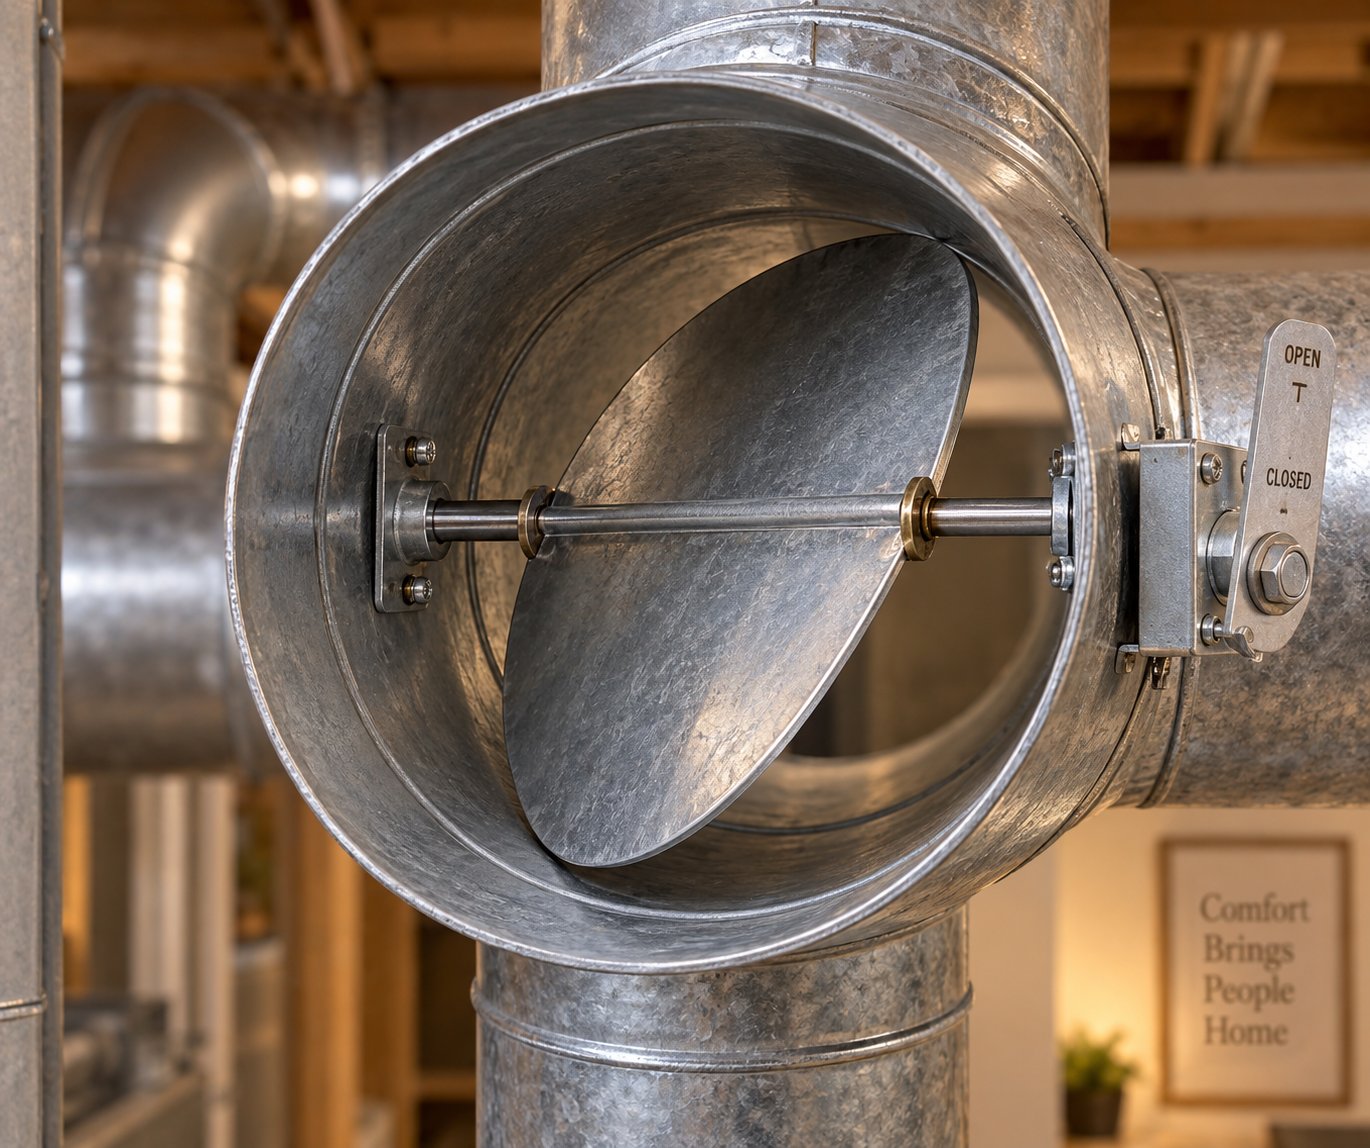
Picture a rectangular or round section of sheet-metal ductwork. Now imagine a flat metal plate - called a blade - mounted on a central axle that runs through the interior of that duct. That assembly, held in place by a surrounding frame or housing, is the heart of a manual duct damper.
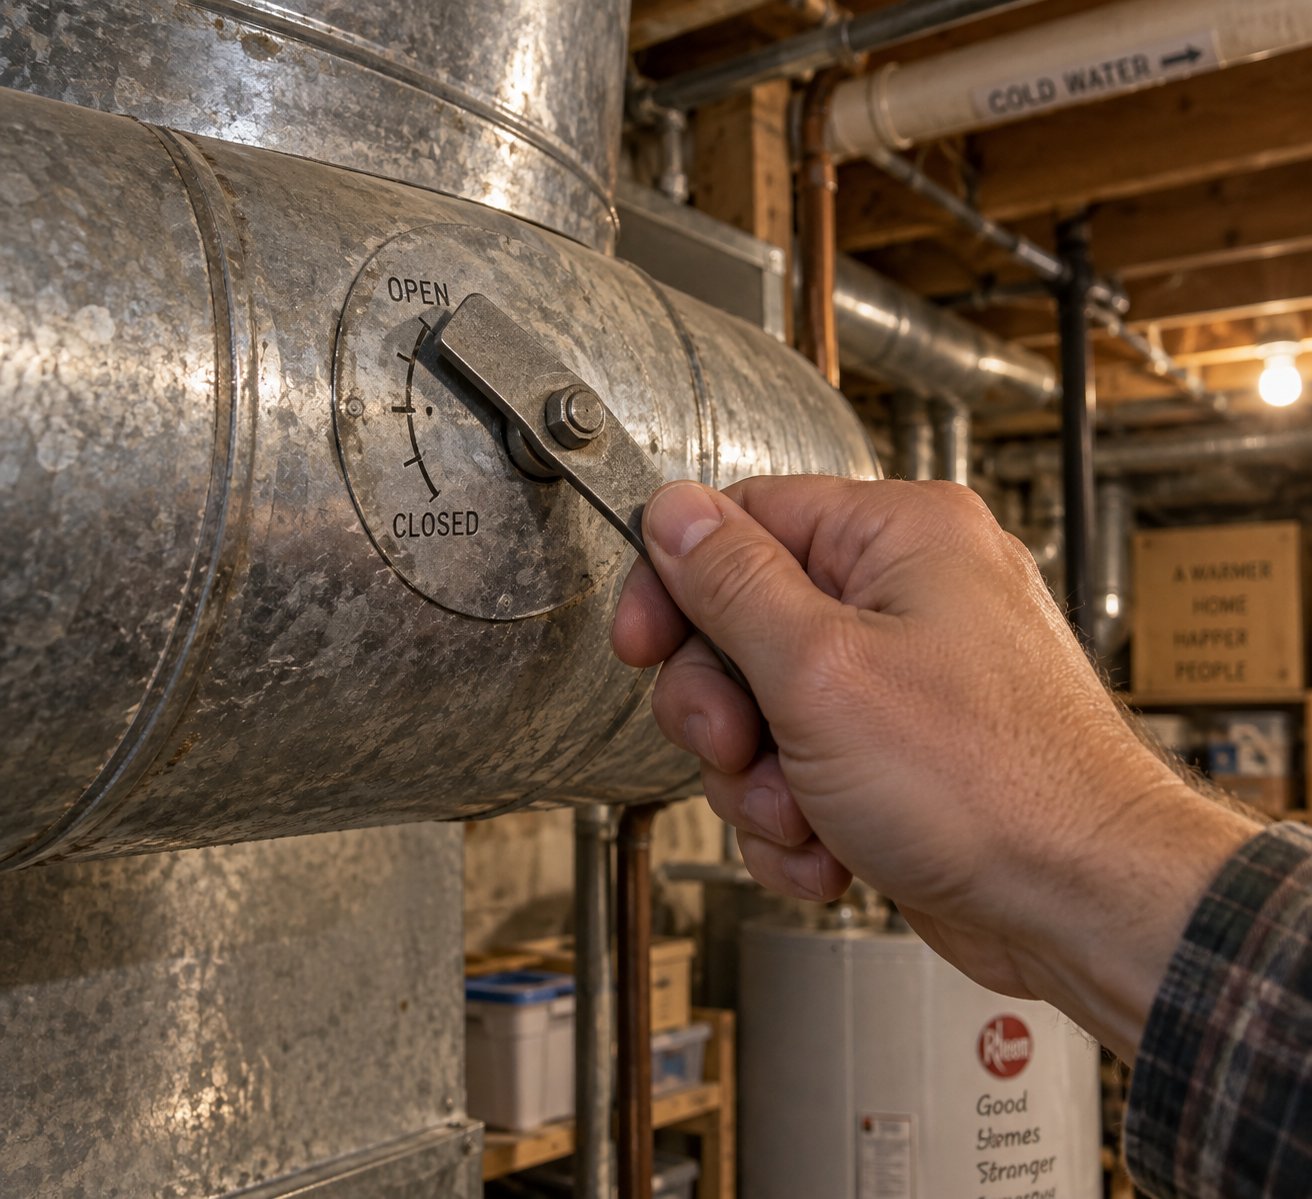
The blade rotates on its axle the same way a door swings on hinges. On the outside of the duct, a small lever or handle connects to that axle. When you turn the lever so it runs parallel to the duct, the blade inside aligns with the airflow and the passage is fully open. Turn the lever perpendicular to the duct, and the blade rotates crosswise, blocking most or all of the air from passing through. It really is that intuitive - think of the lever as an arrow pointing in the direction air can travel.
What about positions in between? A manual blade damper does not have to be all-or-nothing. You can set the lever at any angle to partially restrict airflow, which is exactly how balancing dampers work - they hold a specific blade angle to reduce dynamic pressure in the air stream and even out distribution across multiple ducts. This modulating ability is what makes a single, inexpensive component so powerful for comfort tuning.
Blade design also plays a role. Most residential duct dampers use a single-thickness steel blade that creates a tight seal when closed. Commercial systems sometimes upgrade to airfoil-shaped blades, which have a smoother profile that minimizes drag and reduces pressure drop when the damper is fully open. There are also teardrop-profile blades found in backdraft dampers, where an off-center axle allows air pressure alone to swing the blade open in one direction while gravity pulls it shut when the airflow stops.
How Motorized and Automatic Dampers Receive Commands
A manual lever works perfectly when you set it once and walk away. But what if you need the damper to open and close throughout the day - say, sending cooled air upstairs during the afternoon and redirecting it downstairs in the evening? That is where a motorized damper HVAC setup earns its place.
A motorized zone damper replaces the manual lever with an electric actuator - a small motor bolted to the damper frame that rotates the blade on command. The actuator connects to a zone control panel, which in turn receives temperature signals from one or more thermostats throughout the house. When a thermostat in a specific zone calls for heating or cooling, the panel sends a signal to the actuator, which opens the corresponding damper and allows conditioned air to flow to that zone. When the thermostat is satisfied, the panel signals the actuator to close, and airflow is redirected elsewhere.
Not all actuators behave the same way during a power failure, and the distinction matters. A spring-return actuator uses a mechanical spring that is tensioned every time the motor drives the blade. If power is lost, the spring forces the damper back to a predetermined safe position - typically fully open or fully closed depending on the application. This fail-safe design is critical in situations where a stuck damper could cause coil freezing or equipment damage. A non-spring-return actuator, by contrast, simply holds its last position when power drops. It is simpler and less expensive, but it offers no automatic protection if the system loses electricity at the wrong moment. A newer third option - the electronic fail-safe actuator - uses capacitors instead of springs to store energy, providing fail-safe return with less mechanical wear and lower power consumption.
Beyond motorized zone dampers, some automatic dampers respond to environmental triggers rather than thermostat calls. Fire dampers close when a fusible link melts at a preset temperature. Smoke dampers react to signals from smoke detectors. Barometric dampers adjust based on pressure differentials inside the duct. In every case, effective hvac damper control depends on matching the right control method to the right application.
Here is a quick summary of the three primary ways dampers receive their marching orders:
- Manual lever - A physical handle on the outside of the duct that a person rotates by hand. Best for set-and-forget balancing adjustments.
- Motorized actuator - An electric motor connected to a zone control panel and thermostat network. Ideal for dynamic, multi-zone damper control throughout the day.
- Spring-loaded or sensor-triggered automatic - Activated by temperature changes, air pressure shifts, or smoke detection without any human input. Essential for life-safety and pressure-regulation applications.
Each method has a clear sweet spot, and many homes use more than one. A two-story house might rely on motorized zone dampers for daily comfort while a backdraft damper on the dryer vent operates entirely on air pressure - no wiring, no thermostat, no intervention needed. The mechanical principle is always the same: a blade rotates to control flow. The only variable is what tells that blade when to move.
Every Type of Damper Explained With Purpose and Placement
A blade on an axle is the common thread, but the types of dampers in HVAC systems are far more varied than most homeowners - and even some contractors - realize. Each type is purpose-built for a specific job, installed in a specific location, and operated by a specific mechanism. Choosing the wrong one is not just inefficient; in life-safety applications, it can be dangerous.
HVAC Damper Types at a Glance
The table below lays out every major damper category you are likely to encounter in residential, commercial, and industrial systems. Use it as a quick reference to identify which type applies to your situation.
| Damper Type | Primary Purpose | Where It Is Found | How It Operates | When It Is Used |
|---|---|---|---|---|
| Manual Blade (Volume Damper) | Adjusts airflow volume to individual duct branches | Inside trunk or branch ductwork, near supply takeoffs | External lever rotated by hand to any angle between open and closed | Initial system balancing and seasonal comfort adjustments |
| Motorized Zone Damper | Directs conditioned air to active zones on demand | Main trunk lines feeding distinct zones; controlled by a zone panel | Electric actuator opens or closes the blade in response to thermostat calls | Multi-zone HVAC systems requiring automatic, room-by-room temperature control |
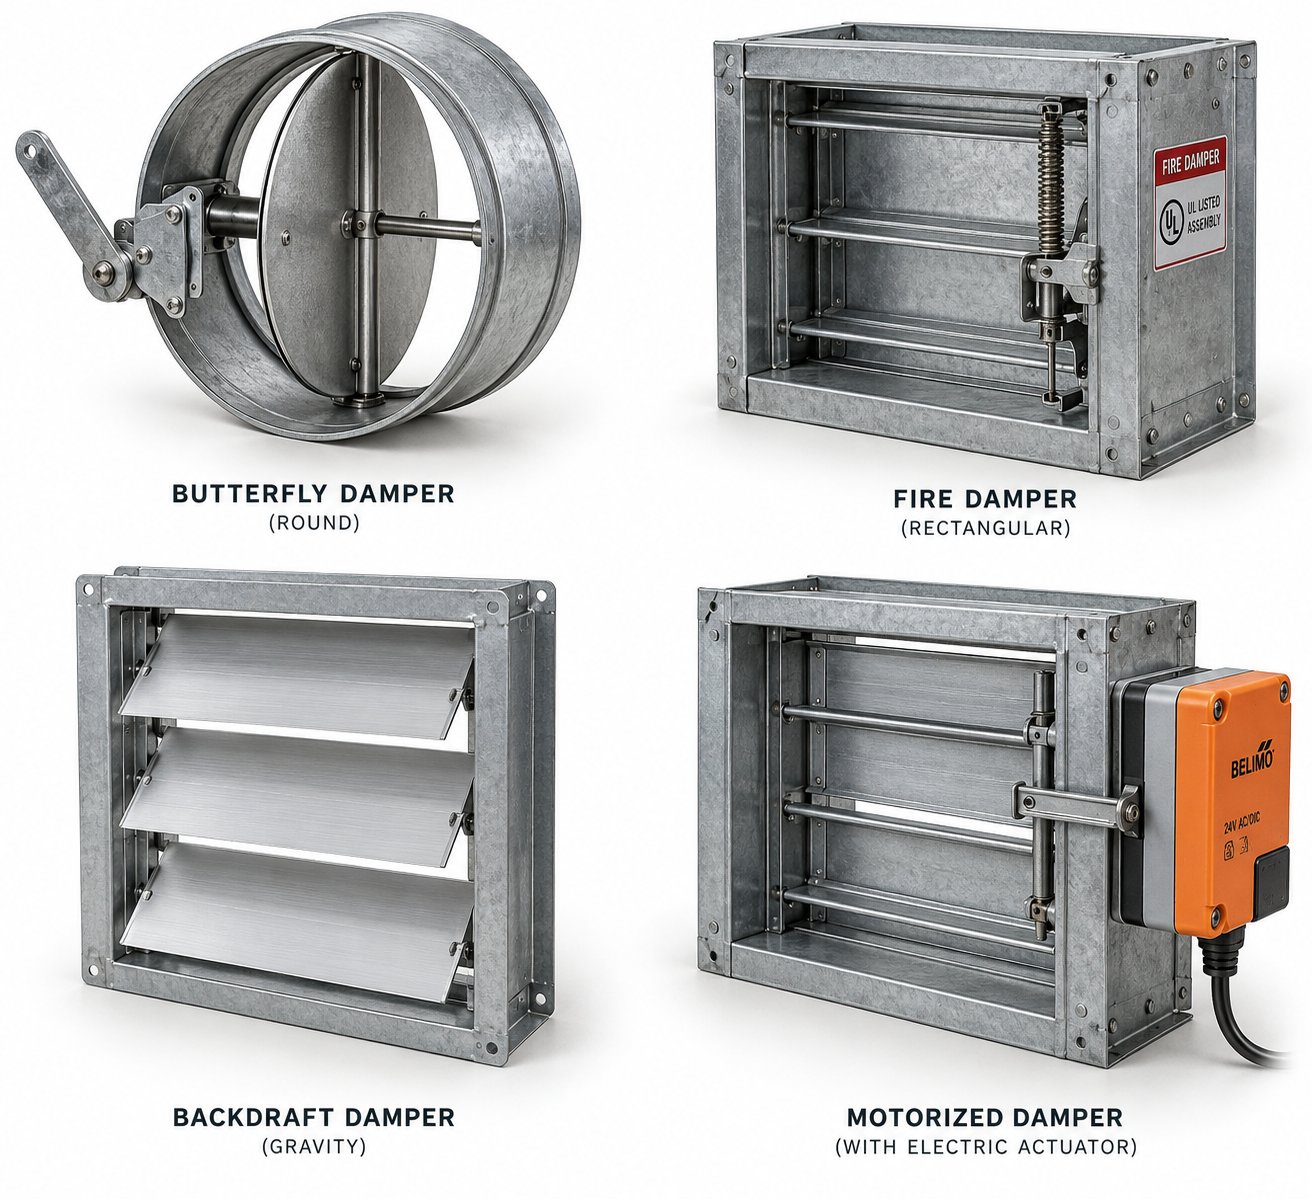
| Butterfly Damper | Provides full shutoff or modulation of airflow in round ducts | Round ductwork in residential, commercial, and industrial systems | Single disc-shaped blade rotates on a center axle, either manually or via actuator | Applications needing tight shutoff or precise airflow regulation in circular ducts |
| Backdraft Damper | Allows airflow in one direction only; prevents reverse flow | Exhaust fan outlets, dryer vents, range hood ducts | Lightweight blades swing open under positive airflow pressure and close by gravity when airflow stops | Preventing outdoor air, odors, or pests from entering through exhaust openings |
| Barometric Damper | Regulates draft pressure by allowing ambient air into the flue | Flue pipes of oil-fired furnaces, boilers, and water heaters | A weighted swinging gate opens when draft pressure exceeds a set threshold | Maintaining consistent draft in combustion appliance venting systems |
| Balancing Damper | Fine-tunes airflow distribution across multiple branches | Branch duct takeoffs, typically set during HVAC commissioning | Manual blade locked at a fixed angle after professional measurement with an anemometer or manometer | Equalizing airflow so every room receives its designed CFM delivery |
| Fire Damper | Prevents flame and heat from spreading through ductwork during a fire | Where ducts penetrate fire-rated walls, floors, and shaft enclosures | A fusible link melts at a rated temperature (typically 165 °F or 212 °F), releasing a spring-loaded blade | Required by building codes wherever ductwork passes through fire-resistance-rated assemblies |
| Smoke Damper | Blocks smoke migration through ducts and air transfer openings | Where ducts penetrate smoke barriers, smoke partitions, and corridor walls | Electric or pneumatic actuator closes the blade when a linked smoke detector activates | Required by life safety codes in smoke-rated barriers and engineered smoke control systems |
Notice the pattern? The first six types focus on comfort, efficiency, or equipment protection. A volume damper fine-tunes your living room airflow. A zone damper keeps the upstairs cool while the basement stays warm. A balancing damper ensures every branch of your duct system delivers its fair share of conditioned air. These are everyday tools that make HVAC systems smarter and more responsive.
The last two rows, however, belong to an entirely different category.
Fire and Smoke Dampers - The Life-Safety Category
Fire and smoke dampers are not comfort accessories. They are life-safety devices mandated by building codes, and understanding their role is critical for anyone involved in building construction, renovation, or facility management.
A fire damper protects openings where ductwork penetrates fire-resistance-rated walls, floors, or shaft enclosures. Its job is simple but non-negotiable: if a fire breaks out, the damper must close automatically to prevent flames and superheated air from traveling through the duct system into otherwise unaffected areas of the building. The triggering mechanism is typically a fusible link - a heat-sensitive metal connector that holds the blade open under normal conditions. When the surrounding temperature reaches the link's rated threshold (commonly 165 °F for most installations, or 212 °F for kitchen and high-temperature areas), the link melts, releasing a spring-loaded blade that snaps shut. No electricity, no signal, no human intervention required.
The International Building Code (IBC) Section 717 specifies exactly where fire dampers are required and what hourly fire rating they must carry. For walls with a fire-resistance rating under three hours, a 1.5-hour-rated fire damper is the minimum. For walls rated at three hours or more, a 3-hour fire damper is required. Fire dampers are further classified as static (designed to close only after the HVAC system shuts down) or dynamic (rated to close against active airflow while the system continues running). Dynamic fire dampers must be labeled with their closure pressure and airflow ratings - information the mechanical designer specifies and the building inspector verifies on-site.
A smoke damper serves a complementary but distinct purpose. Instead of reacting to heat, it reacts to smoke detection. When an area smoke detector or an in-duct smoke detector activates, it sends a signal to the smoke damper's actuator, which drives the blade closed to halt smoke migration through the duct system. As the NFPA explains, smoke dampers are provided with leakage ratings (Class I or Class II) and elevated temperature ratings of not less than 250 °F - because during a fire, the air distribution system can transport deadly smoke and combustion products instead of breathable air.
In many commercial buildings, you will also encounter a combination fire/smoke damper. This device satisfies both requirements simultaneously - it carries a fire-resistance rating tested to UL 555 and a smoke leakage rating tested to UL 555S. Combination dampers are required wherever a barrier is both fire-resistance-rated and designated to restrict smoke transfer. They are especially common in hospital occupancy separations, stairwell shaft walls, and horizontal exits where both fire and smoke containment are critical.
A few key facts set fire damper HVAC installations apart from every other damper type on this list:
- They are code-mandated, not optional. Building and life safety codes - including the IBC, NFPA 101 (Life Safety Code), and NFPA 90A - dictate exactly where these dampers must be installed. Skipping one is a code violation, not a design choice.
- They require accessible inspection and testing. Both NFPA 80 (fire dampers) and NFPA 105 (smoke dampers) require periodic inspection, testing, and maintenance. Access panels must be large enough for a technician to visually inspect the damper and verify that it closes completely without obstruction.
- An operational test is required after installation. Every newly installed hvac fire damper must demonstrate full closure under both airflow and non-airflow conditions before the system is considered compliant.
- Failure has life-threatening consequences. A stuck or missing fire damper can allow fire and toxic gases to spread to occupied spaces on the other side of a rated wall - exactly the scenario the barrier was designed to prevent.
If you are a homeowner in a single-family residence, you may never encounter a fire or smoke damper directly - they are far more common in commercial, institutional, and multi-family buildings. But if you manage, own, or work inside such a building, these devices are protecting you every day, silently waiting for the moment they are needed. They deserve the same respect and maintenance attention as fire sprinklers and smoke alarms.
With all eight damper types mapped out, one question still trips up nearly every homeowner who starts paying attention to airflow: what is the difference between a damper and that adjustable grille on the wall?
Damper vs. Register vs. Vent
You hear all three words tossed around in the same conversation - damper, register, vent - as if they mean the same thing. They do not. Each one lives in a different part of your HVAC system, performs a different job, and gives you a different level of control over airflow. Mixing them up leads to the wrong fix for the wrong problem, so let's untangle them once and for all.
Damper vs. Register - Where Each Lives and What Each Does
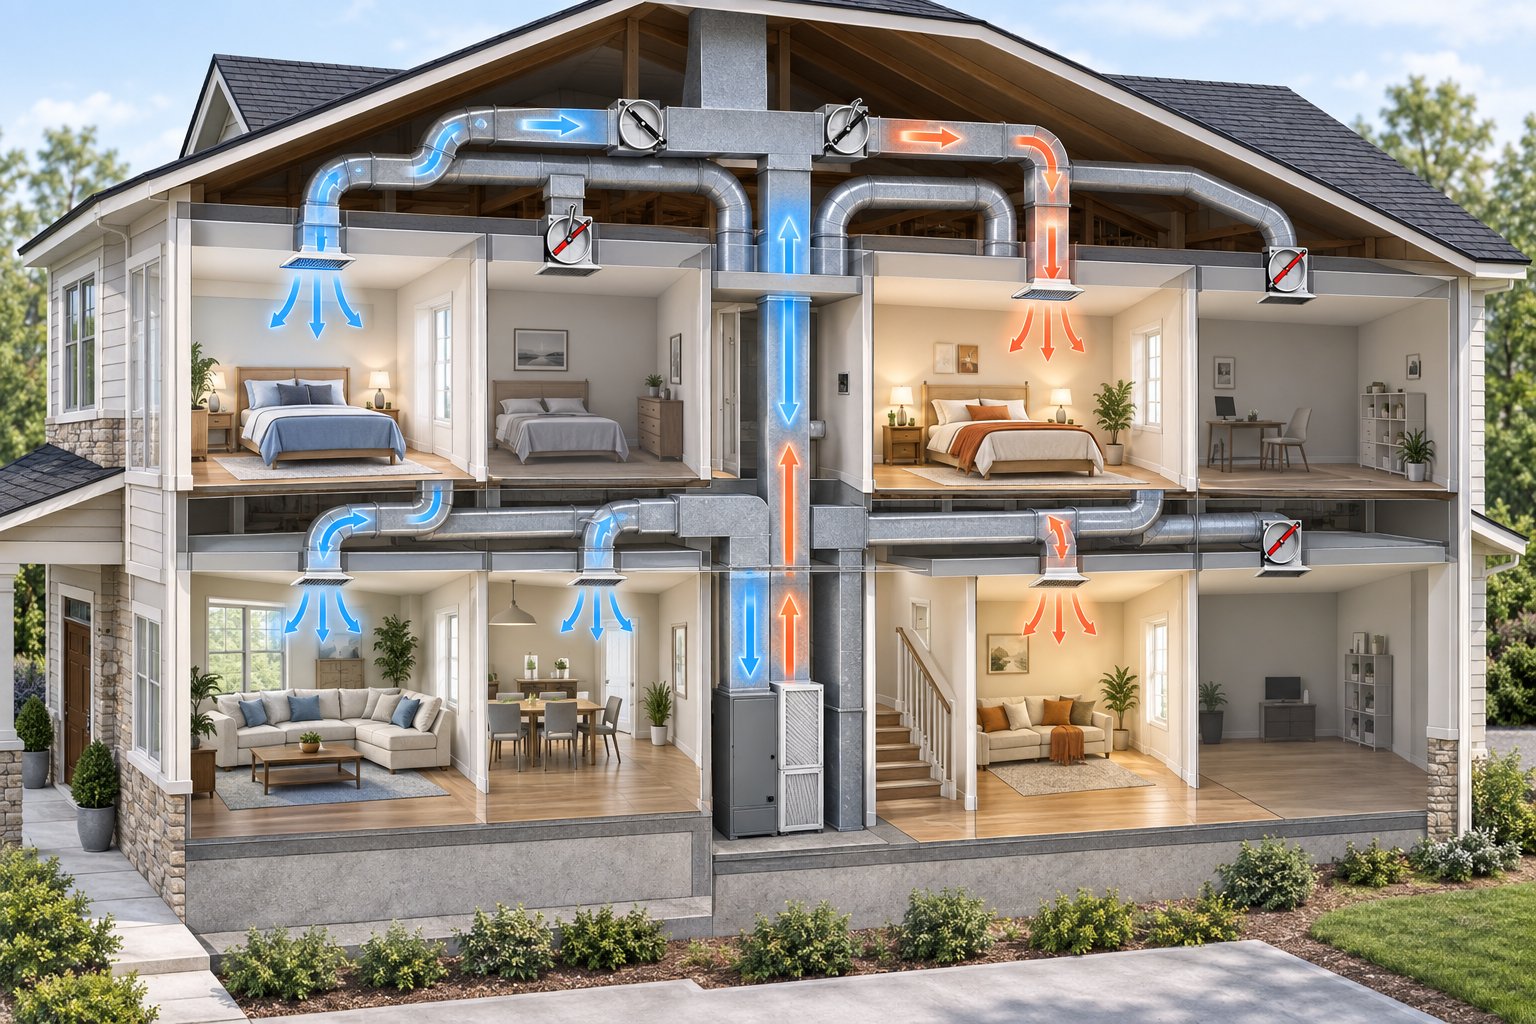
An air duct damper sits inside the ductwork itself, completely hidden from view. It controls the volume of conditioned air flowing through a branch duct before that air ever reaches a room. When you adjust the lever on the outside of a duct, you are rotating a blade upstream - miles ahead of the endpoint, in airflow terms - to throttle delivery at the source.
A register, on the other hand, is the visible grille mounted on your wall, floor, or ceiling. It typically features adjustable louvers or a small built-in lever that lets you redirect or partially block airflow right at the point of delivery. As Envisivent explains, registers deliver heated or cooled air into a space and include a user-adjustable damper mechanism - but that tiny built-in control is far less effective than a dedicated duct damper working upstream.
Here is why the distinction matters: closing a register restricts air after it has already traveled through the entire duct run. The blower still pushes the same volume of air into that branch, and the backed-up pressure has nowhere productive to go. Closing an ac vent damper inside the duct, by contrast, redirects the air before it enters the branch at all - a far more efficient way to manage distribution.
Where Vents Fit Into the Picture
The word "vent" is the umbrella term that covers everything. A vent is simply any opening that allows air to pass into or out of a space. Supply vents deliver conditioned air. Return vents pull room air back into the system for reconditioning. Registers and grilles are both types of vents, and a vent damper is any damping device installed at or within one of those openings.
Think of it this way: every register is a vent, but not every vent is a register - and neither one is a damper in the true HVAC sense. The table below makes the relationship unmistakable.
| Component | Location | Visibility | Function |
|---|---|---|---|
| Damper | Inside the ductwork, mounted on a branch or trunk line | Hidden - only the external lever or handle is visible on the duct surface | Controls airflow volume upstream before air reaches the room |
| Register | Wall, floor, or ceiling at the end of a supply duct run | Fully visible - a decorative grille with adjustable louvers | Directs and partially restricts airflow at the delivery point |
| Vent | Any opening connected to the HVAC system (supply side or return side) | Fully visible - may or may not have adjustable louvers | General term for any air passage; includes both supply and return openings |
The practical takeaway? If a room feels too warm or too cold, most people instinctively reach for the register louvers. That might help a little, but the real control point is the damper hidden inside the duct. Adjusting it correctly can solve comfort problems that no amount of register fiddling will fix - and it can do so without wasting the energy your system already spent conditioning that air.
Dampers and Energy Efficiency
Knowing where the real control point lives is one thing. Using it wisely to save energy - without accidentally damaging your system - is another challenge entirely. A damper HVAC setup gives you a powerful lever for cutting energy waste, but pulling that lever too hard creates problems most homeowners never see coming until the repair bill arrives.
How Dampers Reduce Wasted Conditioned Air
Imagine your HVAC system pushing cooled air into a guest bedroom that no one has slept in for three weeks. The compressor ran, the blower spun, electricity was consumed - and all of that conditioned air landed in an empty room. Multiply that waste across several unused spaces and you start to see why energy bills creep higher than they should.
Closing or partially closing a damper to an unoccupied room redirects that conditioned air toward spaces people actually use. The blower does not have to work harder to produce more air; it simply sends the existing supply where it delivers real comfort. The result is a noticeable drop in the total energy required to maintain your desired temperature in lived-in areas.
This principle reaches its full potential in multi-zone systems. HVAC zone dampers divide a home into independent sections - upstairs, downstairs, a home office wing - each governed by its own thermostat. When the upstairs thermostat is satisfied, the zone control panel signals the corresponding damper to close, and conditioned air shifts automatically to whichever zone still needs it. You are not heating or cooling the entire house to satisfy one uncomfortable room; you are targeting resources precisely where demand exists. According to Lennox, zoning dampers enable tailored temperature settings in different areas, which is especially beneficial for multi-story homes where heat stratification makes uniform comfort nearly impossible with a single thermostat.
Some zoned systems also include bypass dampers. These open a relief duct between the supply and return plenums when multiple zone dampers close simultaneously. The bypass gives excess air a safe path back to the air handler instead of building up pressure in the active ductwork. Think of it as a pressure relief valve - it protects the system while still allowing zone dampers to do their job.
The Hidden Risk of Closing Too Many Dampers
Here is where good intentions backfire. A homeowner discovers the damper levers in the basement, realizes three bedrooms are empty, and shuts every one of those dampers completely. Sounds logical, right? In reality, closing too many supply dampers at once is one of the fastest ways to harm an HVAC system.
The reason comes down to static pressure - the resistance air encounters as it moves through ductwork. Your blower is designed to push a specific volume of air against a specific amount of resistance. When you block multiple branches, the remaining open ducts cannot absorb all that airflow. Pressure inside the duct system spikes, and a cascade of problems follows.
- Blower motor strain - The motor works harder to push air through fewer outlets, drawing more electricity and generating more heat. Over time, this accelerates wear on bearings and windings, shortening the blower's lifespan.
- Evaporator coil freezing - Reduced airflow across the evaporator coil in cooling mode causes the coil temperature to plunge below freezing. Moisture in the air condenses and ices over, further blocking airflow in a destructive feedback loop that can damage the compressor.
- Ductwork pressure damage - Residential ductwork is not built for high-pressure operation. Excessive static pressure can pop seams, loosen connections, and create air leaks that waste conditioned air inside walls, attics, or crawlspaces - exactly where you do not want it.
- Short-cycling - The system hits its safety limits and shuts off prematurely, only to restart minutes later when the thermostat calls again. This rapid on-off pattern, called short-cycling, wastes energy, prevents effective dehumidification, and accelerates equipment fatigue.
Most residential HVAC systems are designed to operate within a static pressure range of roughly 0.5 to 0.8 inches of water column. Closing even two or three supply dampers in a tightly sealed duct system can push pressure above that threshold. The key rule of thumb? Never close more than about 25 percent of your total supply dampers at once - and even then, monitor your system's behavior for the first day or two after making changes.
Seasonal Adjustment Guidance
Because heat naturally rises, a two-story home behaves very differently in January than it does in July. Smart seasonal damper adjustments work with physics instead of against it.
In winter, warm air from your furnace drifts upward, leaving lower floors cooler and upper floors warmer. The fix is to partially close dampers serving the upper floors and fully open the ones feeding the basement and main level. This sends more heated air downstairs where it is needed, and the natural stack effect carries warmth upward to supplement the reduced supply to upper rooms.
In summer, flip the strategy. Open the upper-floor dampers fully to push as much cooled air as possible to the hottest part of the house, and partially restrict airflow to the lower levels, which are naturally cooler. As The DIY Playbook recommends, making this switch at each seasonal transition - once in the spring and once in the fall - can eliminate stubborn hot and cold spots without touching the thermostat.
Label each damper lever with its summer and winter positions using a permanent marker or tape. It takes 30 seconds per lever, and it removes any guesswork the next time the seasons change. Give the system a full day to stabilize after adjustments before fine-tuning further - air distribution shifts gradually, and knee-jerk corrections often overcorrect.
Efficiency and comfort go hand in hand when dampers are set correctly. But even the best settings eventually need a checkup - blades can stick, actuators can fail, and debris can accumulate in places you cannot see without a closer look.
Adjusting, Maintaining, and Troubleshooting Your Dampers
A damper set to the perfect position today will not stay perfect forever. Metal corrodes, dust accumulates, lubricant dries out, and actuator motors eventually wear down. The difference between a damper that quietly does its job for a decade and one that seizes up after two years almost always comes down to a handful of simple maintenance habits - habits that most homeowners never learn because no one tells them.
How to Adjust Manual Dampers Correctly
If you have never touched the HVAC manual dampers in your ductwork, the process is far less intimidating than it sounds. You do not need tools, specialized knowledge, or a service call. You just need to know which direction means what - and when to make the change.
Remember the core rule: a lever or handle running parallel to the duct means the damper is open, allowing full airflow. A lever turned perpendicular to the duct means the damper is closed, blocking airflow. Any angle in between gives you a partial restriction - and that middle ground is where most comfort tuning happens.
Here is a step-by-step process for how to adjust HVAC dampers at each seasonal transition:
- Turn off the HVAC system. Adjusting dampers while the blower is running is not dangerous, but working with the system off prevents sudden air pressure changes and lets you hear and feel the blade rotate without competing noise.
- Locate every damper lever. Follow the main trunk lines from your furnace or air handler and identify each branch duct that has a lever or wing nut. Count them so you know the total number of dampers in the system.
- Identify which branch serves which area. If your dampers are not already labeled, turn the system back on briefly, close one damper at a time, and walk through the house to see which rooms lose airflow. Mark each lever with a piece of tape or permanent marker noting the zone it controls - for example, "upstairs bedrooms" or "basement."
- Set each damper for the current season. In summer, open upper-floor dampers fully and partially close lower-level ones. In winter, reverse the pattern. Never close more than roughly 25 percent of your total supply dampers simultaneously to avoid dangerous static pressure buildup.
- Label the summer and winter positions. Use a permanent marker to draw a small line on the duct at each seasonal setting. The next time you switch, you simply rotate the lever to the corresponding mark - no guessing, no re-testing.
- Wait 24 to 48 hours before fine-tuning. Air distribution shifts gradually. Give your system a full day to stabilize, then check room-by-room temperatures and make small adjustments if any space still feels off.
As The DIY Playbook notes, this twice-a-year routine - once in the spring and once in the fall - can make a noticeable difference in comfort without changing thermostat settings or calling a professional. It takes about 15 minutes once you know where everything is.
Signs Your Damper Needs Attention
Even if you set your dampers perfectly, problems can develop silently between adjustments. Knowing the warning signs helps you catch issues early - before a small annoyance turns into a costly repair. Watch for these red flags:
- Uneven room-to-room temperatures - If one bedroom is significantly warmer or cooler than the rest of the house despite all registers being open, a damper in the branch feeding that room may have shifted, seized, or been accidentally closed.
- Whistling or rattling sounds from ductwork - A high-pitched whistle often signals a damper blade that is almost but not quite fully closed, forcing air through a narrow gap at high velocity. Rattling can mean a loose blade vibrating against its housing.
- A damper handle that is stuck or will not move - Corrosion, dust buildup, or a bent axle can freeze the lever in place. Forcing it risks snapping the lever or damaging the blade. If gentle pressure does not free it, the damper needs hands-on service.
- HVAC system short-cycling - If your furnace or air conditioner turns on for a few minutes, shuts off, and restarts shortly after, excessive static pressure from one or more closed dampers could be the culprit. Check all damper positions before assuming the problem is electrical or mechanical.
- Visible rust or debris buildup on the damper blade - Open an access panel or shine a flashlight into the duct near the damper. If you see rust flakes, dust clumps, or any material preventing the blade from seating flush, the damper needs cleaning and possibly replacement.
Any single symptom on this list warrants a quick inspection. Two or more occurring together strongly suggest a damper-related issue rather than a thermostat or equipment problem.
Maintenance Essentials - Inspection and Lubrication
Dampers are low-maintenance components, but "low" does not mean "zero." A few minutes of annual attention keeps them operating smoothly and extends their working life significantly.
Inspection frequency: Check your manual dampers hvac setup at least once per year, ideally during your regular seasonal HVAC service visit. If your home has motorized zone dampers, include those in the inspection as well - cycle each actuator from open to closed several times to confirm full blade travel. MCDLG recommends inspecting control dampers on a semi-annual basis, with more frequent checks for dampers exposed to dusty or debris-laden airflow. Life-safety dampers such as fire and smoke dampers carry additional inspection requirements under NFPA 80 and NFPA 105.
What to look for during inspection:
- Rust and corrosion - Surface rust on a blade is common in humid environments and does not automatically mean replacement. Light surface rust can be cleaned with a wire brush. Deep pitting or flaking that prevents the blade from closing flush, however, means the damper should be replaced.
- Debris accumulation - Dust, pet hair, and construction debris collect on blade surfaces and along the housing frame over time. Even a thin layer can create enough friction to slow blade movement or prevent a full seal.
- Seal condition - Many dampers have silicone or rubber edge seals that minimize air leakage when the blade is closed. These seals deteriorate with age. If you notice increased airflow through a supposedly closed damper, worn seals are a likely cause. As MCDLG notes, replacement seals are typically self-adhering - you simply peel the old seal away, clean the adhesive residue from the blade edge, and press the new seal into place.
- Actuator condition (motorized dampers) - Inspect the actuator housing and driving arm for visible cracks, corrosion, or loose mounting screws. Power the actuator on and confirm it rotates the blade through its full range without hesitation or grinding noises.
Lubrication: Pivot points and axle bearings benefit from periodic lubrication to prevent binding. Use a silicone-based lubricant - not oil-based products. Oil attracts dust and grit, which builds up on the lubricated surfaces and actually increases friction over time, defeating the purpose entirely. A quick spray of silicone lubricant on each axle pivot once a year is usually sufficient. Non-metallic parts such as molded nylon bearings do not require lubrication. Always use a lint-free cloth when cleaning blade surfaces and housing interiors to avoid leaving behind fibers that could accumulate debris.
When to call a professional: Most manual damper maintenance is well within DIY territory. However, certain situations call for a trained technician:
- Motorized actuator failure - If an actuator does not respond to thermostat calls or produces a buzzing sound without blade movement, the motor or its control wiring may need replacement. Troubleshooting electrical actuators without experience risks damaging the zone control panel.
- Fire damper inspection and testing - NFPA codes require fire and smoke dampers to be inspected and operationally tested by qualified personnel. This is not a DIY task - improper testing can leave a life-safety device in a failed state without anyone realizing it.
- A damper that cannot be freed manually - If gentle hand pressure and lubrication do not free a stuck blade, the axle may be bent or the housing deformed. Forcing it further risks breaking the assembly inside the duct, which creates a much more expensive repair.
- Installing dampers in HVAC ductwork - Adding new dampers to an existing system requires cutting into sheet metal, ensuring proper blade clearance, and verifying that the new damper does not push static pressure beyond safe limits. A qualified HVAC technician can measure system airflow before and after installation to confirm the work does not create downstream problems.
Whether you are installing dampers in HVAC systems for the first time or simply maintaining the ones already in place, the underlying principle is the same: a damper can only do its job if it can move freely. Rust, debris, dried-out lubricant, and neglected actuators are the enemies of that freedom. A small investment of time once or twice a year keeps every blade spinning smoothly - and keeps your comfort, efficiency, and safety where they belong.
Of course, even well-maintained dampers cannot help you if they are being used incorrectly. And as it turns out, some of the most common damper mistakes are the ones homeowners make with the best of intentions.
Common Damper Mistakes to Avoid
Good intentions and good results are not the same thing - especially when it comes to duct dampers. Most homeowners who discover the levers in their basement immediately start experimenting, and most make at least one of the following errors before they figure out what works. Knowing these pitfalls in advance saves you both comfort and money.
Mistakes That Cost Comfort and Money
- Closing too many supply dampers at once. This is the single most damaging mistake homeowners make. When you shut off multiple branches simultaneously, the blower has nowhere to send its air. Static pressure inside the ductwork spikes, stressing the blower motor, risking evaporator coil freeze-ups, and potentially popping duct seams in unconditioned spaces. As Jackson Systems advises, every "closed" damper should still remain at least 15 to 20 percent open to protect the system.
- Never adjusting dampers seasonally. A configuration that keeps your upstairs comfortable in July will leave it cold in December. Heat rises and cold air sinks - physics does not take a season off. Dampers for ductwork feeding upper and lower floors need opposite settings in summer versus winter, yet many homeowners set them once and never touch them again.
- Confusing balancing dampers with zone dampers. Balancing dampers are set during system commissioning to equalize airflow across branches - they are calibrated, measured, and locked in place. Zone dampers open and close dynamically based on thermostat calls. Adjusting a balancing damper when you think you are tuning a zone damper can throw the entire system's airflow distribution out of alignment, creating new hot and cold spots in rooms that were previously comfortable.
- Ignoring damper maintenance until failure. A damper blade that has not moved in three years may not move at all when you finally try. Rust, dust buildup, and dried-out pivot points gradually seize the mechanism. By the time you notice a problem, the blade is frozen in place and the fix has escalated from a five-minute lubrication to a professional repair or full replacement.
- Assuming registers can solve upstream airflow problems. When a room runs too hot or too cold, the instinct is to fiddle with the register louvers on the wall or floor. But registers only redirect air at the delivery point - they do not control how much air enters the branch in the first place. Closing a register forces air to back up into the branch duct, creating turbulence and pushing conditioned air out through duct seams into attics and crawlspaces. The real control point is the duct damper upstream.
How to Avoid Each Pitfall
The corrective actions are straightforward once you know what to watch for. Never close more than roughly one-quarter of your system's total supply dampers at the same time. Adjust damper positions twice per year - once in spring, once in fall - and mark each lever's summer and winter settings with a permanent marker so the next transition takes minutes instead of hours. If your system has both balancing dampers and zone dampers, identify each type before making any changes; when in doubt, call a professional who can measure airflow at each register and confirm which damper serves which purpose. Add a quick damper inspection to your annual HVAC service routine so corrosion and debris never get a head start. And when a room feels uncomfortable, check the duct dampers first - not the registers.
Never close more than about 25 percent of your total supply dampers at once. Exceeding that threshold raises static pressure inside the ductwork, which strains the blower motor, risks coil freezing, damages duct seals, and causes short-cycling - turning a simple comfort adjustment into an expensive repair.
Every one of these mistakes shares a common root: treating dampers as set-and-forget hardware instead of active components that deserve attention. Avoid these five pitfalls, and your system will reward you with even temperatures, lower energy bills, and far fewer surprise service calls. Still, HVAC ductwork is only one place dampers earn their keep - the same principles of controlled flow and motion show up in contexts most people never expect.
Dampers Beyond HVAC
Ductwork may be the most common home for a damper, but it is far from the only one. The same core principle — controlling unwanted flow or motion — shows up in fireplaces, massive industrial exhaust systems, and even the lid of your washing machine. Understanding these broader applications explains why the word "damper" appears in so many seemingly unrelated conversations.
Fireplace and Chimney Dampers
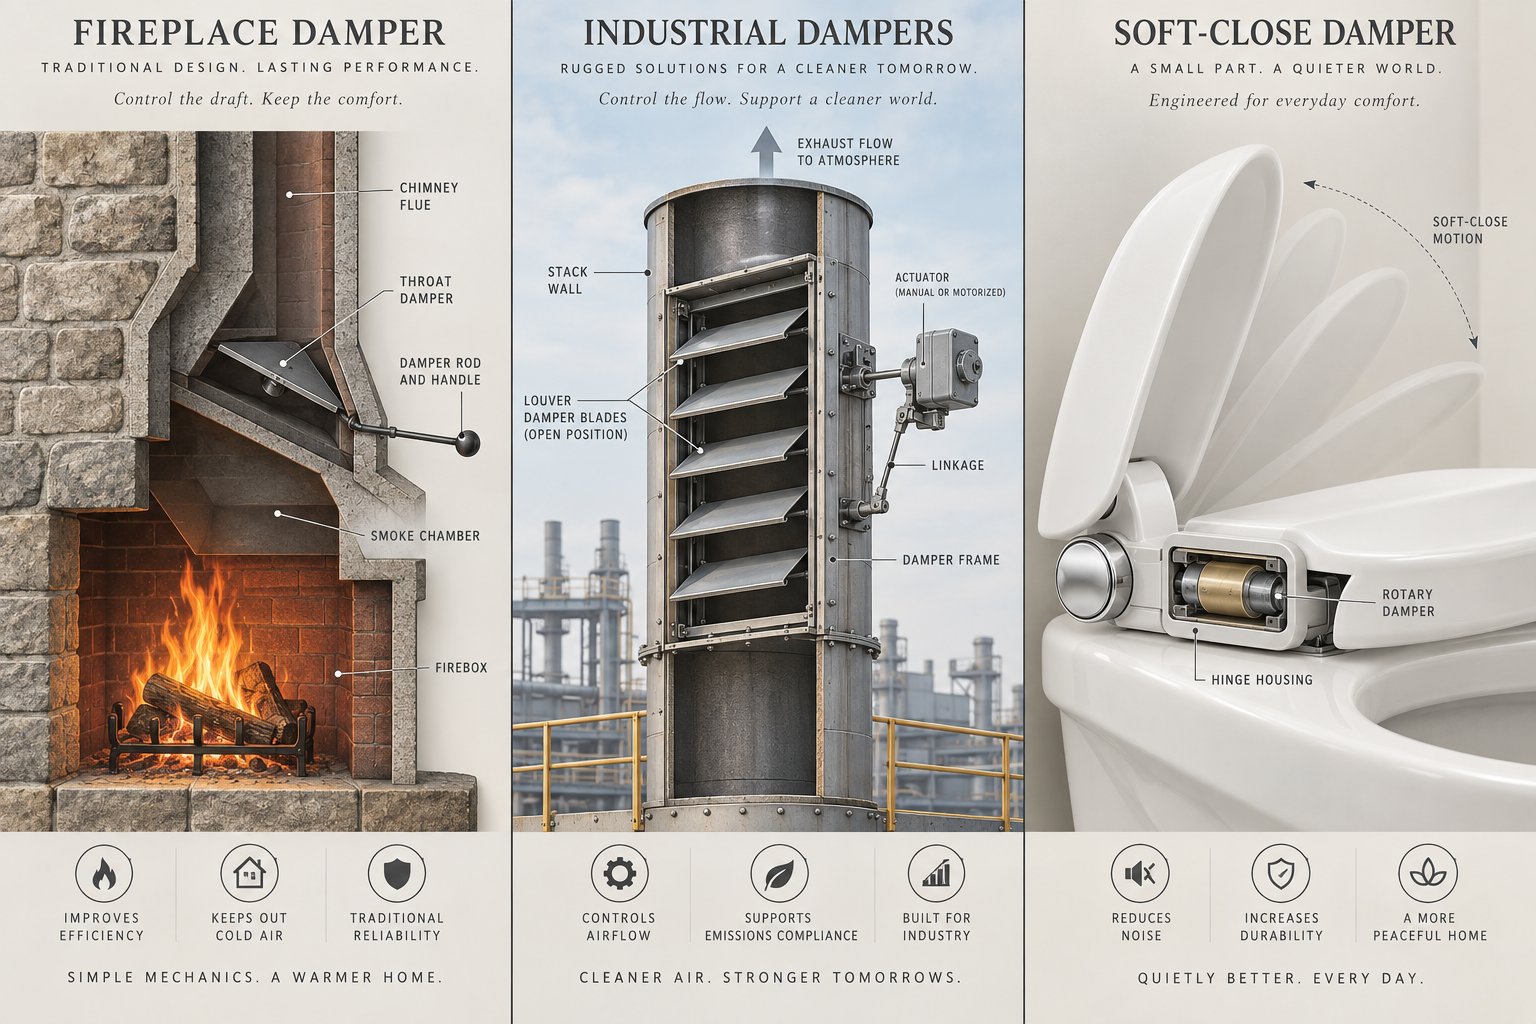
If you own a wood-burning fireplace, you already have a damper — whether you realize it or not. A chimney damper is a plate you maneuver to stop or regulate airflow inside the flue. When the fireplace is idle, a closed damper prevents conditioned air from escaping straight up the chimney and keeps rain, birds, and insects from dropping into your living room.
Two designs dominate the market, and each has a distinct advantage.
A throat damper sits at the base of the chimney, right above the firebox. According to American Chimney, throat dampers are the preferred choice for new construction because they seal off the chimney at its lowest point — meaning the column of cold air that collects inside the flue during winter cannot reach your home. Most throat dampers are operated by a lever or poker accessible from inside the firebox. The downside? When a throat damper fails or corrodes past its useful life, replacement can be difficult and expensive because the entire firebox area must be accessed.
A top-mount damper sits at the very top of the chimney, capping the flue like a lid. These are typically installed as replacements when the original throat damper has deteriorated. Top-mount models feature a rubber-type seal that is virtually airtight, and many double as a chimney cap — keeping rain out even when open. They are less costly to install than rebuilding a failed throat damper, but they leave the full column of chimney air exposed to the home's interior since the seal is at the top rather than the base.
Regardless of type, a fireplace damper also lets you regulate the rate of combustion by controlling how much oxygen reaches the fire. Forgetting to open it before lighting a fire is a fast way to fill your home with smoke — so always confirm the damper position before striking a match.
Industrial Exhaust and Ventilation Dampers
Step outside the residential world and dampers scale up dramatically. Industries like steel manufacturing, cement production, power generation, and petrochemical processing rely on dampers ventilation systems to regulate exhaust flow, manage emissions, and recover waste heat.
Industrial dampers face conditions that would destroy a residential blade in minutes. Exhaust temperatures can reach 1,500 °F to 2,000 °F, and the airstream may carry corrosive particulate matter 30 times smaller than the width of a human hair. To handle these extremes, industrial dampers are built from high-alloy steels or Inconel, fitted with specialized seals that minimize leakage to as little as 0.25 percent, and driven by electric, pneumatic, or hydraulic actuators depending on the speed and force required.
Common industrial types include:
- Louver dampers — Multi-blade assemblies for high-volume flow and fan inlet control, capable of shutting off airflow up to 99 percent.
- Butterfly dampers — Single-disc designs used for heavy-duty heat recovery and air quenching applications where precise modulation and tight shutoff are critical.
- Side gate dampers — Sliding-gate mechanisms ideal for isolating sections of a ventilation system during maintenance or overhaul.
These automatic dampers also play a direct role in pollution control. U.S. environmental regulations require containment of volatile organic compounds (VOCs), and dampers regulate the transport of those pollutants to abatement devices like oxidizers. A malfunctioning damper in this context is not just an efficiency problem — it can mean regulatory violations, unplanned shutdowns, or even catastrophic failure at an industrial plant. The stakes make dryer vent dampers in your laundry room look almost quaint by comparison, yet the underlying physics is identical: a blade rotates to control flow.
Rotary Dampers in Consumer Products and Mechanical Systems
Here is where the concept of a damper takes its most unexpected turn. Beyond airflow entirely, a mechanical damper can also control physical motion — slowing and smoothing the movement of lids, covers, doors, and hinged components so they close gently instead of slamming shut.
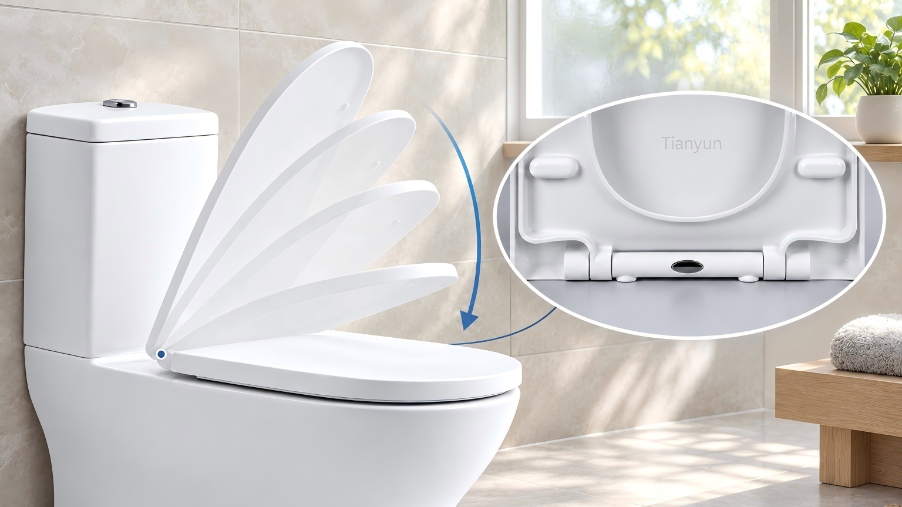
You have probably experienced this technology without knowing its name. A toilet seat that lowers itself slowly instead of crashing down? That is a rotary damper at work. The same mechanism appears in washing machine lids, automotive glove compartments, printer covers, and dozens of other consumer products where controlled deceleration improves the user experience and protects the product from impact damage.
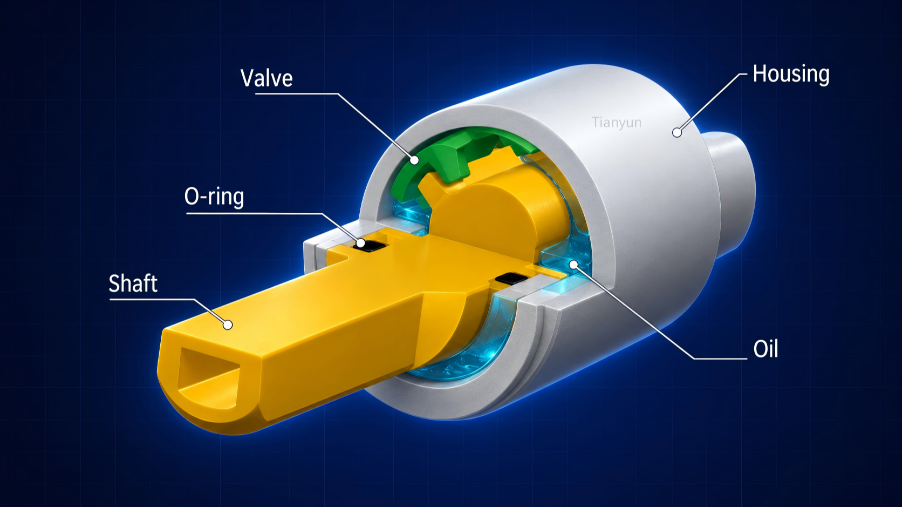
Rotary dampers achieve this effect through fluid resistance or vane-based mechanisms housed inside a compact cylinder. When the lid or cover moves, internal vanes push against a viscous silicone fluid, generating precisely calibrated resistance that decelerates the motion smoothly and consistently. There are no batteries, no electronics, and no maintenance — just physics working quietly inside a small, self-contained unit.
For product designers and OEM engineers looking to integrate this kind of motion control, Tianyun's Vane Rotary Dampers offer a purpose-built solution. Engineered specifically for OEM motion-control applications, these vane dampers help designers add smooth, controlled closing performance to toilet seats, appliance lids, and compact mechanical assemblies. Their small footprint and tunable torque profiles make them practical for space-constrained designs where a bulky hinge mechanism simply will not fit.
The thread connecting a chimney throat damper, a 2,000 °F industrial butterfly valve, and a miniature vane damper inside a toilet seat hinge is the same thread that runs through the entire article: something is moving too freely, and a damper brings it under control. The only difference is scale, material, and context — the principle never changes.
Choosing the Right Damper for Every Application
You have seen how dampers work, what types exist, and where they show up — from basement ductwork to industrial exhaust stacks to the hinge of a soft-close toilet seat. The real question now is practical: which damper solves your specific problem? Picking the wrong type wastes money at best and creates safety hazards at worst, so a clear decision framework matters more than memorizing technical specs.
Matching the Right Damper to Your Application
When someone asks "what is a damper HVAC professionals recommend?" the honest answer is always "it depends on the job." A motorized zone damper is overkill for a dryer exhaust, and a backdraft damper is useless for multi-room temperature control. The table below maps each common application to its ideal damper type and flags the one consideration most likely to trip you up during selection.
| Application | Recommended Damper Type | Key Consideration |
|---|---|---|
| Soft-close product design (toilet seats, appliance lids, compact mechanical assemblies) | Vane rotary damper — Tianyun's Vane Rotary Dampers are purpose-built for OEM designers needing tunable, controlled closing in space-constrained products | Match the damper's torque profile to the lid weight and operating angle; incorrect torque selection causes incomplete closure or excessively slow motion |
| Whole-home HVAC airflow balancing | Balancing damper (manual blade, locked after calibration) | Must be set by measuring CFM at each register with an anemometer; guessing blade angles leads to uneven distribution across zones |
| Multi-zone temperature control | Motorized zone damper with electric actuator | Requires a zone control panel and individual thermostats per zone; a bypass damper may be needed to relieve excess static pressure when multiple zones close |
| Kitchen or bathroom exhaust | Backdraft damper | Blade weight and counterbalance must match exhaust fan CFM — too heavy and the fan cannot push the blades open; too light and outdoor wind forces them open when the fan is off |
| Fireplace draft control | Chimney throat damper or top-mount damper | Throat dampers seal closer to the living space for better energy efficiency; top-mount dampers are easier to retrofit but leave the full flue column exposed |
| Fire safety compliance | Fire damper (fusible-link actuated) | Must carry a UL 555 rating matching the fire-resistance rating of the wall or floor it penetrates; requires periodic inspection under NFPA 80 by qualified personnel |
| Smoke containment in commercial buildings | Smoke damper or combination fire/smoke damper | Actuator must respond to building fire alarm signals; leakage class (I or II) and elevated temperature rating must meet local code requirements per UL 555S |
| Industrial exhaust and emissions control | Industrial louver, butterfly, or side gate damper | Material selection is critical — standard carbon steel fails quickly in high-temperature or corrosive airstreams; specify alloy grade based on operating conditions |
Notice how every row ties back to the same principle this entire article has explored: a damper controls something that would otherwise move too freely, and the right choice depends entirely on what you are controlling and where you are controlling it. An HVAC damper controls airflow. A fire damper controls flame spread. A vane rotary damper controls physical motion. The physics is universal — the engineering is application-specific.
If you are still asking "what is a damper HVAC systems actually need?" — start with the application column. Identify what you are trying to accomplish, then let the table point you toward the correct damper category. From there, sizing, material, and actuator selection become straightforward decisions rather than overwhelming guesswork.
Your Next Step — Act on What You Have Learned
Knowledge without action is just trivia. Here is how to put everything from this guide to work, starting today:
- Homeowners: Walk your ductwork and locate every damper lever. Identify which branch each one controls, label it, and set positions for the current season. Add a damper inspection to your annual HVAC service checklist — five minutes of attention prevents years of silent efficiency loss.
- Facility managers: Verify that all fire and smoke dampers in your building have been inspected and operationally tested within the intervals required by NFPA 80 and NFPA 105. If your records are outdated or incomplete, schedule a qualified inspection before the next fire marshal walkthrough.
- Product designers and OEM engineers: If your next project involves a lid, cover, door, or hinged panel that users will open and close repeatedly, explore rotary damper solutions early in the design process. Matching the correct torque curve to your component's weight and operating angle eliminates slamming, reduces warranty claims, and elevates the perceived quality of the finished product.
- HVAC contractors: When commissioning a new system, document every damper position — balancing, zone, and backdraft — and provide the homeowner with a simple reference card. Educated customers maintain their systems better, call less frequently with preventable complaints, and trust your recommendations when real problems arise.
Every damper in every system — whether it is a manual blade hidden inside basement ductwork, a motorized zone damper responding to thermostat signals, a fusible-link fire damper waiting silently inside a rated wall, or a compact vane damper engineering a soft close into a consumer product — exists to bring uncontrolled movement under deliberate, purposeful control. That mystery handle in your ductwork is not a mystery anymore. Grab it, set it correctly, and let it do the job it was designed for.
Frequently Asked Questions About Dampers
1. Should HVAC dampers be open or closed in summer?
In summer, upper-floor dampers should be fully open to push maximum cooled air to the hottest part of the house, while lower-floor dampers should be partially closed since those areas are naturally cooler. This works with the physics of rising heat rather than against it. Reverse the configuration in winter by opening lower-floor dampers and partially closing upper-floor ones. Mark each lever's seasonal position with a permanent marker so switching takes only a few minutes at each transition.
2. What happens if you close too many dampers at once?
Closing too many supply dampers simultaneously causes static pressure to spike inside the ductwork. This chain reaction can strain the blower motor, freeze the evaporator coil in cooling mode, pop duct seams and loosen connections, and trigger short-cycling where the system rapidly turns on and off. The general safety rule is to never close more than roughly 25 percent of your total supply dampers at any given time, and each closed damper should ideally remain at least 15 to 20 percent open to maintain safe airflow.
3. What is the difference between a damper and a register?
A damper is a hidden blade assembly mounted inside the ductwork that controls airflow volume upstream before conditioned air reaches a room. A register is the visible grille with adjustable louvers installed on a wall, floor, or ceiling at the delivery point. Closing a register only restricts air after it has already traveled through the entire duct run, which creates back-pressure and wastes energy. Adjusting the duct damper upstream is far more effective for solving uneven temperatures because it redirects airflow at the source.
4. How often should dampers be inspected and maintained?
Manual HVAC dampers should be inspected at least once per year, ideally during a seasonal HVAC service visit. Motorized zone dampers should be cycled from fully open to fully closed several times during each inspection to confirm full blade travel. Pivot points benefit from annual lubrication with a silicone-based lubricant rather than oil-based products, which attract dust. Fire and smoke dampers in commercial buildings carry stricter requirements under NFPA 80 and NFPA 105, requiring periodic inspection and operational testing by qualified personnel.
5. Do dampers exist outside of HVAC systems?
Yes, dampers appear in many contexts beyond HVAC. Fireplace chimney dampers control draft and prevent conditioned air from escaping up the flue. Industrial dampers regulate exhaust flow and emissions in manufacturing and power generation. Rotary dampers control physical motion in consumer products like soft-close toilet seats, washing machine lids, and automotive glove compartments. Solutions such as Tianyun's Vane Rotary Dampers (https://www.tianyuntech.com/vane-damper) are engineered specifically for OEM designers who need smooth, controlled closing in compact mechanical assemblies.
Apply This Insight to Your Project
Tell us what you are building and how the topic “What Does a Damper Do? That Mystery Handle in Your Ductwork” relates to your application. Our engineering team can help evaluate the next step.